If you’re looking for how to schedule posts on Facebook, you’ve come to the right place!
In short, you can easily schedule your posts on Facebook on both desktop and mobile just with your Meta Business Suite. Or you can also have advanced options by using third-party tools like Buffer, Hootsuite, Later, etc.
By scheduling Facebook posts, you can save tons of time, keep your content consistent, and make sure your posts go live exactly when your audience is most active, even when you’re offline or busy with other tasks. It’s a total game changer for anyone managing a business page or running marketing campaigns.
Now, in this blog, we’ll guide you step-by-step:
- How to schedule Facebook posts with Meta Business Suite on desktop and mobile
- How to edit scheduled Facebook posts
- How to delete a scheduled Facebook post
- How to schedule a post on Facebook using third-party tools
- Best practices for Facebook scheduling
- Why you can’t schedule Facebook posts? How to fix it?
Let’s get started!
Timing matters, especially for your product data!
Keeping your data updated across all your sales and advertising channels is crucial for success. With our Product Feed Management Tool, you can automate feed updates on a schedule, so your listings stay accurate while you focus on growing your business.
How to Schedule Posts on Facebook with Meta Business Suite
Meta Business Suite is Facebook’s free tool that helps you manage all your business activity in one place. It’s the easiest and most reliable way to schedule Facebook posts ahead of time, whether you’re on a desktop or using your phone.
To schedule Facebook posts:
- Step 1: Log in to your Facebook Business Page.
- Step 2: Click Meta Business Suite in the left sidebar.
- Step 3: Select the Planner tab from the dashboard.
- Step 4: Hover over your desired date and click Schedule > Schedule post.
- Step 5: In the pop-up, choose a date and time, then click Save.
- Step 6: Write your post, add media, and select the Page to publish it on.
- Step 7: Review the Scheduling options and adjust timing if needed.
- Step 8: Click Schedule to finish.
Now, let’s jump right into the process of how to schedule posts on Facebook using Meta Business Suite.
Schedule a post on Facebook on desktop
Step 1. Log in to your Facebook Business Page
Make sure you’re signed in with an account that has editor or admin access.
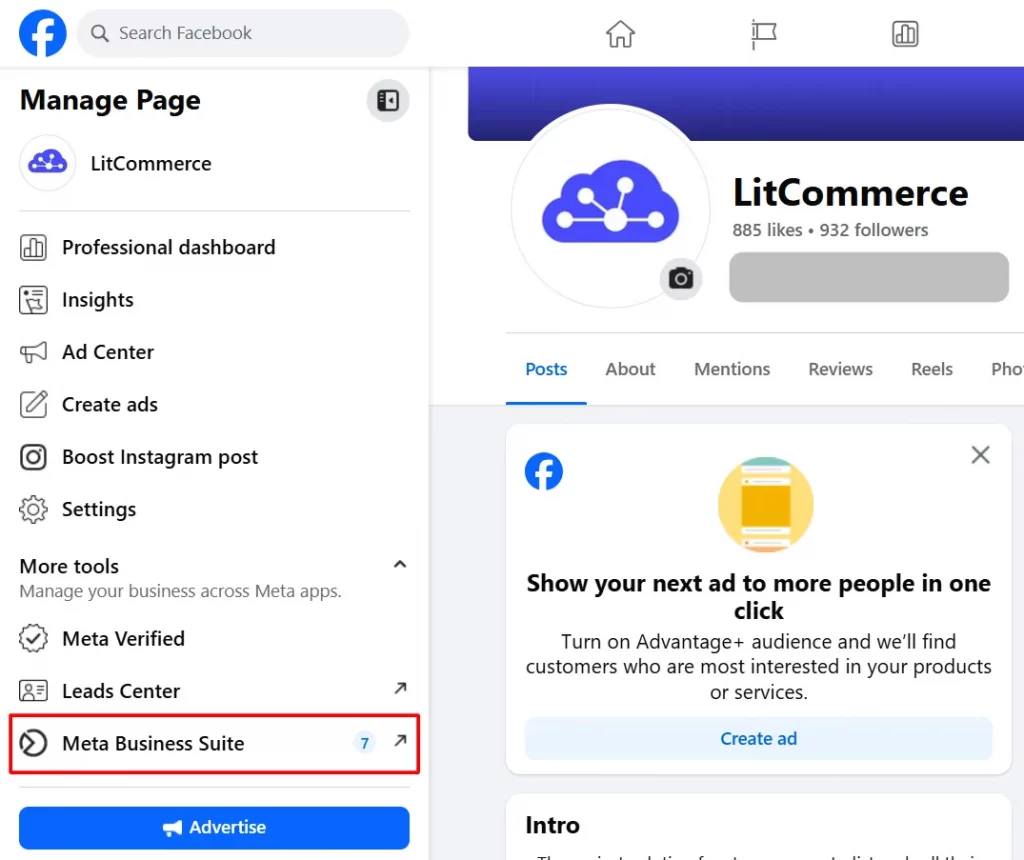
Step 2. Open Meta Business Suite
From the left-hand sidebar of your Facebook Page, click on Meta Business Suite to access the dashboard.
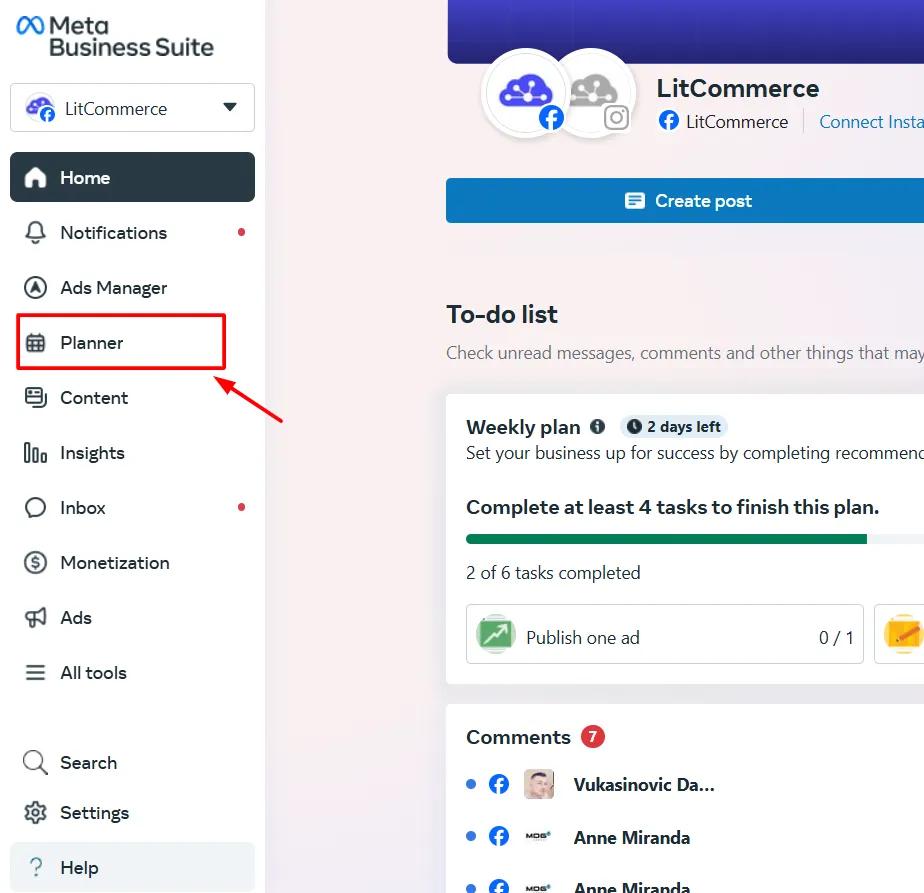
Step 3. Go to the Planner tab
In the main dashboard, click on Planner to view your content calendar.
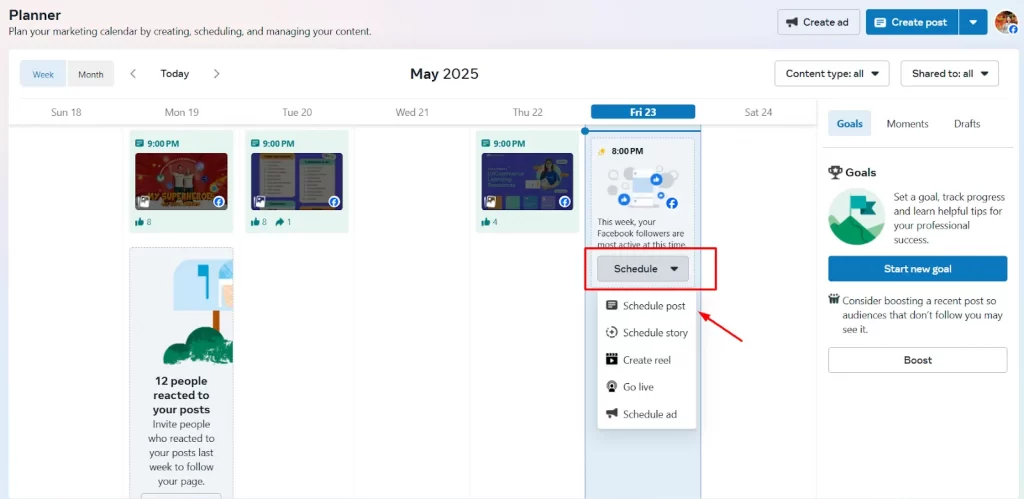
Step 4. Pick a date to schedule
Hover over the date you want to post. Click the Schedule dropdown and select Schedule post.
Or, you can click Create post at the top, this will take you directly to the post editor (you can skip to Step 5 if you go this route).
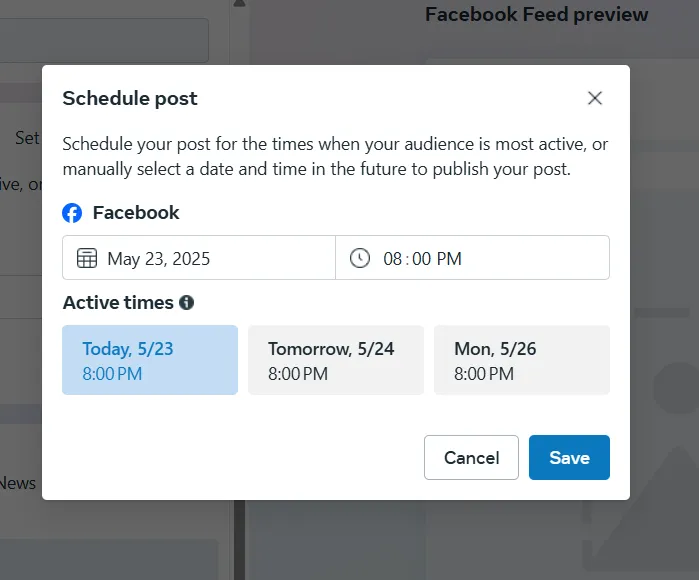
Step 5. Choose your post time
In the pop-up window, pick the date and time you want your post to go live. If Facebook has enough data, it’ll even suggest Active times when your audience is most engaged. Click Save once done.
Step 6. Create your post content
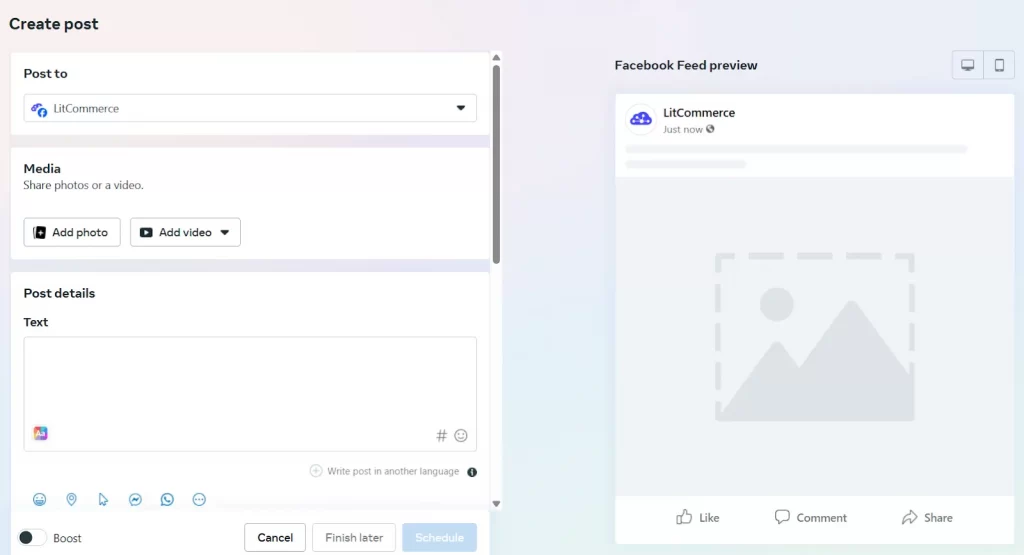
Write your caption, add images or videos, and choose which Page or account you want to post to. You’ll see a live preview of your post on the right side.
Step 7. Confirm scheduling details
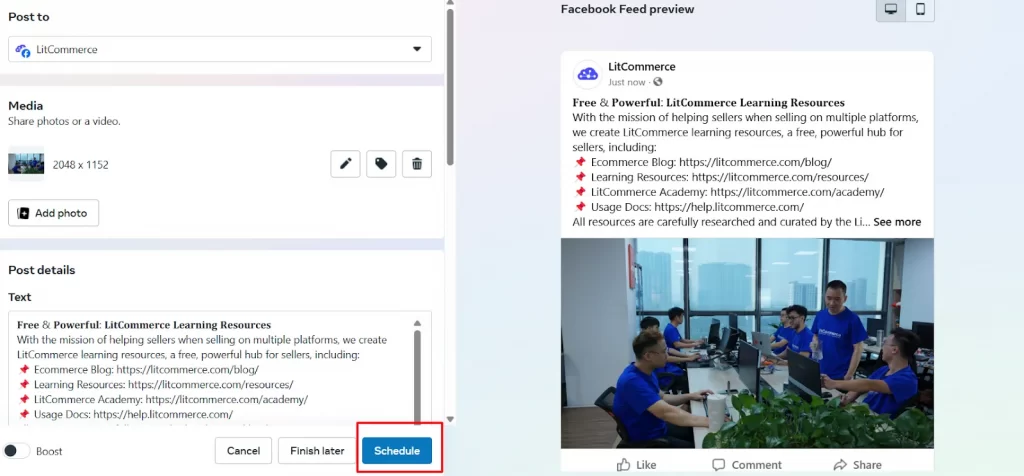
Scroll down to the Scheduling options to double-check or update your post’s timing.
Set your privacy settings.
Once done, click Schedule to finish.
Schedule a post on Facebook on mobile
If you’re looking for how to schedule posts on Facebook while you’re on the move, you can do it right from the Facebook mobile app, no extra tools needed! Just follow these easy steps:
Step 1: Log in to your Facebook Page
Open the Facebook app, log in to your account, and go to your profile. Tap the dropdown menu and select the Facebook Page you want to post to.
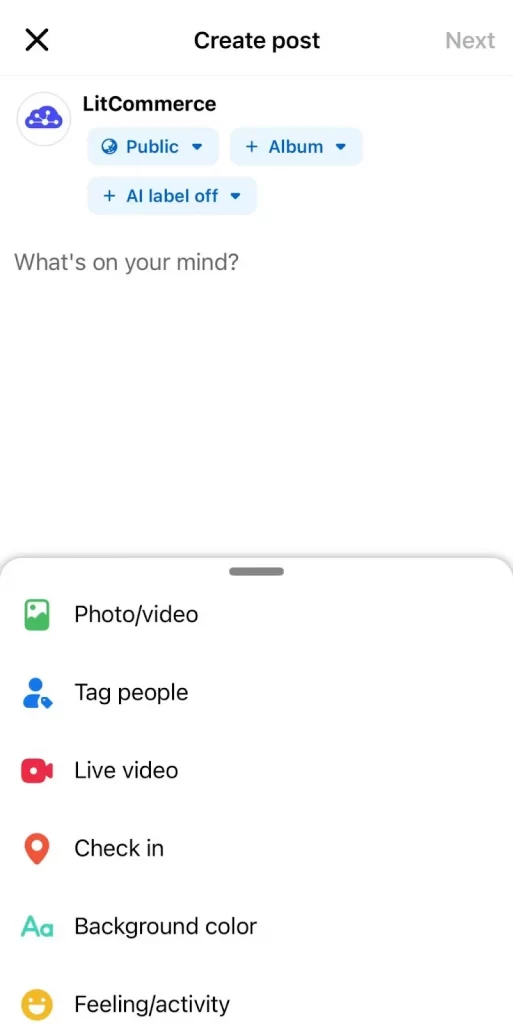
Step 2: Create your post
From your Page, tap to create a post. Add your caption, photo, video, or any other content you’d like. Once ready, tap Next.
Step 3: Choose scheduling options
Go to Scheduling options.
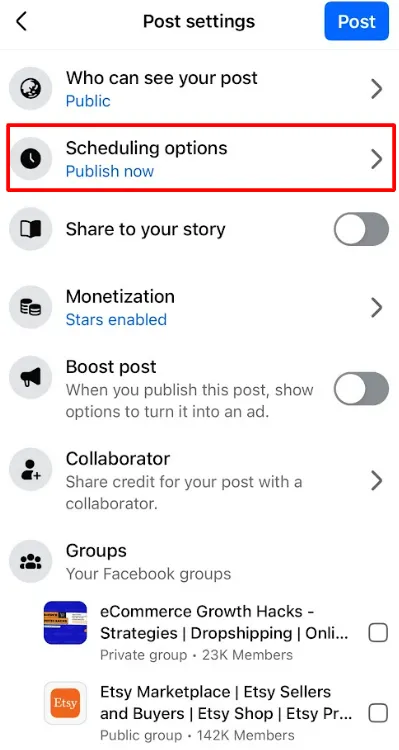
Then select Schedule for later to set up your post for a future time.
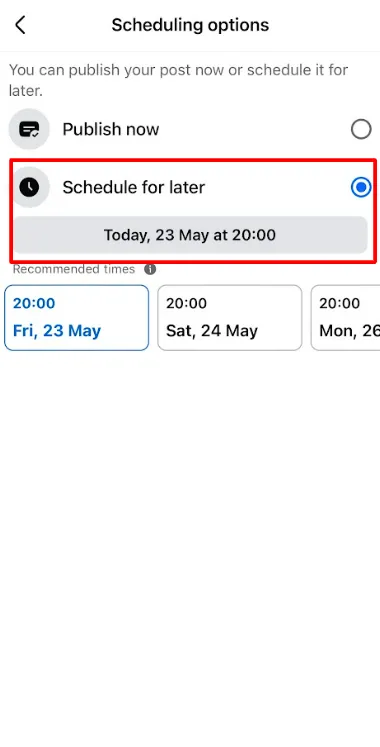
Step 4. Pick the date and time
Use the calendar to choose the exact day and time you want your post to go live. Tap Save.

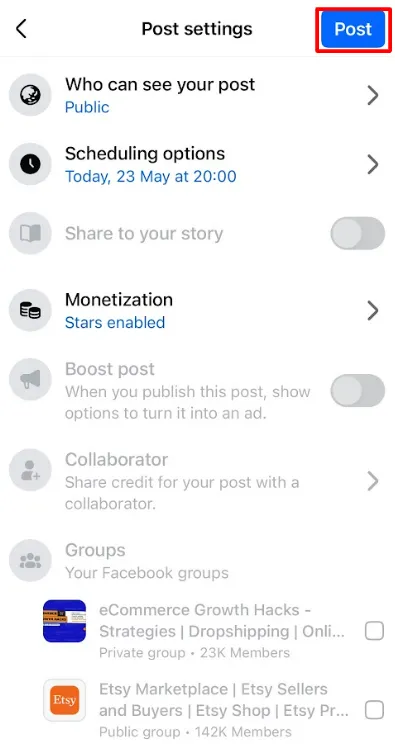
Step 5. Confirm and schedule
Once everything looks good, tap Post. Facebook will schedule it to publish at the time you selected.
Boost your reach on 300+ advertising channels
Take your product visibility to the next level! With LitCommerce, you can maximize your reach across top channels including leading marketplaces, advertising platforms, and price comparison sites.
How to Edit Scheduled Facebook Posts
If you need to make a quick change to a post you’ve already scheduled, you can edit it using Meta Business Suite.
To edit a scheduled Facebook post:
Step 1: Go to the Planner and find the post you want to edit
From your Meta Business Suite dashboard, click on Planner to view your upcoming content.
Then, find and click on the post you want to edit.
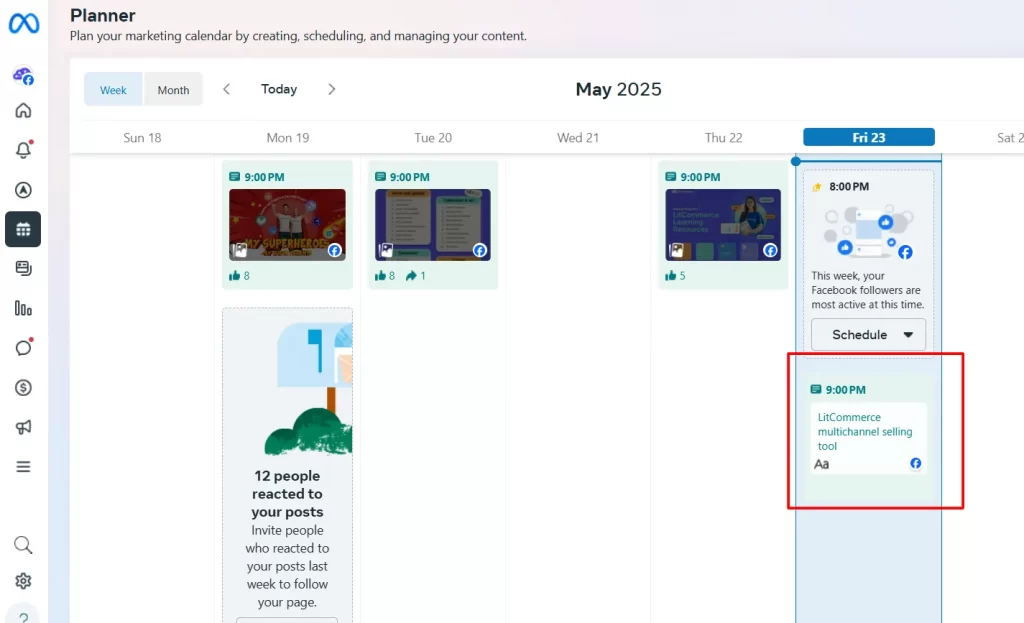
Step 2: Click on the three dots icon > Edit post
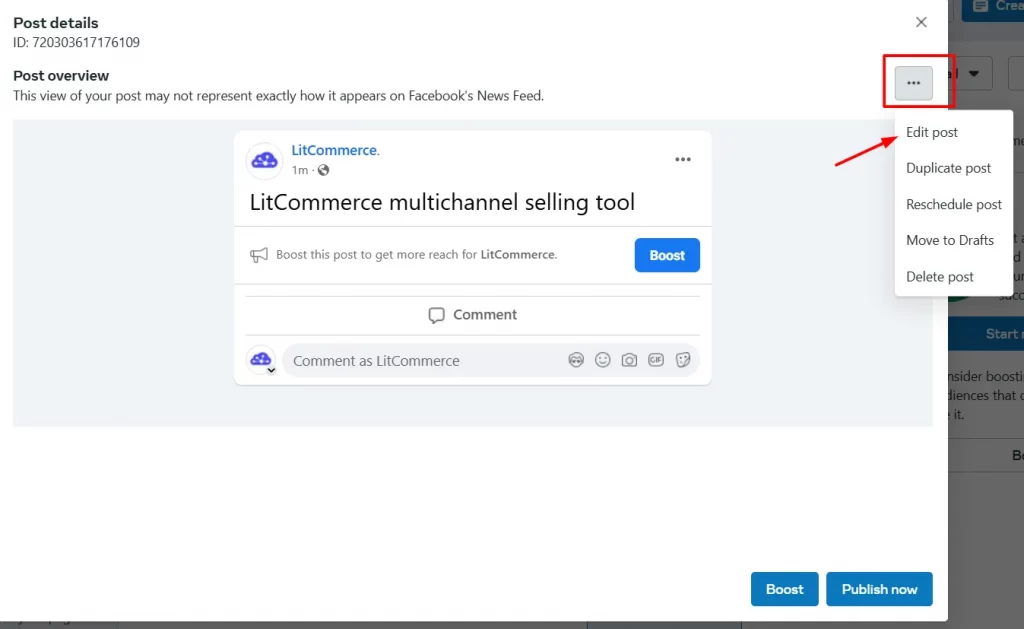
Step 3: Make your changes
You can update the text, replace media, adjust the scheduled date and time, or even switch up the post’s destination (if supported).
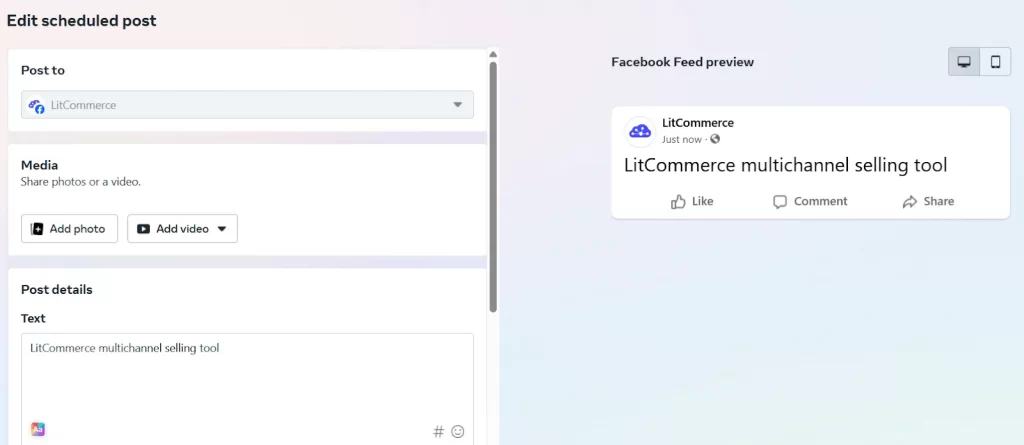
Step 4: Save or reschedule
Once you’re done editing, just click Save to keep the post scheduled, or Reschedule if you’ve changed the publishing time.
How to Delete a Scheduled Facebook Post
To delete a scheduled Facebook post:
Step 1: Open the Planner and locate the post you’d like to remove.
Step 2: Click on the post to view it in full.
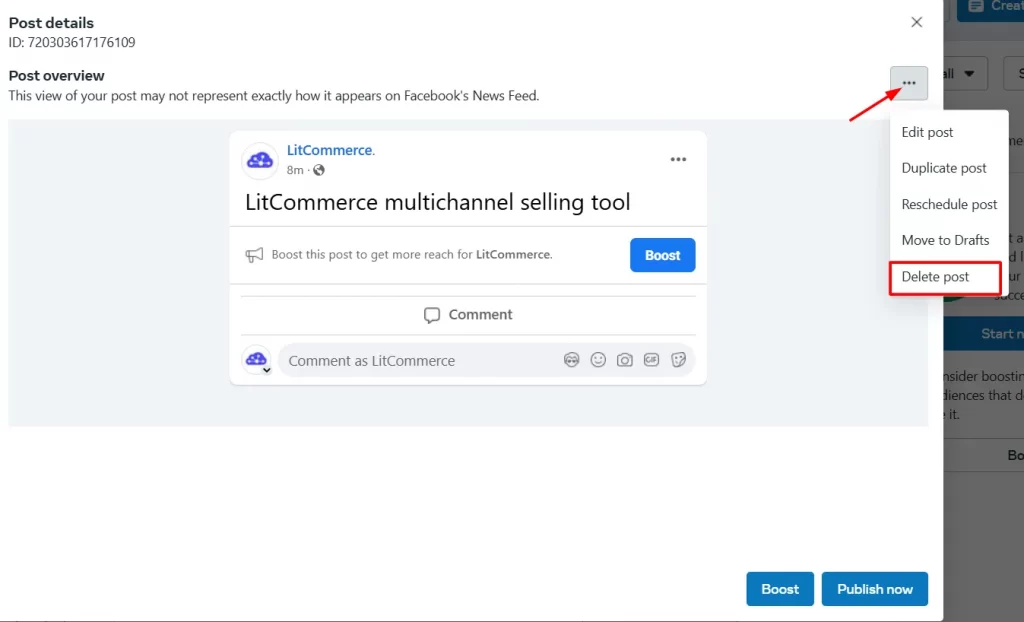
Step 3: Click the three dots (…) and select Delete post from the menu.
Step 4: Confirm your choice by clicking Delete again.
How to Schedule a Post on Facebook Using Third-Party Tools
While Meta Business Suite works well for basic scheduling, advanced third-party tools can offer even more flexibility and features, especially if you’re managing multiple platforms or teams.
These tools come with advanced options such as:
- Managing multiple social media accounts from one dashboard
- Access to analytics and performance tracking
- Bulk scheduling and content planning
- Team collaboration and approval workflows
If you want a more streamlined workflow or need more insights into how your content performs, third-party platforms can be a game changer.
Here’s a quick comparison of Buffer, Hootsuite, and Later – three top scheduling tools, to help you choose the one that best suits your needs.
Buffer | Hootsuite | Later | |
Best for | Solo creators & small teams | Larger teams & agencies | Visual planners & Instagram-first users |
Pricing plans | - Free - Essentials: $5/month - Team: $10/month | - Standard: $99/user/month - Advanced: $249/user/month - Enterprise custom: vary | - Starter: $16.67/month - Growth: $30/month - Advanced: $53.33/month - Agency: $133.33/month - Enterprise: vary |
Platforms supported | Facebook, Instagram, Twitter (X), LinkedIn, TikTok, Pinterest, YouTube, Google Business Profile, Bluesky, Mastodon, Threads | Facebook, Instagram, X, LinkedIn, TikTok, YouTube, Threads, WhatsApp, and Pinterest | Facebook, X (formerly Twitter), Pinterest, TikTok, LinkedIn, Threads, YouTube Shorts, SnapChat |
Notable features | - Multi-platform scheduling - Queue system with pre-determined time slots - Calendar view - Link shortening | - Multi-platform scheduling - Smart scheduling with best time to post - Bulk scheduling - Visual content planner | - Visual content calendar - Multi-platform scheduling - Auto publish and post types - Best time to post recommendations - Schedule first comment |
Best Practices for Scheduling Facebook Posts
You’ve gone through how to schedule posts on Facebook, here are some best practices to help you boost engagement, stay organized, and make the most of your content strategy:
- Know when your audience is most active: Timing matters more than you might think. Scheduling your posts when your audience is most likely to be online increases the chances they’ll actually see and engage with your content. Use tools like Facebook Insights or Meta Business Suite to discover your audience’s peak activity times.
- Plan content ahead with a calendar: One of the biggest benefits of scheduling posts is staying organized, and that starts with a content calendar. A good calendar helps you map out content themes, product launches, holidays, and campaigns in advance. This not only saves you time but ensures a consistent brand voice and message. Whether you’re posting three times a week or daily, having a clear plan reduces stress and keeps your content flowing smoothly.
- Always preview before scheduling: Before you schedule any post, take a few extra seconds to review it. Make sure your caption is clear, your media is properly formatted, and your links actually work. If your post includes tags, hashtags, or mentions, verify that they’re correct. Small mistakes like typos or broken links can hurt your credibility and engagement, especially when posts go live while you’re not online to fix them.
Why You Can’t Schedule Facebook Posts? How to Fix It?
If the “Schedule” option isn’t showing up on your Facebook page, don’t worry. There are several common reasons why scheduling might not be available, and most of them are easy to fix.
1. You’re using the regular Facebook app
The native Facebook app doesn’t support scheduling posts directly. To schedule posts, you need to use:
- Meta Business Suite (on desktop or mobile)
- Or a third-party tool like Buffer, Hootsuite, or Later
2. You don’t have the right page role
If you’re not an admin or editor of the Page, you may not have permission to schedule posts.
So, ask the Page owner to update your role to Admin or Editor in the Page settings.
3. You’re trying to post to a personal profile
Facebook only allows scheduling for Pages, not personal profiles or groups (unless you’re using third-party tools for groups).
Hence, make sure you’re working from a Facebook Page, not a personal profile or community group.
Start making the most of your Facebook Page for free!
LitCommerce offers a free plan for new sellers, supporting creating feeds with up to 1,000 SKUs to help you succeed with product listing ads and maximize sales effortlessly.
How to Schedule Posts on Facebook – FAQs
Can I schedule a post on Facebook?
Yes, you can schedule a post on Facebook using Meta Business Suite, available on both desktop and mobile. It allows you to choose the exact date and time your post will go live, helping you stay consistent and save time.
How far in advance can I schedule a Facebook post?
You can typically schedule posts up to 6 months in advance using Meta Business Suite. Third-party tools may allow even more flexibility depending on your plan.
Can I edit or delete a post after scheduling it?
Yes! Just go to the Planner or Scheduled Posts section in Meta Business Suite, click on the post, and you’ll be able to edit, reschedule, or delete it.
Do scheduled posts notify followers when published?
Yes, once your scheduled post goes live, it behaves like any other post. It appears in your followers’ feeds and may trigger notifications depending on their settings.
How to see scheduled posts on Facebook?
To see scheduled posts on Facebook, go to Meta Business Suite, then click on Planner or Scheduled Posts to view and manage your upcoming content.
Conclusion
Learning how to schedule posts on Facebook is one of the easiest ways to stay consistent, save time, and keep your audience engaged, without needing to be online 24/7.
At LitCommerce, we understand how important time-saving tools are for online sellers. That’s why we offer a powerful product feed management tool that supports you in automating and updating your product data across multiple advertising platforms, including Facebook.
And if you want more social media tips and eCommerce insights, check out the LitCommerce blog, where we regularly share step-by-step guides and strategies to help your online business grow.

