If you’re switching from another eCommerce platform or just starting out your selling journey with Shopify, Shopify CSV import is one of the easiest ways to upload products in bulk using an existing CSV file. It saves you time and effort by eliminating the need to add products one by one.
In this guide, you’ll learn how to handle Shopify CSV import effectively and make the most out of this automation by delving into:
- Method 1: Automated Shopify CSV import using LitCommerce
- Method 2: Manual import CSV file through Shopify Admin
Without further ado, let’s get the ball rolling!
Import CSV Files Easily to Shopify
With LitCommerce, you can effortlessly add or update products with accurate, hassle-free data management.
How to Perform Shopify CSV Import with LitCommerce In 6 Easy Steps
Importing a CSV file to LitCommerce doesn’t need to be complicated. With LitCommerce, we make it even easier by allowing you to import CSV files to Shopify and keep them up to date. This way, you can easily manage your Shopify catalog directly from your file. Let’s discover how you can automate the Shopify CSV import process with LitCommerce!
In short, here’s how to import a CSV file to Shopify and automate it using LitCommerce:
- Step 1: Prepare your CSV files
- Step 2: Create a LitCommerce account
- Step 3: Add your Shopify CSV file to LitCommerce
- Step 4: Connect your Shopify store
- Step 5: Import or update products to Shopify
- Step 6: Sync inventory and prices between your CSV file and Shopify
Step 1: Prepare your CSV files
The first step in the Shopify import process is preparing your CSV file. If you’re migrating from another platform, exporting your product data into a CSV file is simple. However, if you’re starting from scratch, you’ll need to create a properly formatted CSV file.
Your file should include essential product details, such as:
- Product title: Name your product with a clear, descriptive title with relevant keywords.
- Product description: Include key details like materials, dimensions, benefits, shipping information, and your unique selling points (USP).
- Product photos: Upload high-quality images to showcase your product properly.
- Pricing: Set a competitive price based on costs, competitors, and your desired profit margin. You can also add discounts.
- Inventory: Track stock levels, add SKUs, and barcodes as needed.
- Shipping details: Include weight and international shipping info if applicable.
- Product variants: Specify options such as size, color, or style with separate pricing and quantities.
- Product URL: Provide a link that allows customers to easily find your product.
- Product status: Choose whether to publish your product immediately or save it as a draft
The more accurate and detailed your product information is, the easier it will be for your customers to understand the product and its benefits. Plus, your products will look more professional. You can also download the Shopify product import CSV template and fill in the information.
To ensure a smooth Shopify import process, ensure that each column is clearly labeled and that your data is clean. Avoid special characters, merged cells, and check for any typos, blank rows, or formatting issues.
Once your Shopify CSV import file is ready, let’s move on to the next step: create a LitCommerce account!
Step 2: Create a LitCommerce account
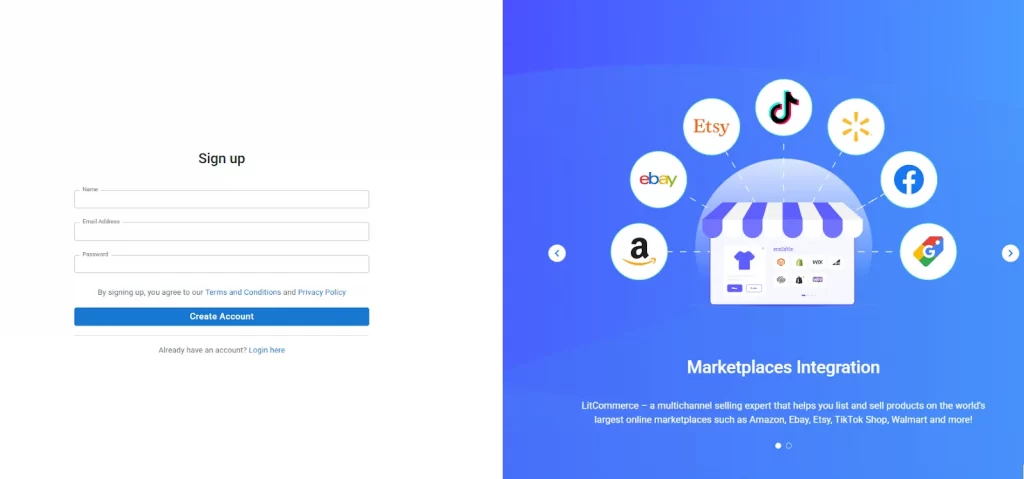
Now, let’s create a LitCommerce account to access the automated Shopify CSV import feature. To register, simply visit the LitCommerce sign-up page.
Fill in the required fields, such as your Name, Email Address, and Password, then click Create Account. Alternatively, you can sign up using your existing Facebook or Google account for quicker access. By creating an account, you agree to LitCommerce’s Terms and Conditions and Privacy Policy.
Step 3: Set up your CSV file on LitCommerce
Once your CSV file is ready and you’ve logged into your LitCommerce account, the next step is to upload your file. This CSV file will act as your Main Store, where all your product data will be pulled from and uploaded to Shopify.
1. Upload your CSV file to LitCommerce
First, you have two options to upload your CSV file to Shopify through LitCommerce:
- Add CSV File: If you have a product CSV file hosted on a server or cloud service, simply copy the link and paste it into LitCommerce.
- Add Google Sheet: If you have a CSV file, you’ll need to upload it to Google Drive, then open it in Google Sheets. Uploading your CSV file to Google Sheets allows LitCommerce to keep your products on Shopify up to date whenever you make changes to the file. When choosing this option, ensure your link is accessible.
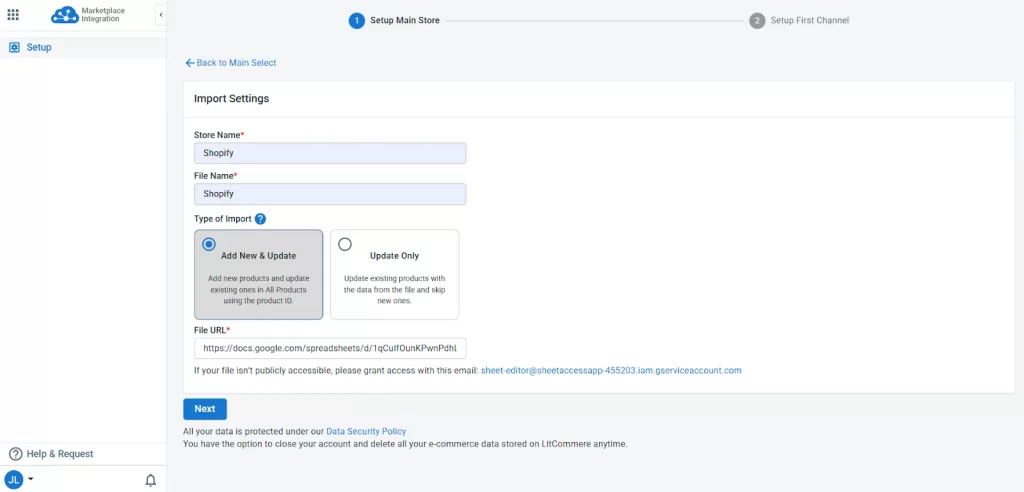
LitCommerce will then take you to the Import Settings page, where you’ll enter the key details to complete your setup.
2. Configure your Shopify CSV import settings
In this step, you’ll need to provide the following details:
- Store Name: Give your CSV store a name for easy reference.
- File Name: Add a name for the file you’re importing.
- Type of Import: Decide if you want to add new products and update existing ones on Shopify, or simply update your current products.
Select “Add New & Update”: Choose this option if you want to add new products and update existing ones on Shopify.
Select “Update Only”: Use this option if you only want to update the products already listed on your Shopify store. Ensure that the product ID remains unchanged when updating.
- Import Method: If you selected Add CSV file, you will need to select between URL download or FTP/SFTP. Otherwise, if you go for the Add Google Sheet option, skip this step.
- URL Link: Paste your accessible URL link or Google Sheet link.
- Test Connection: If using a CSV URL link or FTP/SFTP, click Test Connection to ensure LitCommerce can access your product data.
3. Map your CSV fields to Shopify product attributes
After LitCommerce connects to your CSV file, you’ll be directed to the Attribute Mapping screen.
Here, map the columns in your CSV file to the corresponding product attributes in LitCommerce. This step ensures your product details are correctly imported into Shopify.
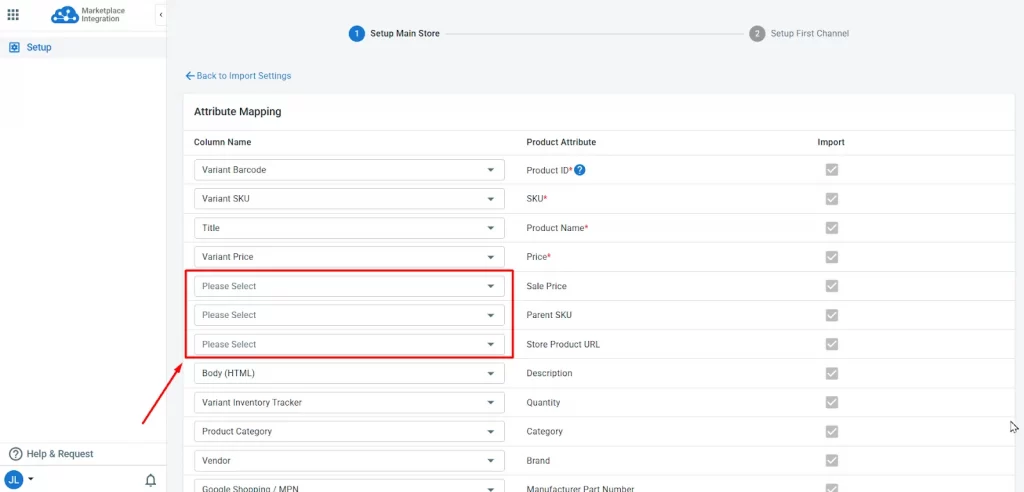
LitCommerce will automatically match column names in your file with system attributes like SKU, Product Name, Price, and Quantity.
If any columns aren’t auto-mapped (for instance, if the column name differs), you can flexibly select the correct field from the dropdown. You can also uncheck any fields you don’t want to import.
Once done, click Save to start importing your product data into LitCommerce.
Step 4: Connect with your Shopify store
After you have finished setting up your CSV file upload, you will be redirected to the Setup First Channel page in your LitCommerce dashboard. Here, let’s connect your Shopify store to LitCommerce before processing the Shopify CSV import.
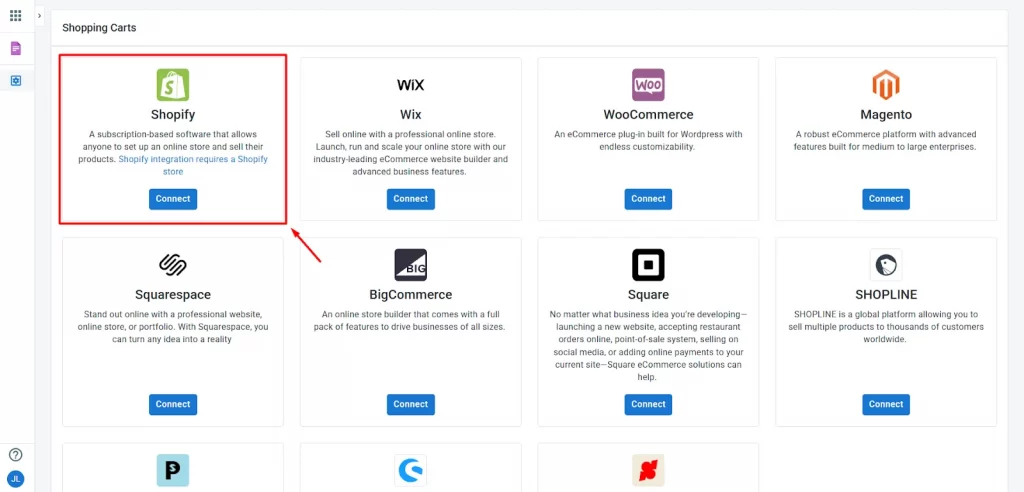
From the list of supported channels, select Shopify, then click Connect your account.
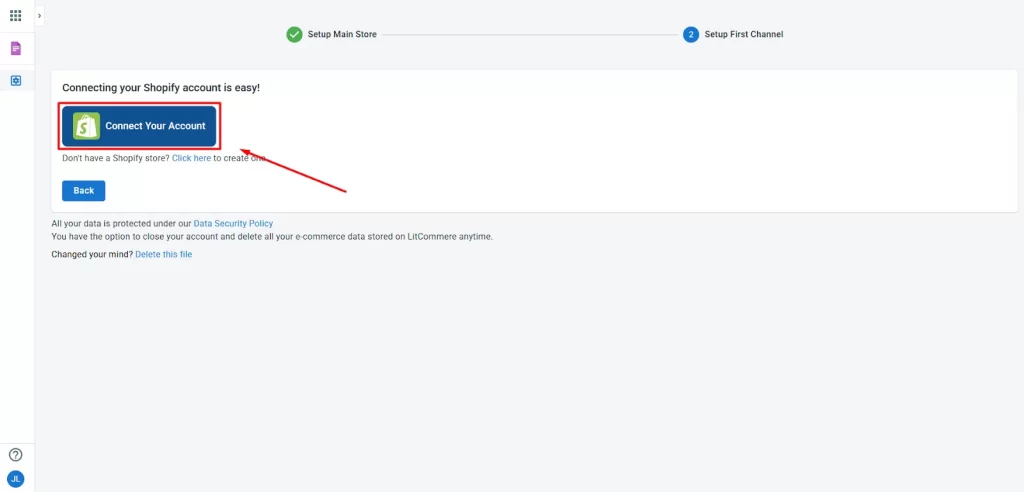
LitCommerce will redirect you to Shopify’s login page. Simply sign in and grant permission for LitCommerce to access your store. Once the connection is established, you’ll be returned to your LitCommerce dashboard, where Shopify will now be listed as your active sales channel.
Your Shopify store is now connected! You’re ready to import and update your product listings to Shopify from LitCommerce.
Step 5: Import & update products to Shopify
Let’s proceed to the main step in this Shopify CSV import guide: importing and updating the products to Shopify via your CSV file. Below are the detailed guidelines for the two most popular cases:
- You want to add new products and update existing products on your Shopify store.
- You only want to update existing products on Shopify.
#Case 1: Import and update products on Shopify using a CSV file
If you’re looking to list new products or update existing listings on Shopify, follow these steps:
- From the left side of the dashboard, go to All Products.
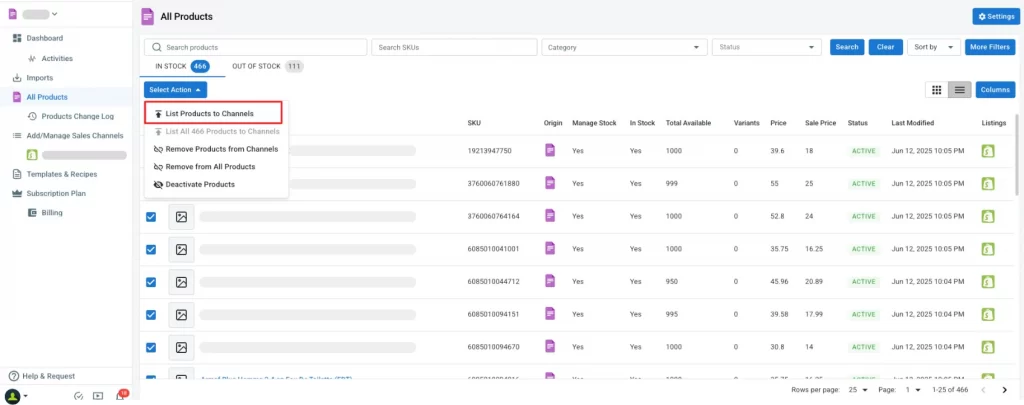
- Tick the box beside the products you want to list on Shopify. Then click Select action and choose List Products to Shopify.
- Next, select Shopify from the list of available channels.
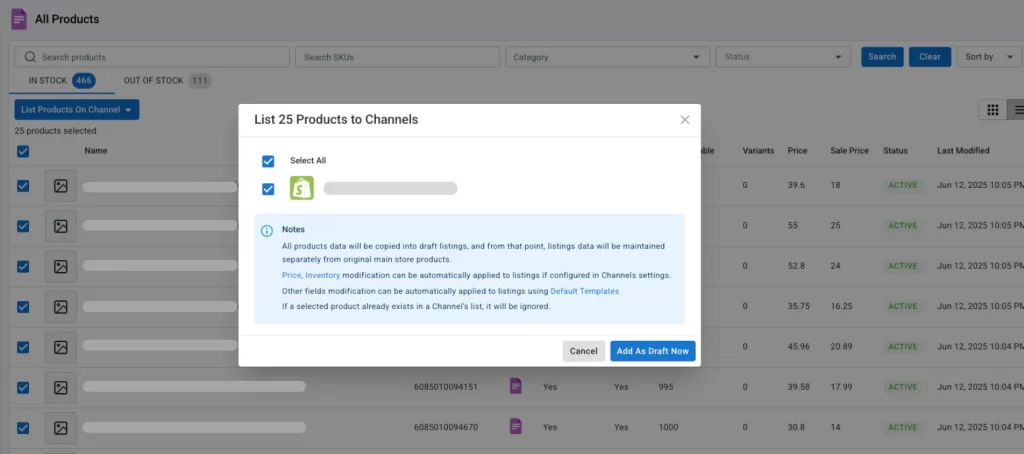
- Finally, go to Shopify, select the products, click Select Action, and choose Update to Shopify.
Before publishing, you can even customize your listings to meet your needs. Click on any product to edit details such as category, condition, shipping settings, pricing, and return policy to ensure everything is in line with Shopify’s requirements. Once you’ve made all the necessary adjustments, click Save & Publish to Shopify.
And that’s it. You have successfully imported and updated your products to Shopify using your CSV file.
#Case 2: Bulk update products on Shopify using a CSV file
If you only need to update products already listed on Shopify without adding new ones, this method, corresponding to the “Update Only” type of import, will work best.
Here’s how to bulk update products on Shopify:
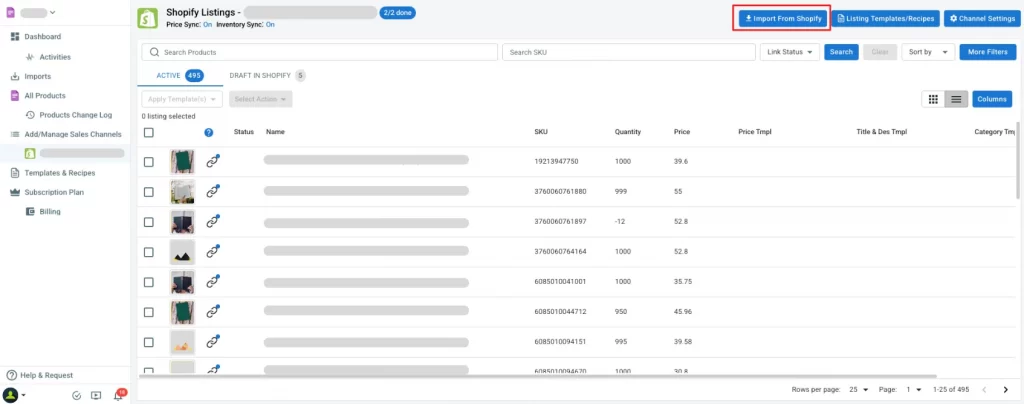
1. Once your Shopify store is connected to LitCommerce, navigate to your Shopify tab and click Import from Shopify to import your existing listings to LitCommerce.
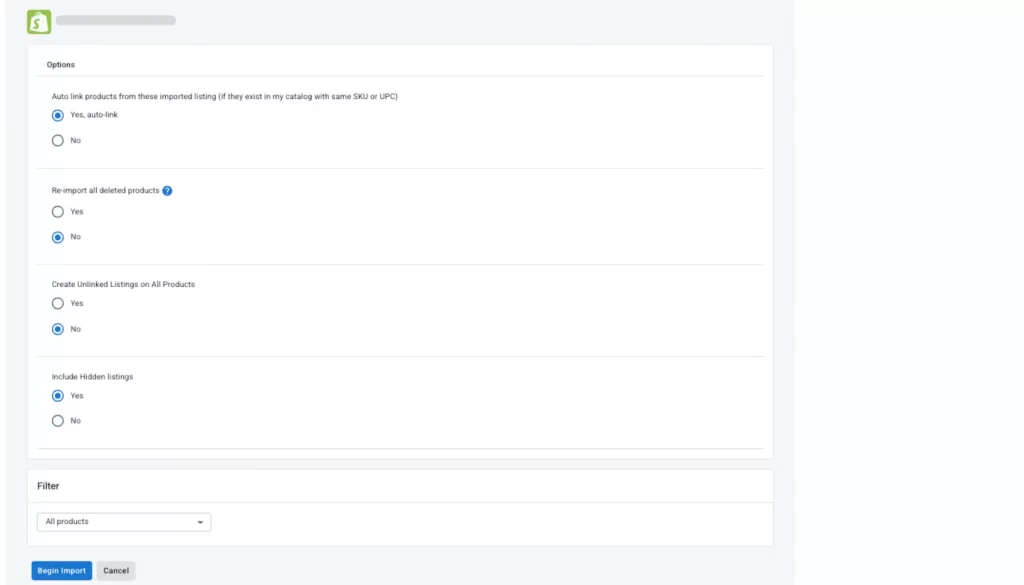
2. Configure settings like auto-linking matching SKUs from your Shopify store and CSV file, importing deleted items, and more. Choose the settings you want, then hit Begin Import.
3. After importing, select the products you want to update and click Create to All Products to add them to your All Products section.
Once your Shopify products appear in the All Products section, you can bulk edit the CSV file (such as adjusting pricing, descriptions, or inventory levels). Any updates made will automatically reflect in Shopify, as long as the product IDs match.
If you’ve set up a scheduled sync for your CSV file, LitCommerce will automatically sync updates with your Shopify listings at the scheduled time. This eliminates the need for manual updates, ensuring your listings remain accurate and up-to-date.
By following these steps, you’ve been finishing the Shopify CSV import using LitCommerce. This automation saves time and ensures your product data remains current across all platforms.
Want to make Shopify CSV product imports easier?
Try LitCommerce today and effortlessly manage your products across multiple platforms. Get started now and enjoy hassle-free updates and imports!
Step 6: Enable inventory sync & price sync
By and by, you’re almost done with the Shopify bulk import process using CSV files! To prevent overselling or price mismatches, LitCommerce can automatically synchronize your inventory and pricing between your CSV file and Shopify listings.
Now, from your Shopify store on LitCommerce, click Channel settings to access inventory and price sync for your Shopify store.

1. Price sync
Besides helping you perform a Shopify CSV import, LitCommerce also makes it easy to manage and sync prices between your product file and Shopify store.
In the Pricing Settings, you can customize how prices are handled with these options:
- Price Sync: Automatically update product prices on Shopify based on your CSV file.
- Currency Conversion: Convert prices when your CSV file and Shopify use different currencies.
- Price Adjustment: In the Price Rules section, you can set product prices on Shopify by a fixed amount ($) or percentage (%).
- Price Rounding: Round prices to more attractive values (e.g., nearest 0.95) for a cleaner, more professional appearance.

2. Inventory sync
Now, let’s scroll down to the Inventory section.
Turn on the switch button next to Inventory sync if you want to keep your Shopify stock always updated with your CSV file automatically.
You can also set the Inventory rules and decide how you want to set the number of listings on your Shopify store. There are 3 rules for you to consider: Quantity, Maximum Quantity, and Minimum Quantity.
- Quantity: With this rule, you can only display a specific percentage of your available inventory from your CSV file to Shopify.
- Maximum Quantity: You can specify the maximum quantity displayed on your Shopify store. It will be extremely useful if you want to create scarcity in your listings.
- Minimum Quantity: Regardless of how many products you have in your inventory, LitCommerce only displays the number of products you have specified.
These inventory rules are great for multichannel sellers who want to control product visibility, prevent overselling, or manage extra stock from their Shopify CSV file.

3. Other sync settings
In addition to price and inventory sync, LitCommerce offers additional settings to simplify and enhance the accuracy of managing your Shopify product listings. Here are some helpful options:
- Title Sync: Keep your product titles consistent by syncing them between your file and your Shopify store.
- Description Sync: Automatically update product descriptions from your file to your Shopify listings, ensuring your product details are always the same.
- Deselect Products After Bulk Action: Choose whether to clear the selection of products after performing bulk actions, such as updating or removing products.
These settings make it easier to keep your product listings up-to-date across multiple platforms, saving you time and reducing the need for manual updates.
Manually Import Products to Shopify with CSV files
If you don’t have a lot of products, you can manually upload them to your Shopify store one by one or utilize the default Shopify CSV import.
Here is how to upload a CSV file to Shopify using Shopify’s native feature:
- From the Shopify Admin Dashboard, go to Products > Import.
- On the Import products by CSV page, click on Add file, then select the CSV file that you want to import.
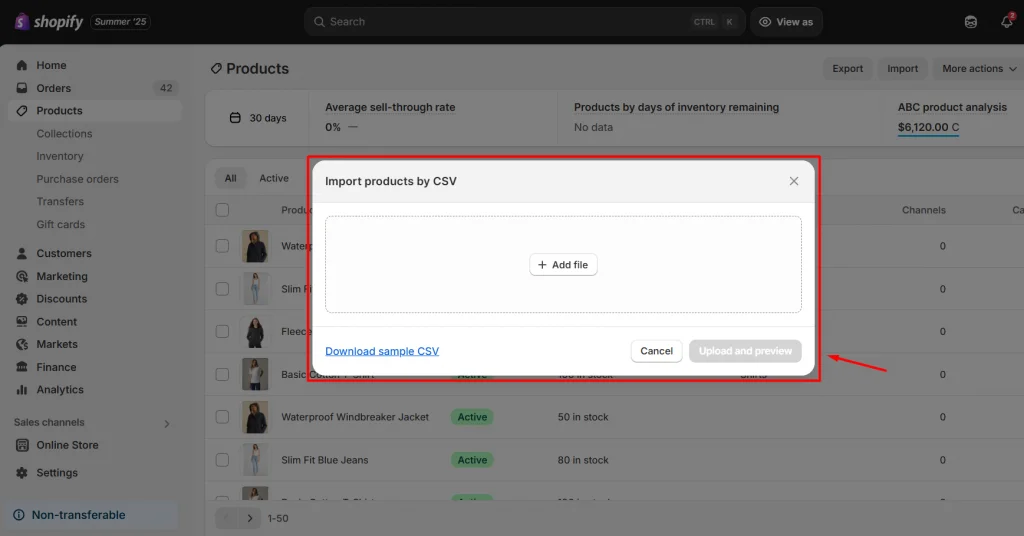
- Click Upload, continue, and review the details about the import.
- Click Import products.
Shopify will send out a confirmation email once your CSV file has been successfully uploaded. If there is any issue during the process, you will also be notified via email so that you can go back and fix it.
Note: Ensure that your CSV files conform to the Shopify format and do not contain any missing headers. If Shopify finds any missing headers in your file, your CSV import will fail.
Shopify CSV Import: FAQs
How do I import a CSV file into Shopify?
You can import a CSV file into Shopify by following the steps below:
1. From the Shopify Admin Dashboard, go to Products.
2. Click Import > Add files. After that, select the CSV file that you want to import.
3. Next, hit on Upload and continue
4. Review the details about the import, then click Import products.
5. Make sure that your CSV files are in the Shopify CSV template and don’t exceed 15MB. Once your CSV file has been successfully uploaded, 6. Shopify will send a confirmation to your registered email address.
The whole process can take up to several hours based on the size of your CSV files. You can speed up the process by registering an account with LitCommerce and experiencing an automated Shopify CSV import.
Can you import Excel into Shopify?
Yes, you can import data from Excel files into Shopify, providing that these files are in CSV format and do not exceed 15MB. Make sure that your files contain the Shopify required data fields for easier data mapping later on.
How do I upload bulk items to Shopify?
You can use CSV files to bulk upload items to Shopify. When using a CSV file containing your product information separated by commas, you can import a large number of items and their details into your Shopify store at the same time.
How long does it take to import CSV Shopify?
Typically, Shopify CSV import can take several hours based on the file size. However, there are times when it can take up to 24 hours or several days for goods to be inspected. You’d better opt for a reputed multichannel selling solution such as LitCommerce to speed up the process.
Start your Shopify CSV Import with LitCommerce Today!
Whether you are expanding your sales channels to Shopify or just starting your eCommerce journey on this platform, Shopify CSV import is an indispensable process. Depending on the size of the CSV files, the entire process may take a lot of time and require technical skills, resulting in data being broken. As a result, you should be cautious and keep one copy as a backup for your data.
You can manually import products to your Shopify store or get help from LitCommerce, a reputable multichannel selling solution. With over 10 years of experience in helping online store owners write their own success stories, LitCommerce simplifies the importing process, enabling you to import products from any website to Shopify easily. In case you need further assistance, do not hesitate to reach out to the LitCommerce support team, or join our active community to get more eCommerce knowledge.

