You’ve just created your Shopify account and feel unsure about how to add products to Shopify and kick-start your online store? You’re not alone! For many Shopify beginners, this process can seem a bit overwhelming at first.
That’s where this guide comes in! We’ll walk you through everything you need to know about how to add a product on Shopify, step by step, from the basics to more advanced tips:
- 8-step guide on how to add products to Shopify
- How to add products to Shopify using a CSV file
- Additional methods to add products to Shopify
- How to manage products on Shopify
Add Products to Shopify Faster with BulkFlow
Want to add products to Shopify in bulk? BulkFlow lets you import all your products at once using CSV, Excel, or Google Sheets. Get your store up and running faster.
8-Step Guide on How to Add Products to Shopify
Here is a step-by-step guide on how to add product to Shopify.
Step 1: Access the Shopify product dashboard
Log in to your Shopify account > Admin Dashboard > Products > Add product.

Hidden truth: Shopify imposes a limit of adding or creating up to 1,000 new products or product variants within a 24-hour period if your store exceeds 50,000 products or variants.
Step 2: Enter product details
– Enter product information like title and description.
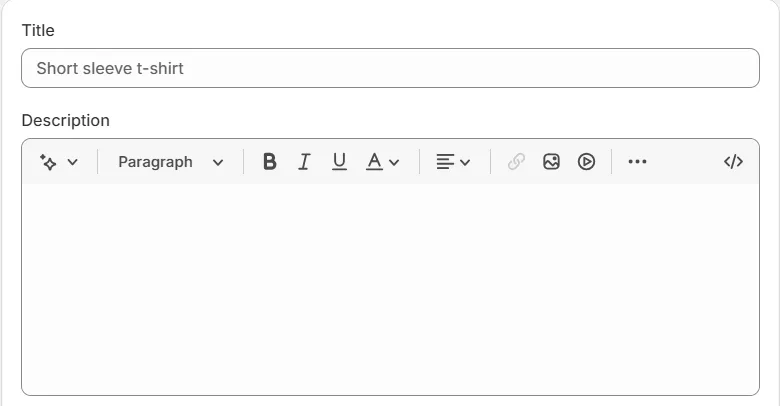
Tips for writing titles:
- Use a clear and descriptive product title.
- Include key features or the product name to make it easy to understand.
Tips for writing descriptions:
- Focus on the benefits of the product, not just the features.
- Use simple language to ensure your description is easy to understand.
- Avoid generic and overused phrases such as “high quality,” “effective”.
- Break up text with bullet points for easy readability.
- Include keywords naturally to improve your product’s search engine ranking.
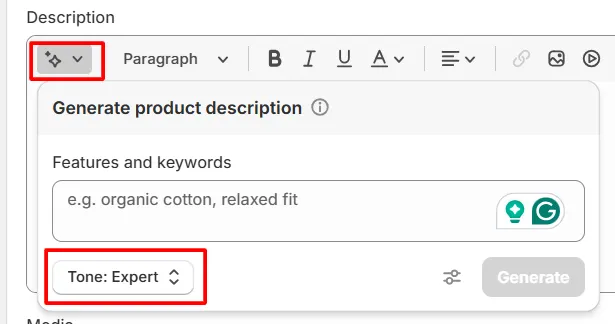
Shopify provides you with an AI tool to generate product descriptions from features and keywords you type in. You can also choose tones like expert, daring, and playful… for better customer engagement.
– Next, you’ll need to set the product category for your item.
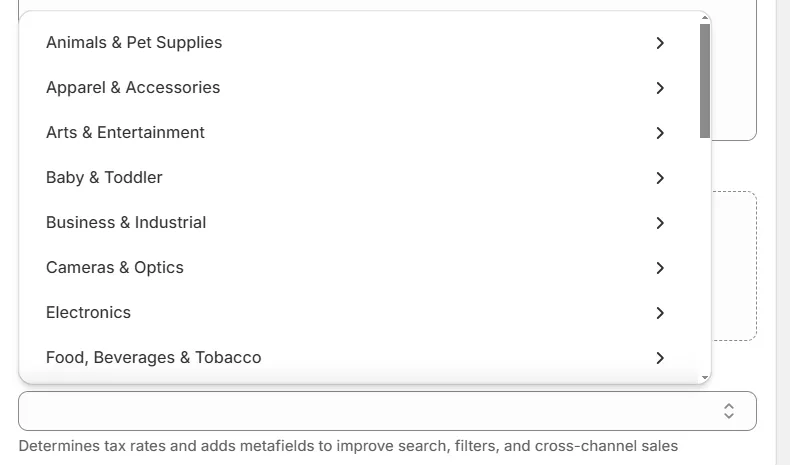
Shopify suggests a category based on your product title, so that you can save your time to find the best match category.
Step 3: Upload product images and videos

Product images are crucial for any Shopify product listing, as they create a shopper’s first impression. If your images are low-quality, blurry, or flawed, shoppers are likely to leave without even clicking on your products.
Note that Shopify accepts images, videos, and even 3D models. Try to utilize all these types to make your product as attractive as possible. Also, Shopify recommends using square images (2048 x 2048 pixels) for consistency.
Here are some tips to enhance your product images:
- Make your product stand out with a clean, white background.
- Offer multiple angles to give a complete view of your product.
- Show the product in action to give shoppers a sense of its use.
- Emphasize product quality with clear, high-resolution images.
- Utilize images from customer reviews to build trust.
Step 4: Set pricing and inventory details
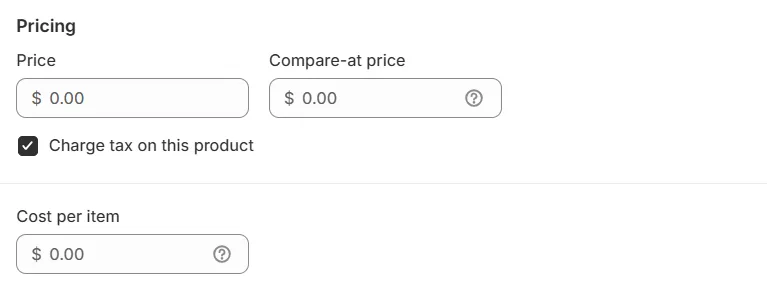
4.1. Set pricing
Enter the retail price of your product in the ‘Price’ section.
If you plan to run sales or discounts, use the ‘Compare-at price’ field to show customers how much they’re saving.
Also, if you select the ‘Charge tax on this product’ option on your product page, it indicates that any applicable taxes will be added to the product’s price during checkout. For instance, if your product costs $100 and your region has a tax rate of 10%, the customer will be charged $110 at checkout.
You can configure taxes in your admin panel by navigating to Settings > Taxes.
You might be interested in setting up Shopify Payment Gateways to streamline the payment process.
4.2. Set up inventory details
Shopify allows you to assign specific locations for your products. Since it integrates with various apps within the platform, each app maintains its own inventory. If you select the ‘Multiple locations’ option, it will include all your designated locations as well as any apps that share SKUs across different locations.
Thanks to this, you can ensure seamless inventory management and accurate stock tracking across your store and connected apps.
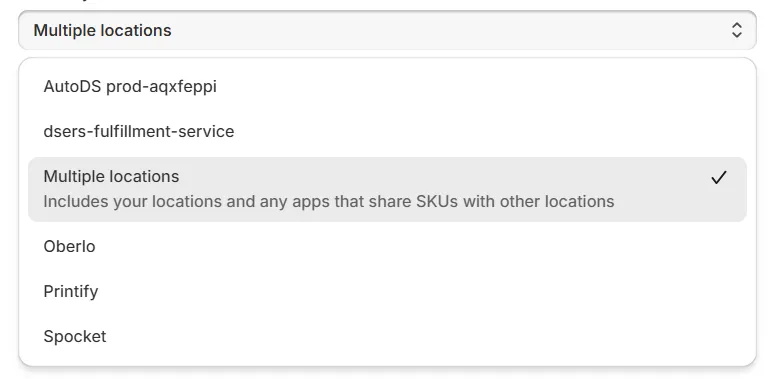
If you want Shopify to update stock levels automatically when a product is sold, enable ‘Track quantity.’ Specify the quantity available and whether you want to allow backorders when stock runs out.
What’s more, if you select the “Continue selling when out of stock” option, your online store will allow customers to place orders even when inventory is depleted. For in-person sales through Shopify POS, this option won’t prevent transactions either. Staff members will receive a warning when inventory levels hit zero or go negative, but they can still complete the sale.

You can also enter your product SKU (Stock Keeping Unit) or barcode for better trạcking:
- SKU: This code helps you organize and keep track of your stock.
- Barcode (ISBN, UPC, GTIN, etc.): This is especially useful for physical stores and POS systems.

Keep Your Shopify Product Information Up-to-Date!
Experience near-instant inventory and price synchronization across your Shopify store and integrations. With updates every 15 minutes, ensure accurate stock levels across all channels effortlessly.
Step 5: Configure shipping settings
Enter your product weight and country/region of origin.
If you ship internationally, you must enter Harmonized System (HS) codes.
An HS code is a six-digit international trade code used to classify and describe a product. Including HS codes for your products helps you avoid issues such as non-compliance penalties, border delays, product seizures, or import denials. To learn more about the HS code system, check out the following resources:
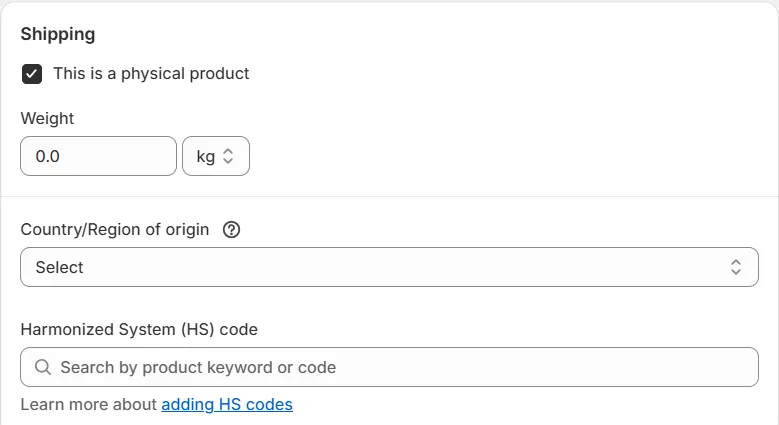
If you’re learning how to add products to Shopify for digital product, deselect the ‘This is a physical product.’ To provide customers with a download link for the digital product, you’ll need to use an app from the Shopify app store, such as Digital Downloads.
Pro tips: Use Shopify’s shipping profiles to set specific shipping rates for different product types or regions.
A shipping profile is a collection of shipping rules tailored to specific products and locations. You can either use the default general shipping profile for all products or create custom profiles for individual products.
Shipping profiles allow you to set precise shipping rates by defining product-specific shipping rules. Hence, you can charge different rates based on the destination and origin of your shipments as well as easily establish shipping zones and rates for each fulfillment location.
Step 6: Set up product variants
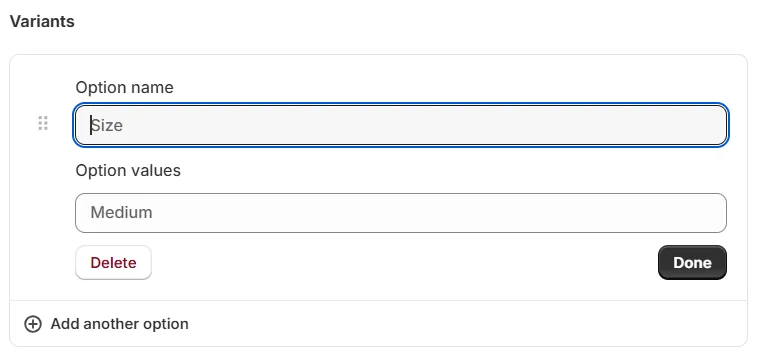
If your product comes in multiple versions (like size, color, or material), set up variants:
- Click ‘Add option like size or color” > specify options.
- Set different prices, SKUs, and inventory levels for each variant if needed.
- Manage inventory for each variant individually and configure unique shipping settings if required.
Example: For a T-shirt that comes in three sizes and four colors, Shopify will create 12 unique variants for you to manage.
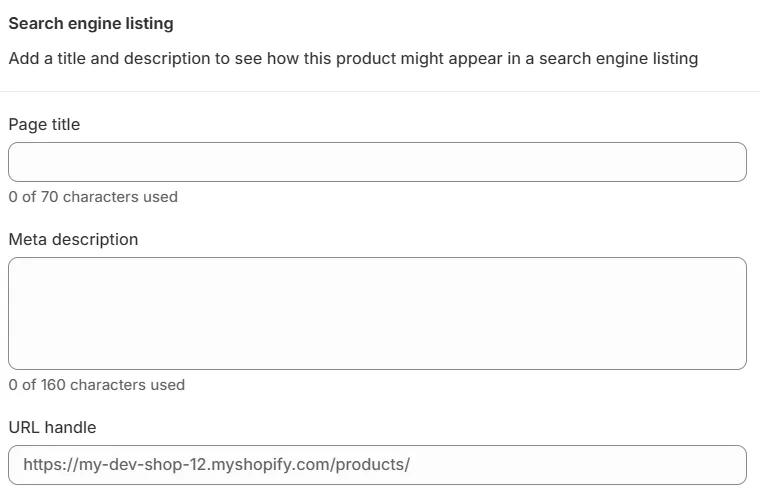
Step 7: Optimize for search engines
SEO (Search engine optimization) is crucial for driving organic traffic to your store. In this step, you need to focus on:
- SEO title: Create a compelling and keyword-rich SEO title that will appear in search results. Keep it under 60 characters to avoid truncation.
- Meta description: Write a brief, engaging meta description (around 155 characters) that encourages clicks. Summarize the product’s benefits and unique features.
- URL handle: Customize the URL to include keywords and make it easy to read. Avoid long or confusing strings of numbers and letters.
Step 8: Save and publish product
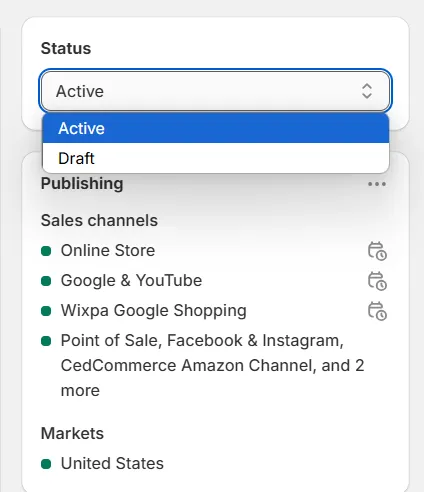
Once you’ve added all the necessary details, it’s time to make your product live:
- If you’re ready to start selling, click ‘Save’ and then choose status as ‘Active’.
- If you need to review or update details later, choose ‘Draft’ for status.
Tip: Before publishing, use the ‘Preview’ feature to see how the product will appear on your site and make sure everything looks great.
View more about how to add products to Shopify manually in this video:
How to Add Products to Shopify Using a CSV File
If you have many products to upload, using a CSV file can save you time. Here’s how to add products in Shopify with a CSV file:
1. Prepare your CSV file
You can download the Shopify CSV template to ensure your file is formatted correctly. The template includes columns for product details like title, description, price, and images.
When filling in product information, be sure to include image URLs and follow Shopify’s guidelines for data formatting.
For more insights into the Shopify CSV file and detailed descriptions of potential columns in the product CSV, read more in the Shopify help center.
Note: To update your products using a CSV file, you’ll first need to export them. Once exported, you can edit the CSV file in a spreadsheet program like Google Sheets. After making your changes, simply import the updated CSV file back into your Shopify admin.
2. Import the CSV file
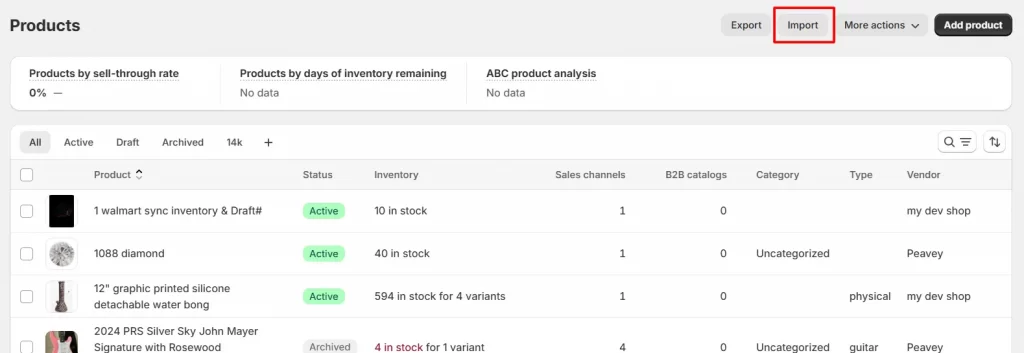
– In your Shopify admin, navigate to Products.
– Click on ‘Import’.
– Select ‘Add file’ and choose the CSV file you want to import.
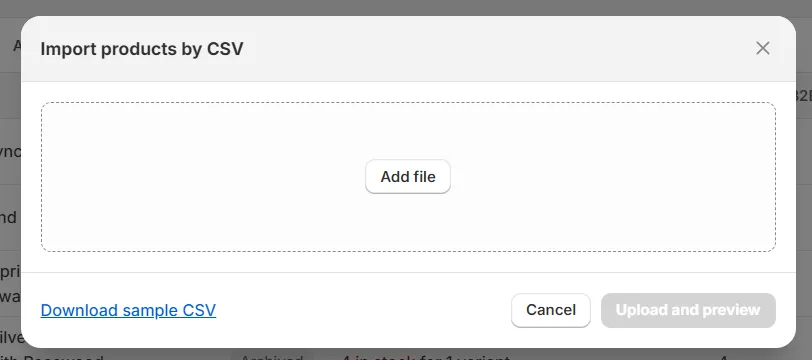
You can also download a sample CSV file in this section.
– (Optional) To publish new products only to your online store and not all sales channels, deselect ‘Publish new products to all sales channels.’
– (Optional) To update existing products by replacing values in matching handles, select Overwrite products with matching handles. If enabled, this option ensures that when a handle in the CSV file matches one in your existing product list, the values in the CSV file will replace the corresponding values in the existing product. If you do not select this option, products with matching handles will be skipped during the import process, leaving the original product data unchanged.
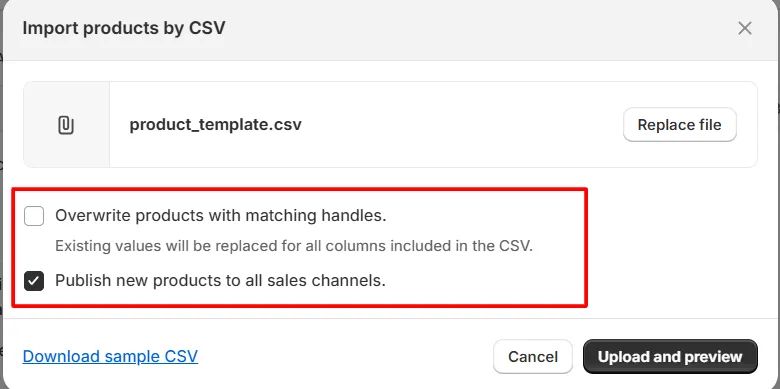
– Click ‘Upload and preview.’
– Review the import details, then click ‘Import products’ to complete the process.
Note: If you have a CSV file exported from another store or sourced elsewhere, ensure it matches Shopify’s required CSV format. If the file format is incorrect or headers are missing, the import will fail.Keep in mind that your product CSV file must not exceed 15 MB. If you encounter errors during the upload or if the process times out, consider splitting the file into smaller parts and uploading each one separately.
Additionally, if you’re encountering issues while uploading your product CSV file, review the following common problems and solutions.
- Daily variant creation limit reached: For stores with 50,000 product variants (excluding Shopify Plus), a maximum of 1,000 new variants can be created via CSV uploads (or API) within a 24-hour period. The timer resets 24 hours after the first upload of the day.
- Fulfillment service can’t be blank: Ensure you’ve entered the name of the fulfillment service you’re using. If you’re not using a service, set this field to ‘manual.’
- Incorrect header check: Remove the image from the affected line in the CSV file and try again. If the issue is resolved, consider hosting the image on a different platform.
- Inventory policy is not included in the list: Set the inventory policy to either ‘deny’ or ‘continue’ to resolve this error.
Check out our detailed guide to Shopify Import Products with CSV Files
Additional Methods to Add Products to Shopify
In addition to these manual methods, Shopify offers a variety of apps that enable sellers to import products from other platforms automatically. Here are some of the most popular ones:
1. Import products from 20+ popular marketplaces with LitCommerce
LitCommerce is a powerful multichannel selling tool designed to simplify selling on Shopify and multiple marketplaces like Amazon, eBay, Etsy, and more.
If you’re currently managing inventory and listings across various channels, you may face challenges with organization and efficiency. LitCommerce solves this with ease.
With features like multichannel connect, real-time data sync, and one-click bulk upload, LitCommerce empowers you to import products to Shopify and grow your Shopify store seamlessly.
How it works:
- Connect Shopify as your Main Store, then link your existing marketplace store (for example, Amazon).
- Import Amazon listings into the LitCommerce app and recreate them on Shopify.
- Enable sync to keep inventory, prices, and orders up to date automatically.
Boost Sales Across Channels via Shopify Integration
Selling on Shopify gives you full control over your website and helps build a strong brand. LitCommerce’s Shopify integration lets you easily list and sync products across all sales channels!

2. Import products from 140+ platforms with LitExtension
LitExtension is an official Shopify partner offering the fastest and most reliable Shopify migration services. With LitExtension, you can seamlessly transfer various data types such as products, customers, orders, and more from over 140 eCommerce platforms, including WooCommerce, Magento, and BigCommerce.
How it works:
- Consultation with LitExtension experts: LitExtension specialists will thoroughly assess your specific requirements and recommend the best strategies to ensure a smooth Shopify migration process.
- Data mapping & store setup by experts: The experts will configure your Shopify store, install necessary apps, and create an optimal environment for the migration.
- Performing the full Shopify migration: Your migration will be initiated and closely monitored. Once completed, the team will review your product listings and other data to ensure accuracy.

3. Import products from AliExpress with DSers
DSers is a comprehensive eCommerce application designed to streamline and automate the dropshipping process, particularly for merchants using Shopify. As an official partner of AliExpress, DSers enables users to efficiently source products, manage suppliers, process orders and easily import products to Shopify.
How to use:
- Connect DSers to your Shopify store and AliExpress account.
- Browse AliExpress and add products directly to your DSers account.
- Import selected products into Shopify, customize listings, and set pricing rules.

You can dig deeper into how to connect AliExpress to Shopify in our dedicated blog.
4. Use Shopify POS
If you’re transitioning your store from an online platform to a physical location, you’ll need Shopify POS for iPhone, iPad, or Android devices.
With Shopify POS, you can add new products directly from the products screen. Any updates to product availability settings in Shopify will be reflected across your other sales channels.
Here’s how to add products to Shopify using Shopify POS:
1. Log in to your Shopify account → Sales channels → Point of Sale.
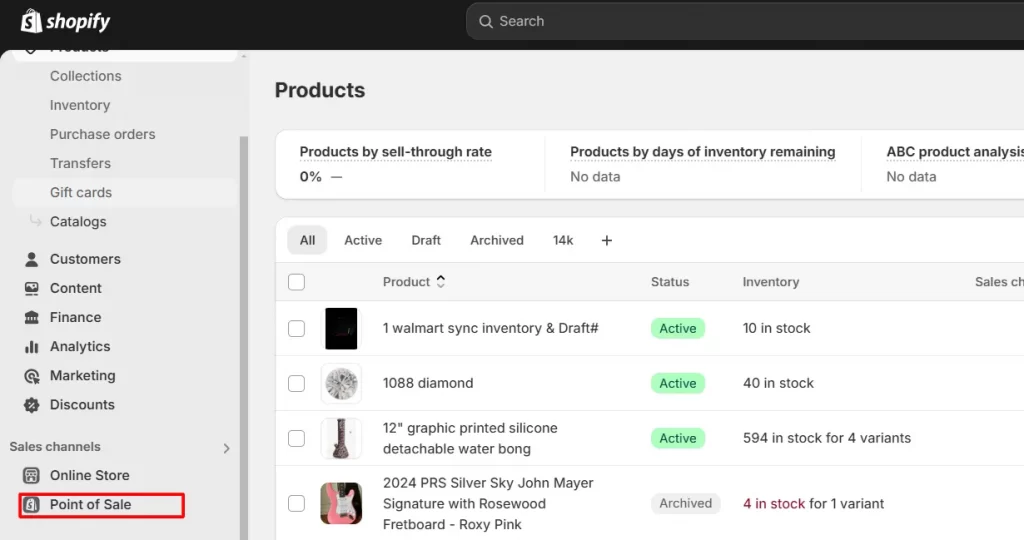
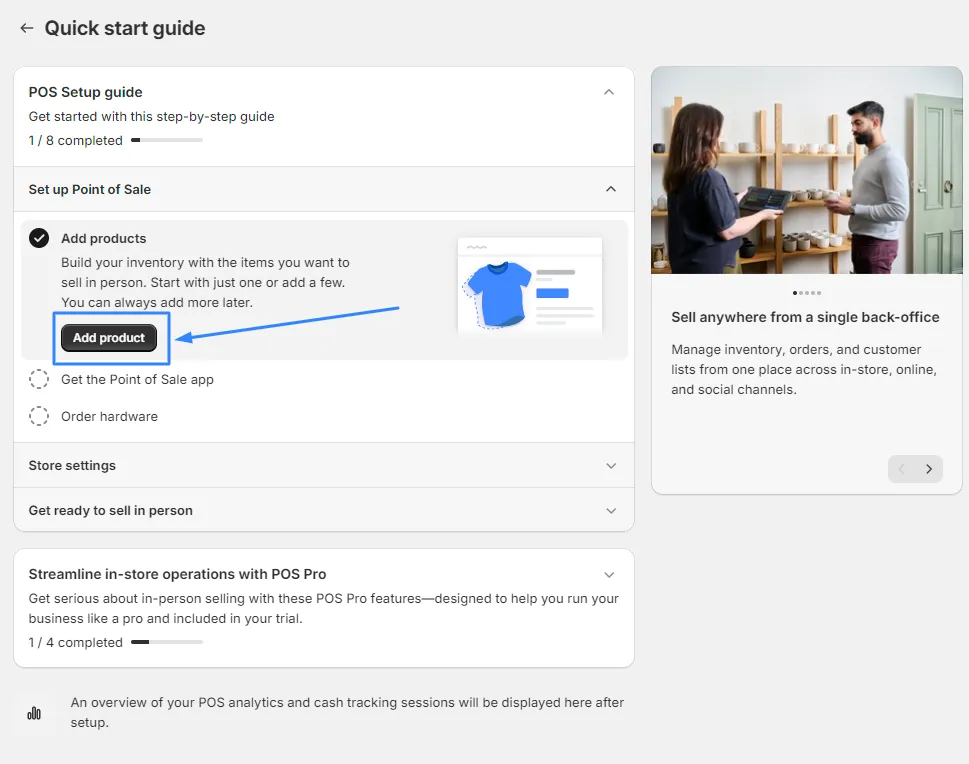
2. Tap the “Add products” button to go to the Products section.
3. Enter product details, such as the title, description, price, and images.
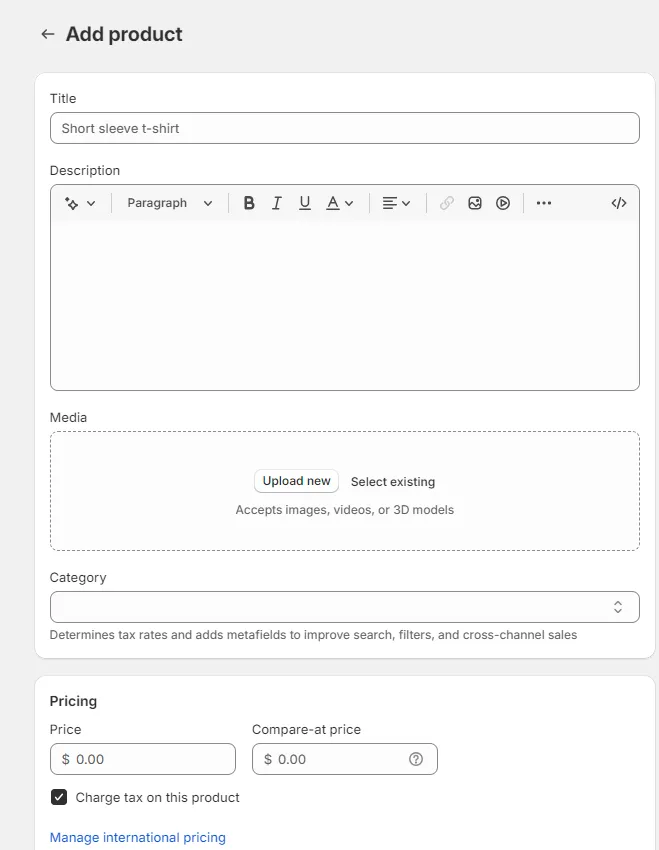
4. Click ‘Save’.
5. Scan barcodes
If you have barcodes for your products, you can use your device’s camera or a barcode scanner to add items efficiently. This method is particularly useful for stores with a large inventory, such as retail shops, where manually entering details for each item would be time-consuming.
Here’s how to add a product on Shopify using barcodes:
1. Open the Shopify mobile app on your smartphone or tablet.
2. Use the camera to scan the barcode of the product.
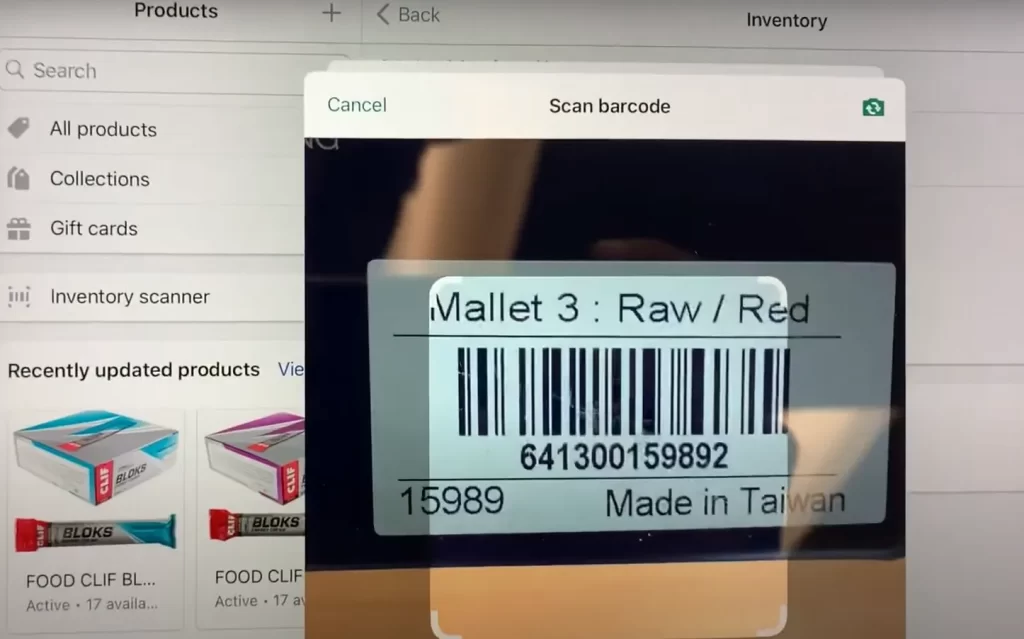
3. Shopify will auto-fill fields like SKU and product name if recognized. You can then add or edit any remaining details.
FAQs – How to Add Products to Shopify
Yes, you can use a CSV file to import multiple products simultaneously. Make sure your CSV is formatted correctly to avoid errors. Shopify allows merchants to add an unlimited number of products to their stores. However, there are specific limitations to consider: Focus on writing SEO-friendly titles, using relevant keywords in descriptions, and filling out the SEO settings in Shopify. Archiving hides the product from customers but keeps it in your admin for future use. Deleting removes it permanently from your store. Yes. When adding a product, simply uncheck the ‘This is a physical product’ option and upload the digital file or set up a download link.
Ready to Add Products to Shopify Page and Start Selling?
Now that you have a comprehensive understanding of how to add products to Shopify, it’s time to put this knowledge into action. Remember that the key is to stay organized and optimize Shopify product listing for SEO and customer engagement.
Start adding products to Shopify store today and set yourself up for eCommerce success! And, for more valuable insights on eCommerce and selling on Shopify, check out the LitCommerce blog to stay informed with the latest industry trends and best practices.
If you have any questions, feel free to reach out. We’re always here to help!


