Shopify introduced its connection with Facebook in 2015, and since then, this has been regarded as one of the best multi-channel eCommerce solutions.
Thanks to it, online sellers can customize their stores inside Facebook while managing their products, orders, and fulfillment directly from within Shopify.
If you already have a Shopify store and want to connect Shopify to Facebook to get more sales, this tutorial is for you. We will walk you through 4 steps to integrate Shopify with Facebook:
- #Step 1: Connect Shopify to Facebook
- #Step 2: Set up Shopify Facebook Store
- #Step 3: Enable sync between Shopify and Facebook
- #Step 4: Manage Facebook orders
Now, let’s dive into how to connect Facebook to Shopify. In this article, we will cover two ways to connect:
- Using the LitCommerce App.
- Using the Facebook & Instagram App.
How to Connect Shopify to Facebook Using LitCommerce App
You should connect Shopify and Facebook with LitCommerce if you want to:
- Connect for free.
- Sell on multiple channels other than just Shopify and Facebook.
- Save time by editing your products in bulk with templates.
- Have tailored and timely support during the connection process.
- Use an app rated 4.7 stars on the Shopify App Store rather than the Facebook & Instagram App with a 3.3-star rating.
#Step 1: Connect Shopify to Facebook
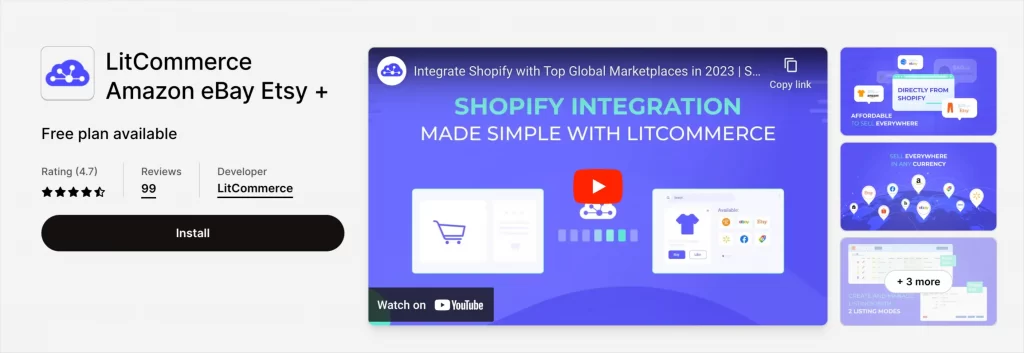
Go to LitCommerce App on the Shopify App Store. Click Install.
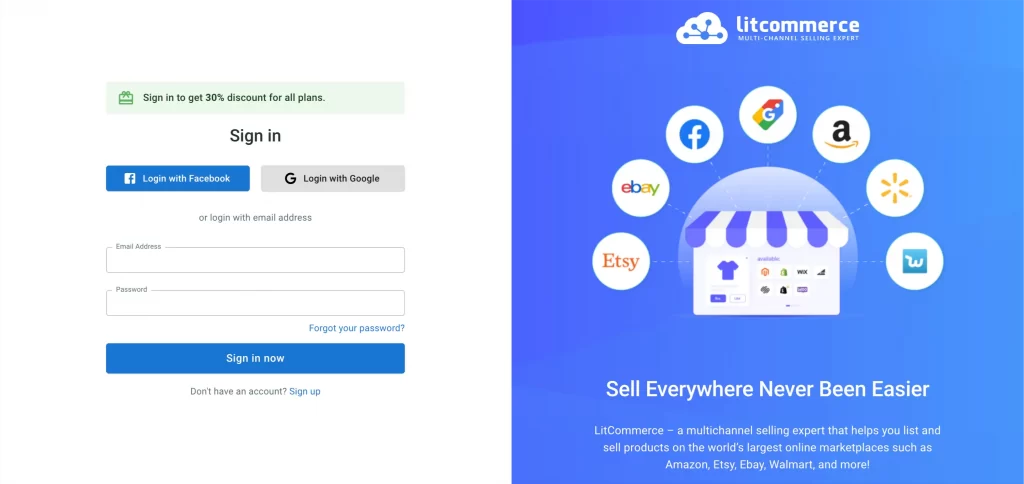
Sign up or log in with your Google or Facebook account.
Click Connect under the Shopify logo to choose Shopify as your main store.
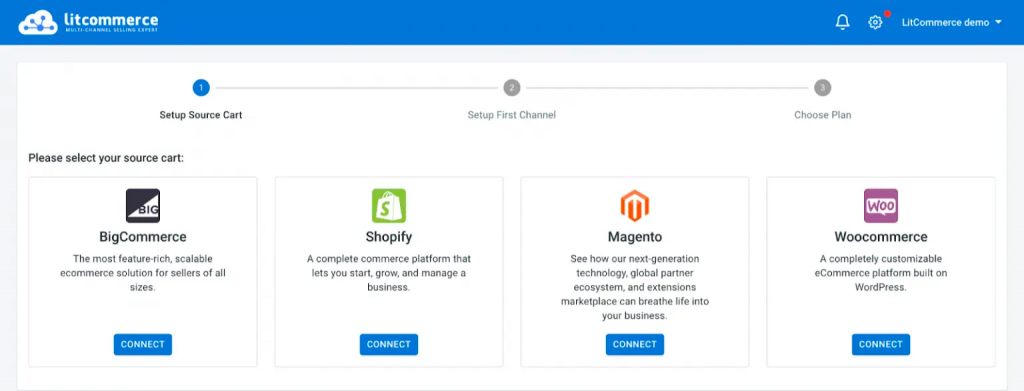
If you choose Shopify as your Main Store, all orders from Facebook will be pulled into the Shopify admin panel, where you can easily view and manage your Facebook and Shopify fulfillment process.
Next, fill in the required information. Then, select Facebook as the sales channel you want to connect to.
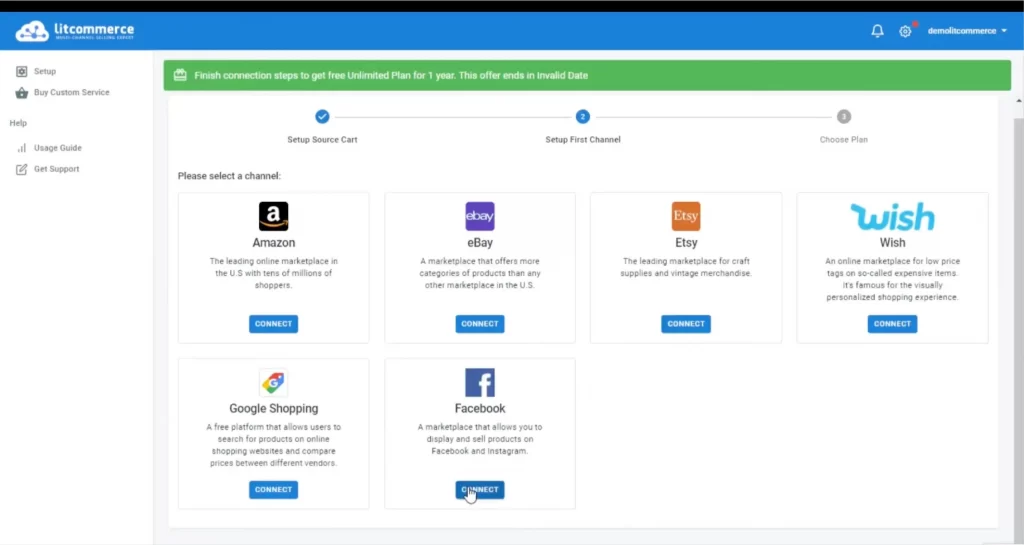
Give the channel a name (you can change it anytime). On the pop-up screen, log in to your Facebook account.
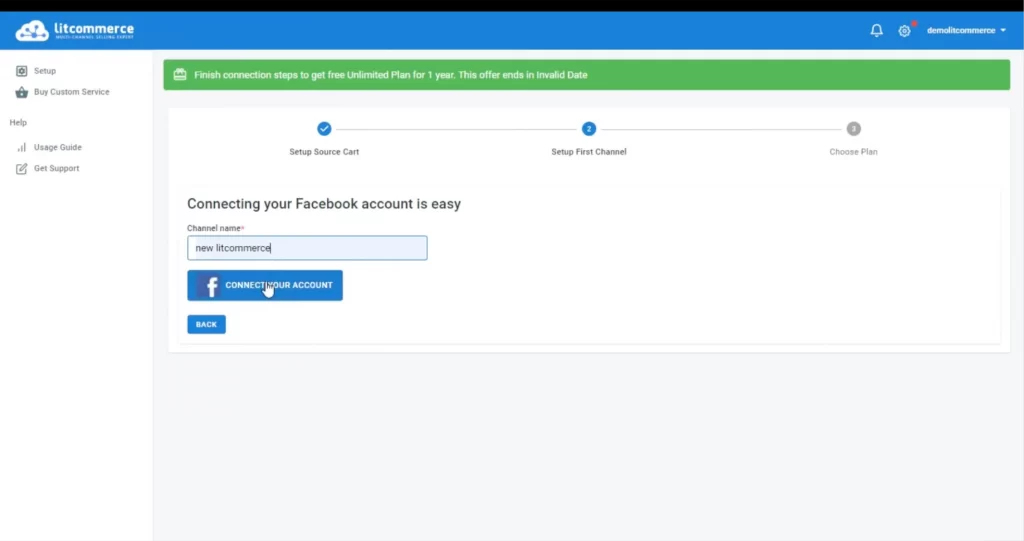
#Step 2: List products on Facebook and Shopify
Navigate to All Products on the left-hand menu.
Then, check the box next to the products you want to list on Facebook. Click List products on a channel and choose Facebook from the list. Then click “Add as draft now“.
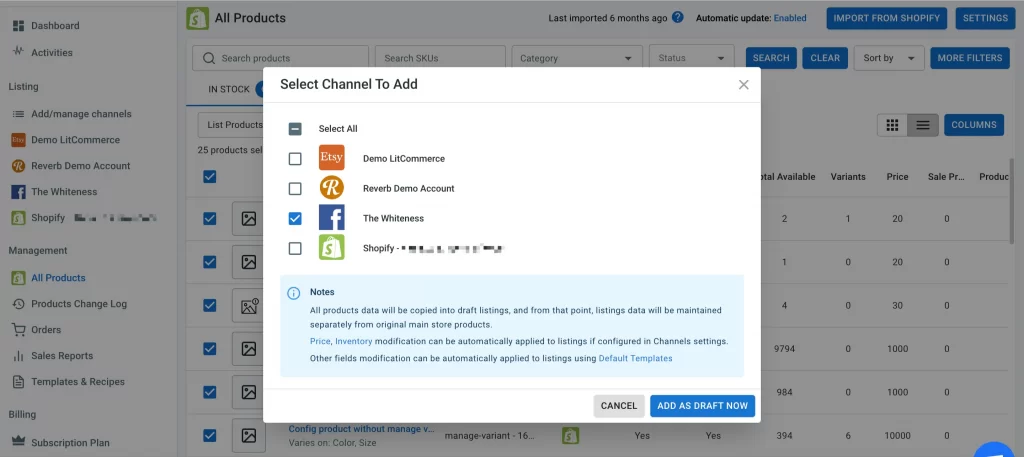
You will receive a confirmation that the Draft listings were successfully produced before being forwarded to Facebook’s draft listings. Before publishing on Facebook, you can still make changes to your listings.
Turn to Facebook under Listing, and check the box next to the listings. Then, select Action “Publish to Facebook” and click Run. At this point, you have successfully connected Shopify to Facebook.
Edit product details on Shopify and Facebook
If you want to edit your listings, LitCommerce provides single or multi-edit modes. Single edit mode is used to edit one by one, while Multi-edit mode is used for multiple editings.
First, look at the left sidebar menu, find the Listing section, then Click on Facebook.
Notice: QuickGrid feature is only available on the Basic plan or above.
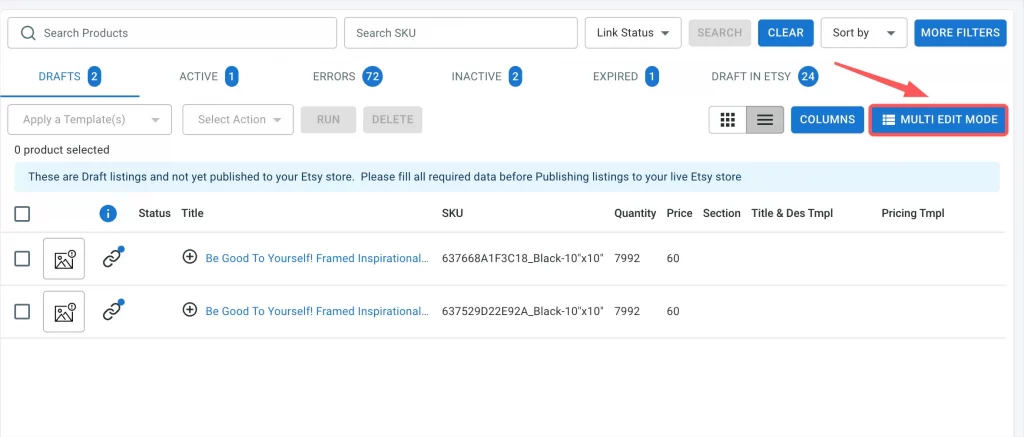
If you’re on a paid plan, click on the Multi-Edit Mode to open the spreadsheet interface. To expand the dashboard, choose Fullscreen in the top right corner.
Here is how your Facebook listings will appear on the multi-edit interface.
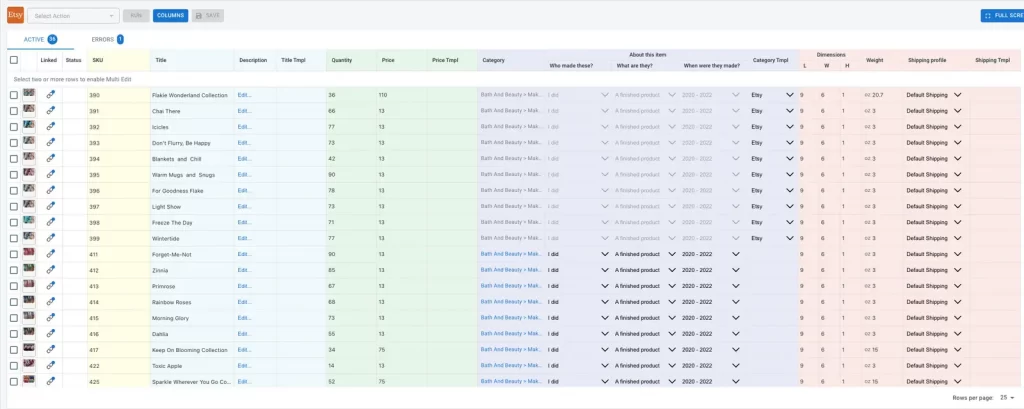
As you can see, there are two tabs on the top of the table, which indicate:
- Active: Active items in your store.
- Error: Items with broken settings or missing details.

Under that, you will see detailed information about your products in columns Linked, Status, SKU, Title, Description, Quantity, Price, Category, etc. You can easily edit them by double-clicking on the cells you wish to edit.
Note: Listings applied templates or recipes are grayed out and can’t be edited in the Multi-Edit Mode.
Templates and Recipes
Another thing that you might be interested in is templates & recipes.
After connecting Shopify to Facebook, the next thing to consider is or adding products across the two channels. Imagine you have 1,000 new listings, and you have to add Descriptions, Pricing, and Categories one by one. Needless to say, it’s very time-consuming. With Template, all you need is one click.
A template is a set of properties and settings for listings on a particular sale channel used to create or edit product listings quickly. Changes made to the template will be automatically applied to your applied listings.
A recipe is a collection of templates for a particular channel (in this case, Facebook) that helps you save even more time. A recipe may include a shipping template, a category template, a pricing template, and more.
Right, how to create a template?
To add a new template, navigate to Listing Templates and Recipes from the left-hand menu.
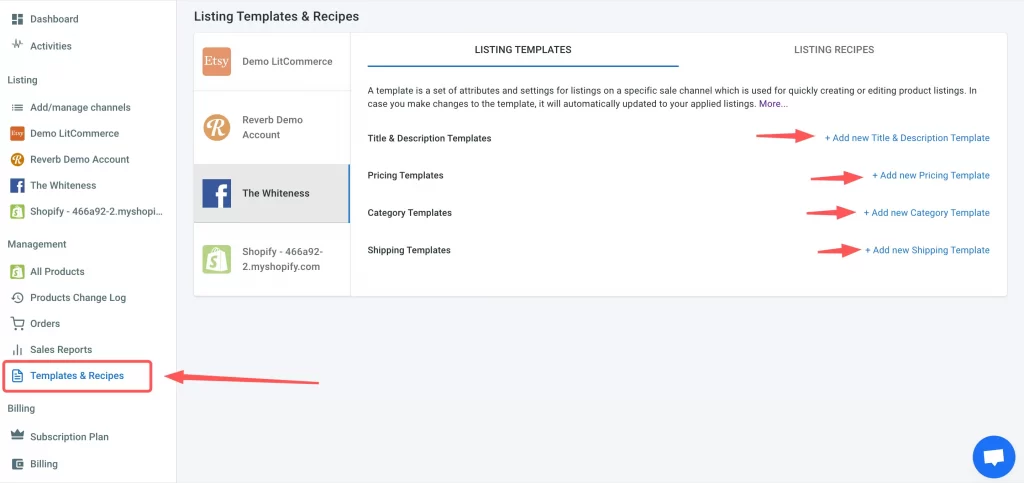
Here, you can see all your integrated channels. Click on the Facebook logo.
Now, choose + Add new template on the right of the screen and fill in the required information.
You can name the template to make it easy to find later.
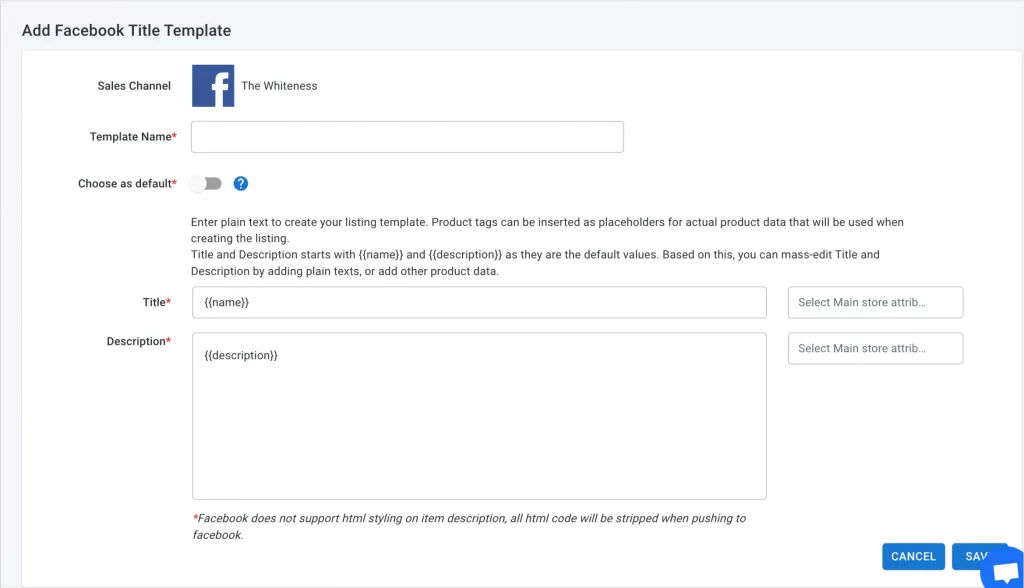
Default Templates
If you choose the template as default, it will be automatically applied every time you create new draft listings on that channel.

How to apply templates and recipes
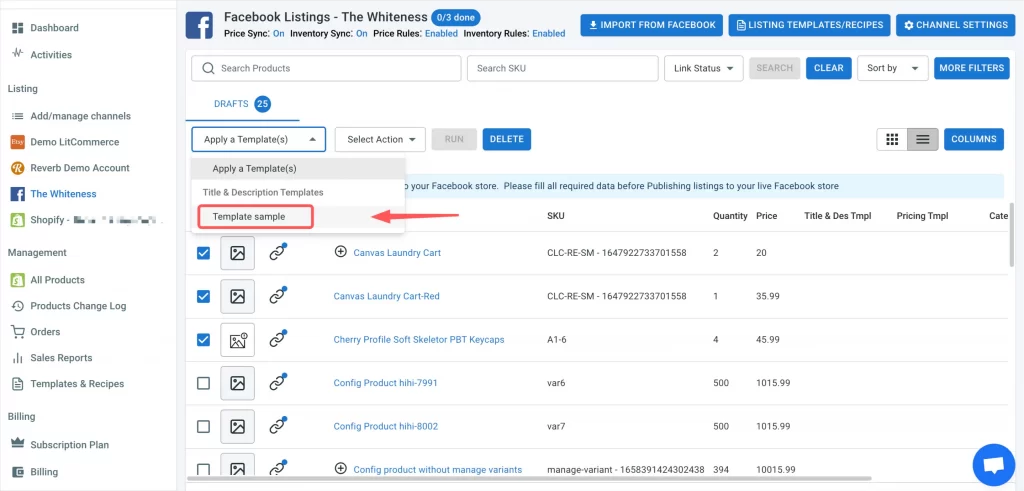
To apply the templates you’ve made to your listings, navigate to Facebook under the Listing section on the left-hand menu.
Select listings you want to apply templates or recipes by checking the boxes and click Apply a template. Next, select the template you want to apply and click Action.
#Step 3: Enable sync between Shopify and Facebook
To connect Shopify to Facebook or any other platform, you will need to connect three important things: inventory, price and order.
Inventory sync
- Go to your channel’s Listing section and click Channel setting in the top right corner to allow inventory sync.
- To access the Inventory section, scroll below. Toggle the button next to Inventory Sync to turn on the feature.
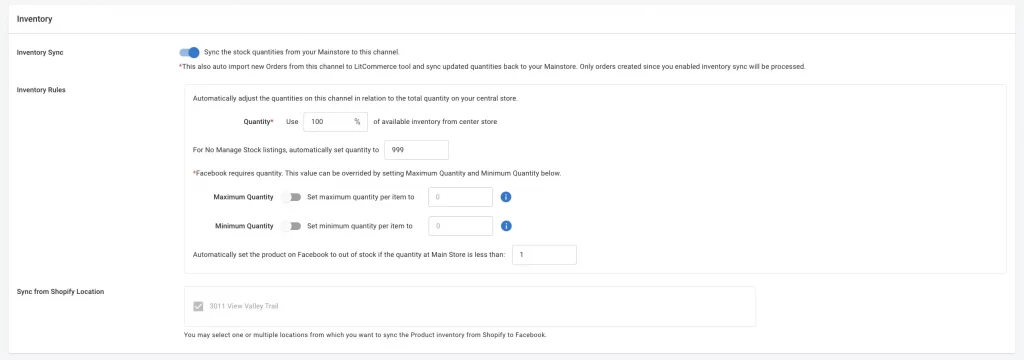
- To save the changes, click Save Settings.
Price sync
- The Price Sync feature will automatically adjust the price of all listings on Facebook to match those found in the LitCommerce catalog. The price will also be instantly synced when you add a new listing on Facebook.
- To turn on Price Sync, choose Facebook under the Listing section on the left-hand menu. Click on Channel Settings, and scroll down to the Pricing section.
- Toggle the button, and LitCommerce will help you sync product prices for your Facebook.
Order sync
- To turn this feature on, under the Listing section, select Facebook.
- Click on Channel settings in the top right corner, scroll down to the bottom, and choose Import Orders to MainStore. “Inventory Sync” is required to enable this.
- There are five main tabs you should focus on: All, Open, Completed, Ready to Ship, and Unlinked. These will help you clarify the order status for each statement. For instance, the Ready to Ship tab indicates that the customer’s order is fully packed and ready to ship.
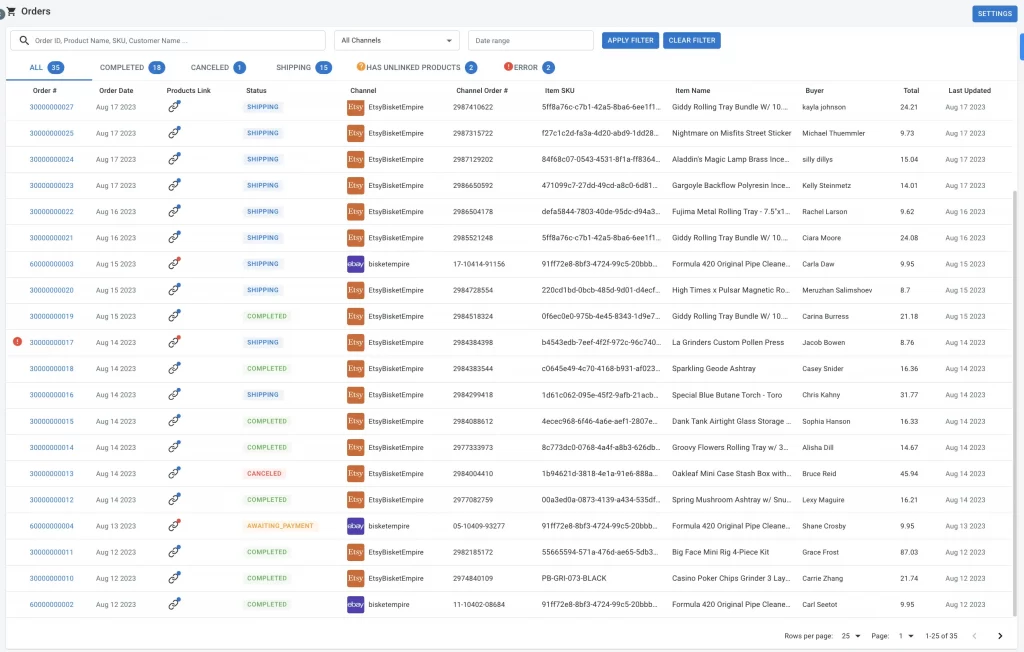
Example
Also, on each tab, there is some information you should take a look at:
- Link status: Once your products and listings are linked together, managing orders from Facebook and Shopify will be easier. LitCommerce helps import linked orders into Shopify and also updates inventory counts on Facebook.
- Status: Order status helps you decide what to do next to fulfill an order, such as packing or shipping.
- The channel shows you where your orders come from.
#Step 4: Manage Facebook orders
Now that you have connected Facebook to Shopify and enabled order sync, incoming orders from Facebook will be pulled into your Shopify dashboard.
- You can choose whether to review orders before the fulfillment process or have LitCommerce import them into your Shopify order flow for centralized multichannel fulfillment.

- LitCommerce will constantly update shipment status and tracking data for Facebook and Shopify orders.
- All your Facebook orders will be reflected and fulfilled in the Shopify admin panel.
How to Connect Shopify to Facebook with the Facebook & Instagram App
You should choose this method if you want to:
- Connect for free.
- Avoid connecting via a third-party app.
- Sell on only Facebook and Shopify.
- List & update your products one by one, manually.
Basic preparations
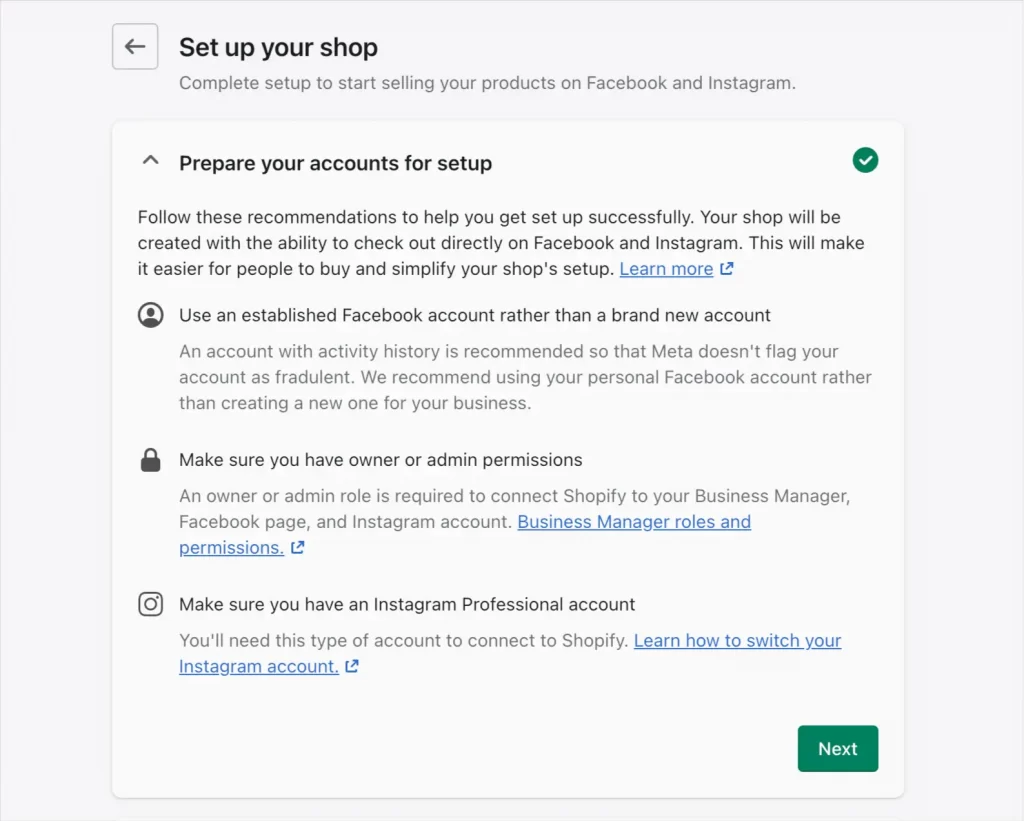
Before we dive into the step-by-step tutorial, let’s first see what you need to connect Shopify with Facebook:
- A Shopify store: You can still connect to Shopify while on a free trial. However, you should set up a Shopify store with at least Basic Plan since the free trial plan doesn’t support critical features for connecting to Facebook, such as Product catalog Shipping and Payments.
- Facebook Personal account: You also need a Facebook account to set up a Shopify Facebook store.
*Notice: We recommend using an established Facebook account rather than a brand-new one. An account with an activity history is recommended so Facebook doesn’t flag your account as fraudulent.
- Business Facebook Page: You also need a published Facebook Business Page with an admin role. Facebook requires all Business Pages to be published before they can be used with other apps and services. Your Business Facebook Page must be associated with your Facebook personal account.
- Facebook Business Manager: You must have a Business Manager (again, with an admin role) associated with your Business Facebook Page.
How to connect Shopify to Facebook using Facebook & Instagram App
#Step 1: Connect Facebook sales channels
Once you have all the requirements, you can now follow these steps to connect Facebook to Shopify:
- Visit https://apps.shopify.com/facebook
- Click Install.
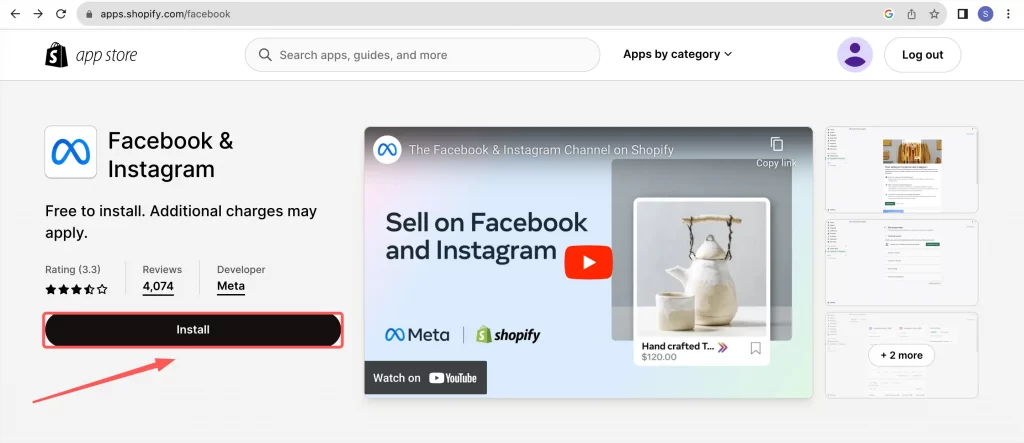
- Next, choose “Add sales channel“.
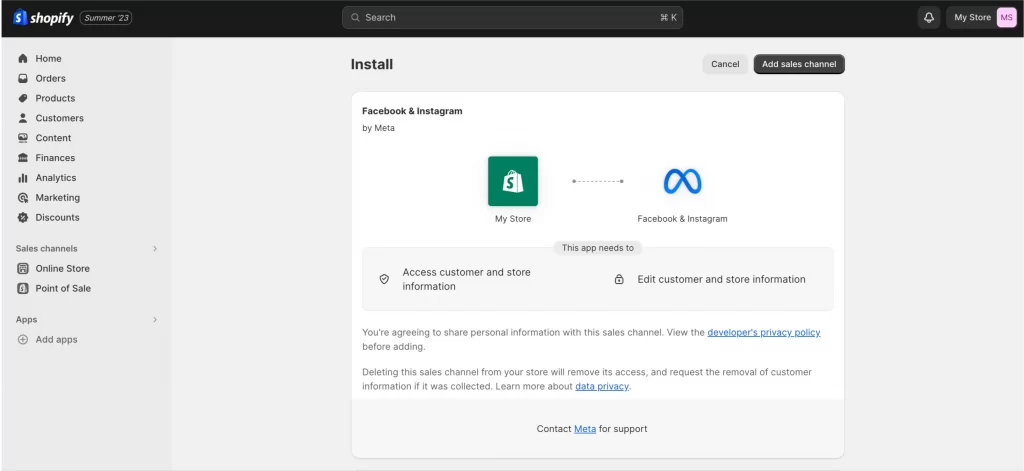
#Step 2: Set up Shopify Facebook Store
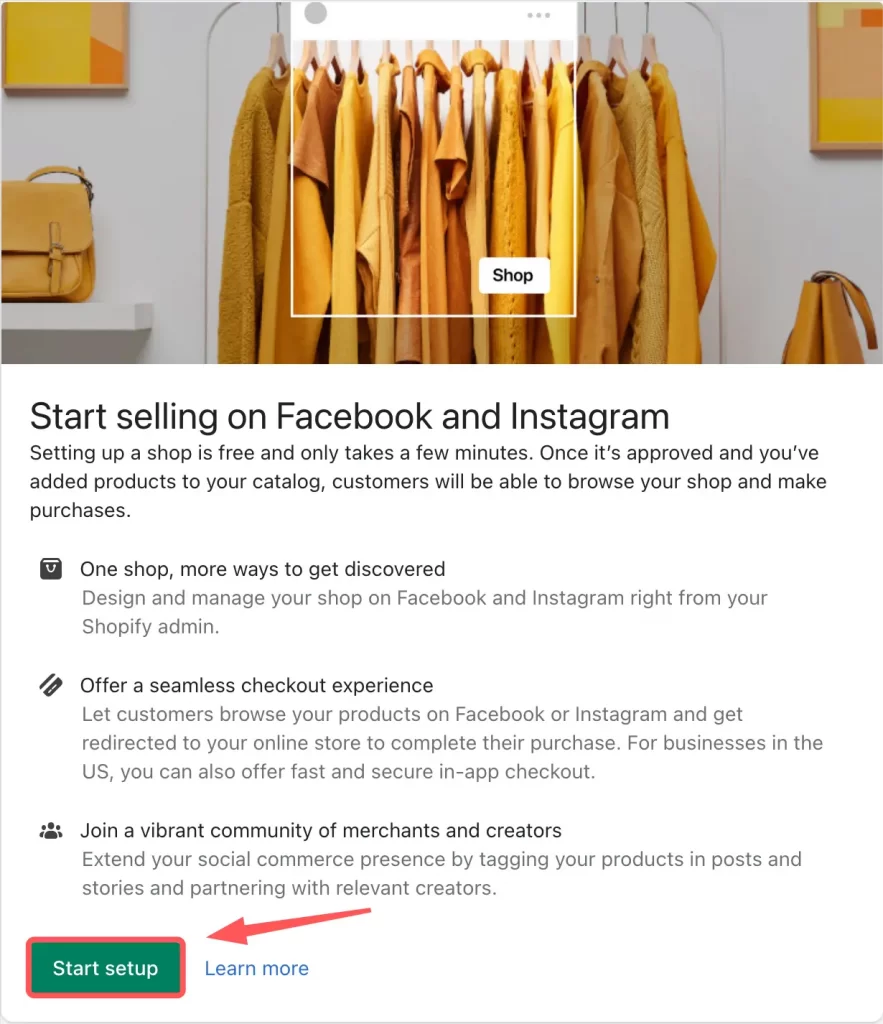
- Now, click start setup. On the Facebook account and click Connect account.
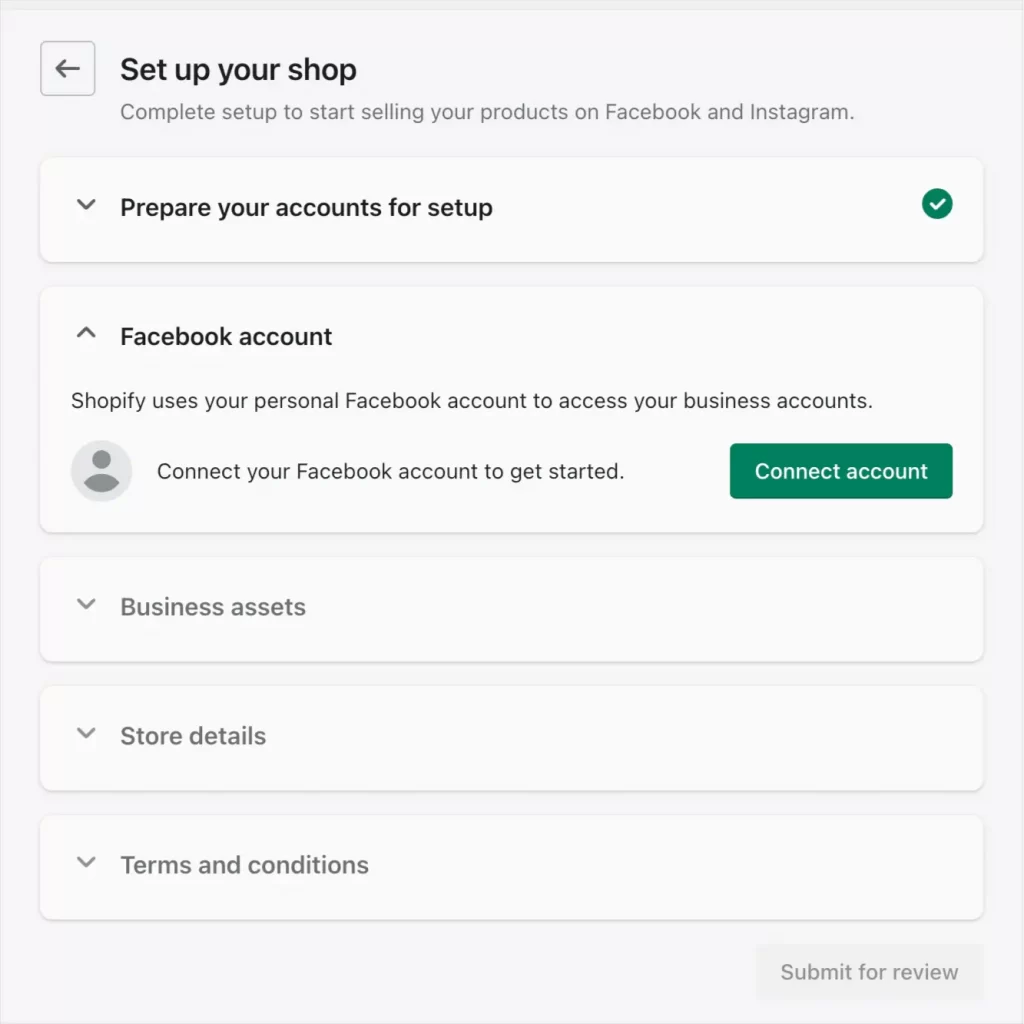
- Hit Continue to sign in to your personal account (it must be linked to your Facebook Business Page).
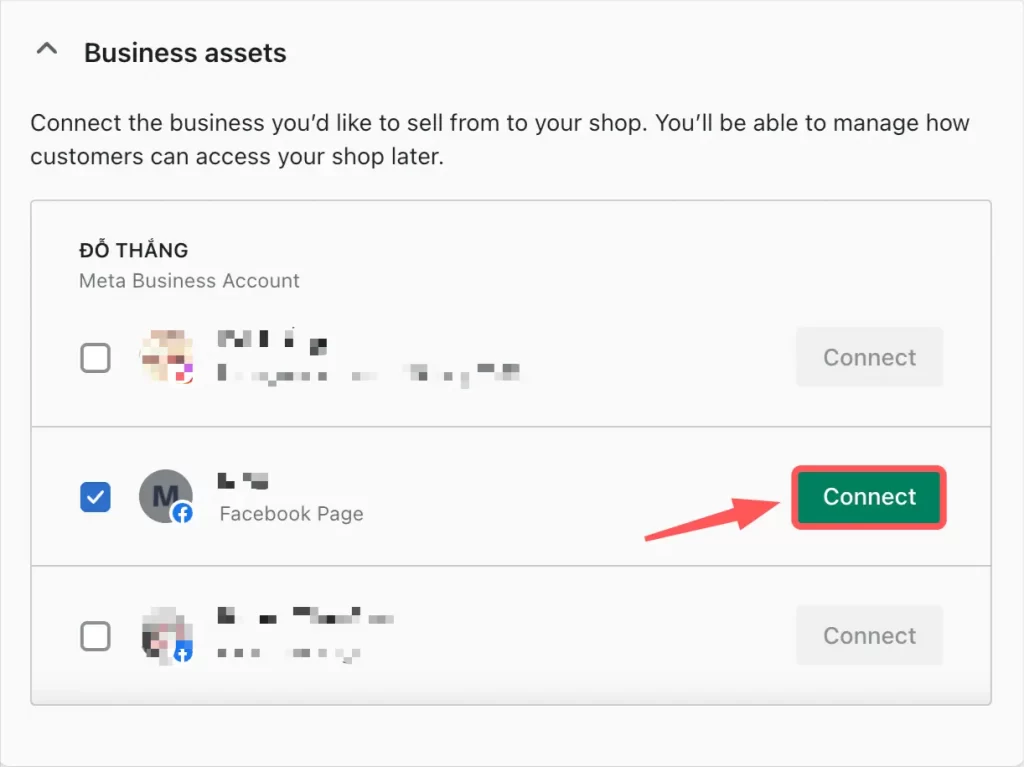
- Next, navigate down to Business Assets. Choose your Facebook Business Page and click Connect. If you need to learn how to create a Facebook Business Page, check out the official Meta guide on how to create a Facebook Page for your business.
- In the data sharing pop-up screen, turn on Share data. This option allows you to track orders and gather information from various events, which can be used to analyze your store traffic and enhance ad targeting with dynamic ads.
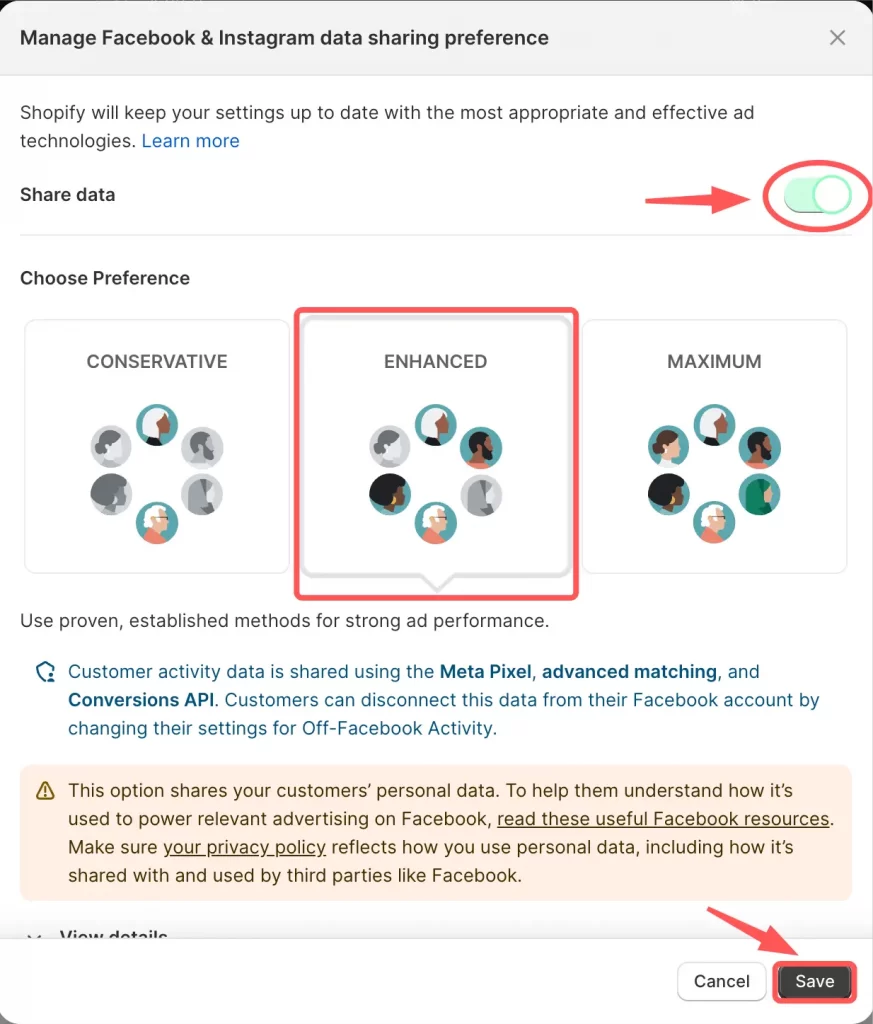
- Now you can Choose Preference. Here, we decided on “Enhanced.” Here you can learn more about each levels of data sharing on Facebook.
- Scroll down and connect Facebook pixel to Shopify. Choose the Facebook pixel associated with your ad account and hit Connect. You also can create a new pixel by clicking Create New.
- Next, add your email so your customers can contact you with questions or feedback. Then, under the Return window, you can set a time limit for accepting returns.
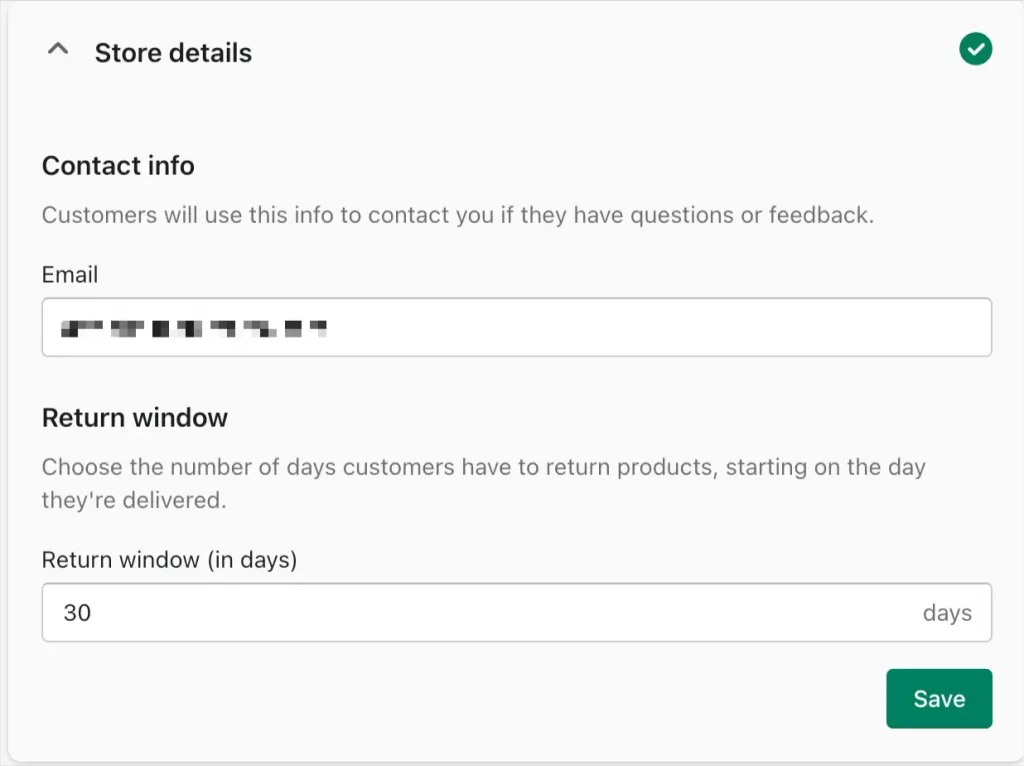
- Lastly, agree to Terms and conditions, then click Submit for review, and you are all set! Now, you will wait for Facebook to review your store. It usually takes up to 48 hours to successfully connect Shopify to Facebook.
#Step 3: Customize your Facebook Shopify store
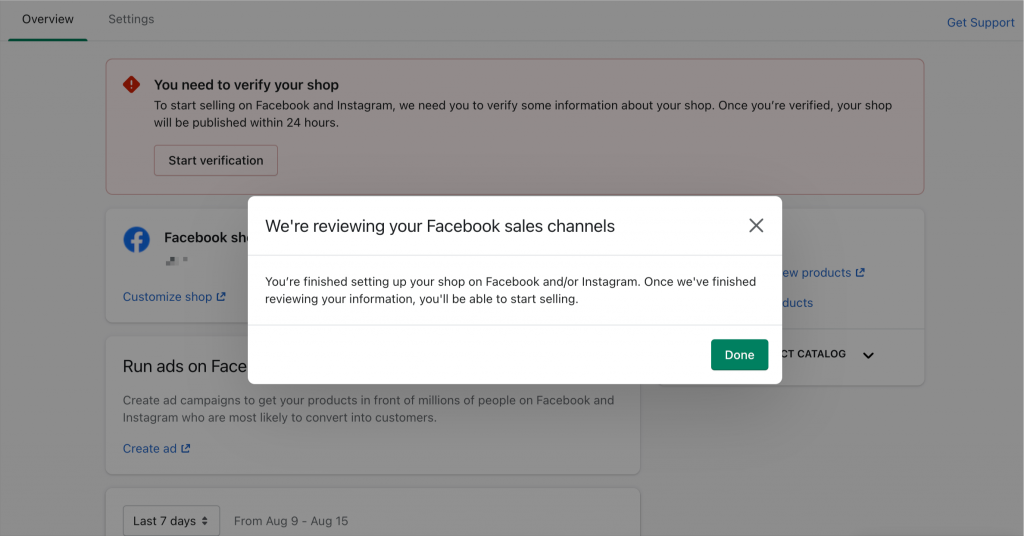
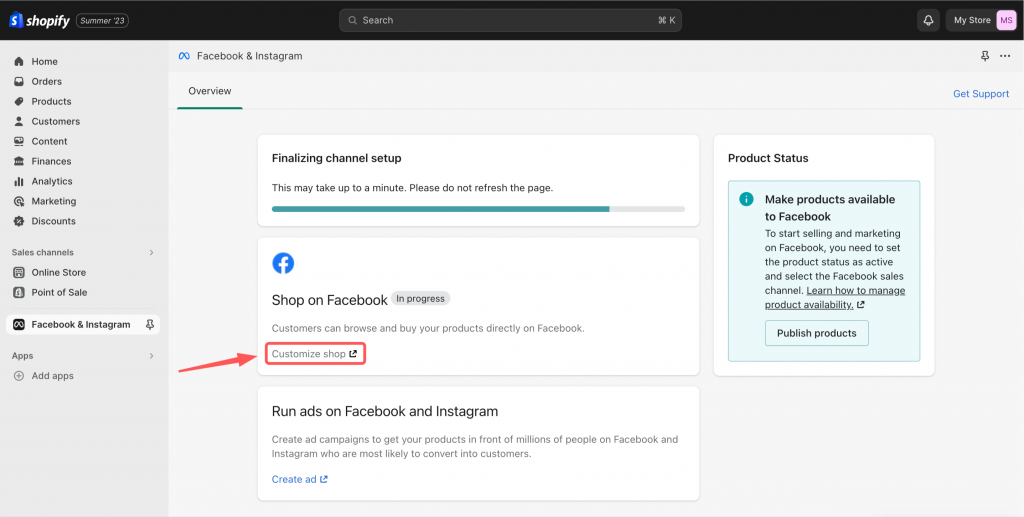
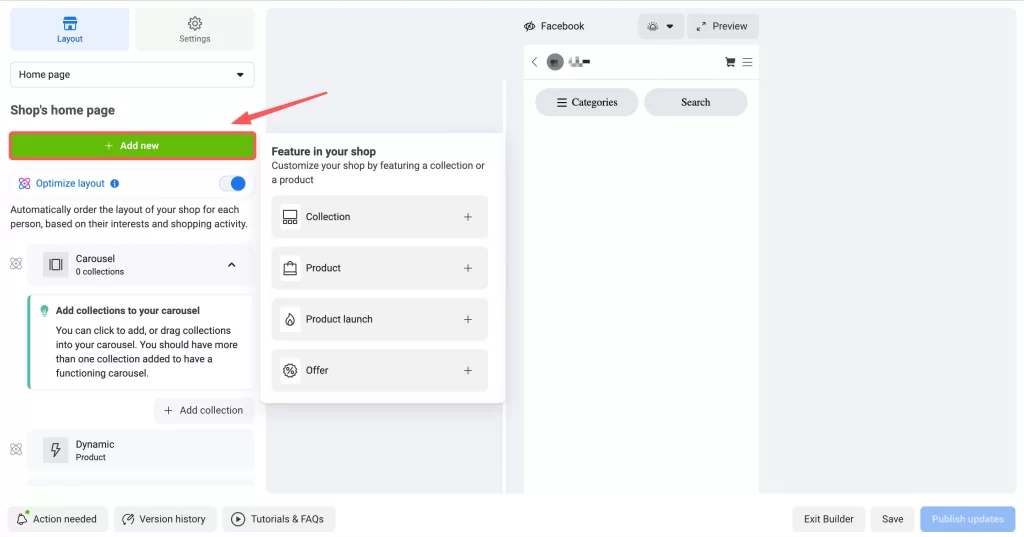
- While you wait for Facebook to review your shop, scroll down to the Shop on Facebook section, and click Customize shop. You will be directed to an interface where you can customize your shop layout and preview your products on Facebook.
- On the left-hand menu, toggle “Optimize layout“.
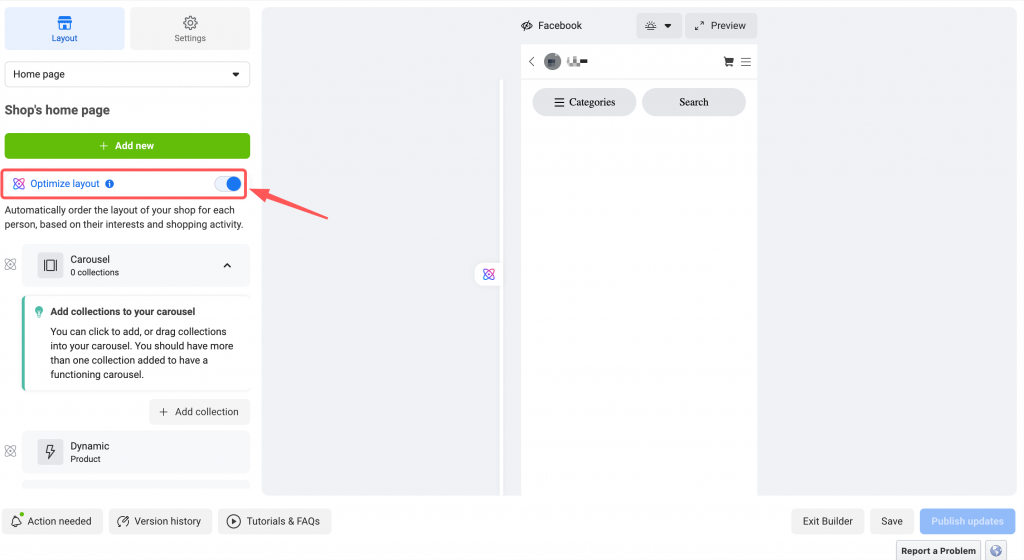
- When this option is turned on, you can decide which products or collections will appear on your home page. However, each customer may see them in a different order compared to your chosen layout.
- We recommend you turn the feature on to give your customers a tailored experience.
- Scroll down a bit. You can adjust your shop by adding collections, products, and offer to your shop’s home page.
In the Setting Section, you will see:
- Visibility: From here, you can manage where people can view your shop, products, and collections.
- Inventory: You can decide which products in the catalog appear in your shop. You can also add new products and edit their details.
- Tagged content: Choose whether you want to show a tagged photo. We recommend you keep it on to increase the visibility of your products in the collections.

Why Choose LitCommerce to Connect Shopify to Facebook?
20,000 sellers chose us, and here is why.
Features
With LitCommerce, you can avoid repetitive tasks and free up valuable time to focus on making sales rather than manually updating each of your listings.
- Livesync: Have your product listing, orders, pricing, and inventory automatically synced between Shopify and Facebook every 15 minutes.
- Multi-connect: Manage your inventory, prices, and orders across 20+ channels (Shopify, Facebook, Etsy, eBay, Amazon, etc.) within a single platform (Shopify, BigCommerce, WooCommerce, Squarespace or Wix, whatever you are already familiar with)—no technical skill is required.
- Order Flow: Have your Facebook orders automatically imported into the Shopify admin interface. Order management and processing can be done efficiently in one location.
- QuickGrid: View, edit, and manage all listings on a single, spreadsheet-style screen. You can edit products individually or in filtered groups. You can also save time and effort by bulk-updating products with Templates and Recipes.
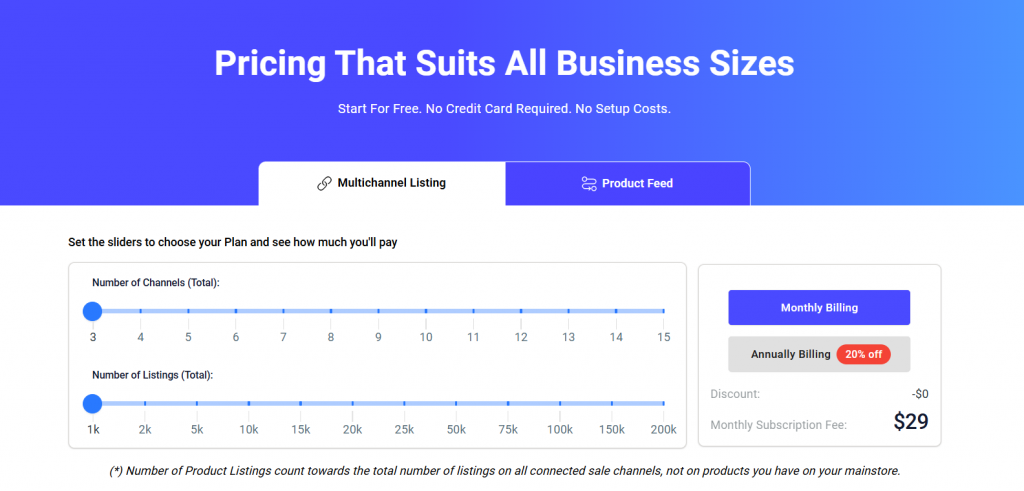
Pricing plan
LitCommerce has a flexible pricing plan where users only pay for what they use, making it easy and affordable to grow their online sales across multiple channels.
Top-rated customer services
It’s not by chance that we have been voted 4.9/5 stars by customers on reputable review platforms. 97% of Trustpilot customers appreciate our support throughout and after the setup process.
“Excellent customer service and great app”
I firstly have to start with the excellent customer service provided to me by Hanah which was 10/10 – absolutely brilliant! She was very helpful, knowledgeable and very, very patient which trying to resolve my issue.
The app has a very clean, easy-to-navigate user interface and is quite straightforward and easy to use. I have many time-saving functions, like being able to create listing templates to enable you to export and sync with your chosen sales channel quickly and efficiently. After getting to know the export and sync settings, things are pretty easy if you are looking to sync your entire Shopify store with eBay or Etsy. The sync itself works flawlessly.
Help is at hand almost instantly if you have any questions or issues. As I said, the customer service is excellent.”
From Conrad Pascal, Store Owner.
Connect Shopify to Facebook: Frequently Asked Questions
You may run into some errors when connecting, if so, try these solutions below: Whether connecting by LitCommerce or Facebook and Instagram app, you can fulfill your order on the Shopify admin panel. All your Facebook orders will be there after sync. We recommend you list your product little by little. Listing your popular/important product first and adding other products each week Yes, you can. It typically takes up to 48 hours for Facebook to review and approve your products. No. You don’t have to pay fees when connecting by LitCommerce or Facebook & Instagram app. There are also no transaction fees when you sell on Facebook with Shopify. However, you will need to pay some Shopify fees, like Shopify basic plan, which starts at $29 monthly. Depending on your business needs, you may also need to pay for additional apps or features. For instance, there is a 2% transaction fee if you want to use Shopify’s built-in payment system.
Are You Ready to Sell on Both Facebook and Shopify?
Connecting Shopify to Facebook opens up a world of opportunities for businesses wanting to reach a wider audience and boost their sales.
Whether you choose to use the LitCommerce app or the Facebook & Instagram App, the process is easy to follow and can be done in just a few minutes.
Check out LitCommerce if you are planning to expand your business and want to manage everything in one place. LitCommerce is the easiest way for store owners to list and sell their products on the top global online marketplaces, including Facebook and Amazon, Esty, eBay, or multiple eCommerce platforms like WooCommerce, BigCommerce,…
Please contact the support team; we are always happy to assist!

