If you’re looking for how to get verified on Facebook, you’ve come to the right spot.
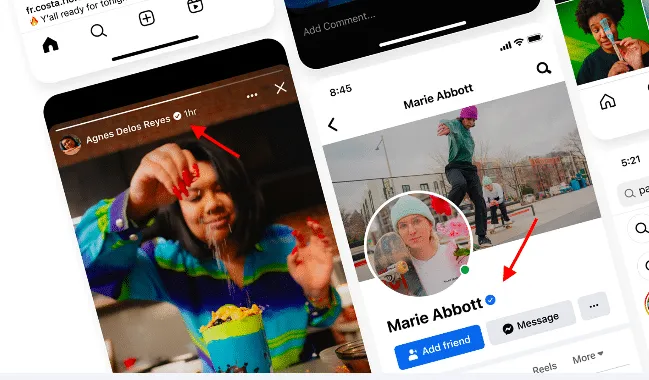
Facebook verification is the process by which Facebook confirms the authenticity of an account, signified by a blue checkmark next to your name. This badge indicates that the account belongs to the person, brand, or organization it claims to represent, offering a layer of credibility and trust.
With the rise of fake accounts and misinformation, a verified Facebook account has become more important. It helps your Page show up at the top of relevant searches, giving you more visibility and building trust.
So, in this guide, we’ll walk you through:
- Types of verified Facebook accounts
- Must-have criteria to get verified on Facebook
- How to get verified on Facebook for free
- How to get verified on Facebook with Meta Verified
- Tips to increase your chances of getting verified
- What to do if your verification request is rejected
- How to keep the badge and your reputation
Let’s dive into it!
Boost Your Sales Beyond Verification!
Getting verified on Facebook is just the very first step. To truly excel, use our product feed management tool to optimize your Facebook product feed, so you can enhance your listings and start driving more sales on Facebook!
Types of Verified Facebook Accounts
When it comes to how to get verified on Facebook, there are two main types of verification: traditional verification and Meta Verified, which is a newer subscription-based service.
Each type serves a different purpose and comes with varying benefits tailored to the needs of users.
Traditional Facebook verification
The traditional route to getting verified on Facebook is available to public figures, celebrities, brands, and organizations who meet the platform’s eligibility requirements. This includes businesses, influencers, and any individual who can prove their account is authentic, notable, and active.
While learning how to get a blue check on Facebook this way doesn’t come with a subscription fee, it is based on factors like the account’s public presence, media coverage, and the ability to prove it represents a significant person or entity. Once approved, you receive the familiar blue checkmark next to your name, signaling your authenticity.
Meta Verified: subscription-based verification
Meta Verified is Facebook’s new, paid verification service that’s aimed at enhancing both security and visibility on the platform. It is only available for profiles, not for Facebook Pages. However, notable Pages can still apply for a verified badge, even though the subscription option is not available to them.
Meta Verified offers a few pricing tiers, each designed to cater to different needs depending on the level of protection and features you want. Here’s a breakdown of the key subscription plans available under Meta Verified:
Plan | Price | Benefits |
Business Standard | $14.99/month or $143.99/year | - Verified badge - Impersonation protection - Enhanced profile - Search optimization |
Business Plus | $44.99/month or $479.99/year | - All Business Standard benefits - Enhanced profile - Links in reels - Featured account |
Business Premium | $119.99/month or $1,399.99/year | - All Business Plus benefits - Enhanced profile - Links in reels - Employee impersonation protection - Customized messaging charts |
Business Max | $349.99/month or $4,199.99/year | - All Business Premium benefits - Enhanced profile - Links in reels - Employee impersonation protection - Account review |
Who should choose traditional Facebook verification:
- Public figures, celebrities, and influencers looking for organic verification without a subscription fee.
- Brands or businesses with significant media coverage and public presence that need the blue checkmark for credibility.
- High-profile accounts that don’t need additional subscription-based features but want to stand out as authentic.
- Organizations and non-profits aiming to verify their identity for legitimacy and trust.
Who should choose Meta Verified:
- Small businesses or entrepreneurs looking for additional features like enhanced profiles and search optimization for a monthly fee.
- Content creators wanting added security, such as impersonation protection and links in Reels.
- Public figures or celebrities who want extra benefits like priority customer support and featured accounts.
- Brands needing advanced protection, such as employee impersonation protection, and the ability to review and optimize their profiles more comprehensively.
Who Can Get Verified on Facebook?
In fact, anyone can get verified on Facebook through either of the two options, as long as they meet Meta’s strict eligibility criteria for verifying Pages and profiles.
For both options, your Page must comply with Facebook’s Terms of Service and Community Standards. It also needs to have:
- A profile photo
- A cover photo
- and a Page name that adheres to the platform’s naming guidelines.
Who qualifies for traditional Facebook verification?
To qualify for traditional Facebook verification, your account must meet the following must-have criteria:
- Your account must represent a real person, business, or entity.
- You must have a profile photo, cover photo, and a bio. At least one post should be visible on your profile.
- Your account must be the unique presence of the entity it represents. This means there should be only one account per entity (with exceptions for language-specific accounts).
- Your account must represent a well-known individual, brand, or entity. Accounts that are frequently searched for on Facebook or mentioned in multiple news sources are eligible for review.
- Your account must comply with Facebook’s Terms of Service and Community Standards.
Additionally, you’ll need documentation to prove authenticity:
- For individuals: A government-issued photo ID (e.g., passport or driver’s license).
- For organizations: Proof such as a certificate of formation, articles of incorporation, or tax documents
And here are some red flags that get accounts rejected instantly
- Incomplete profile: Missing profile photo, bio, or posts.
- Misleading or general names: Account names that don’t clearly represent the entity, such as overly generic terms or locations.
- Too many accounts for the same entity: You can only have one account per entity unless it’s for language-specific needs.
- Lack of media coverage: Accounts that aren’t widely searched or are niche, like meme accounts, generally don’t qualify.
Who qualifies for Meta Verified?
Meta Verified is a subscription-based service that allows users to get verified on Facebook and Instagram. Here are the must-have criteria for each type of Meta Verified account:
For profiles (individuals):
- You must be at least 18 years old or the age of majority in your country.
- Available only in countries where Meta Verified is offered.
- Government-issued photo ID to confirm your identity.
- Your account name and profile picture should not change frequently.
- Two-factor authentication must be enabled on your account.
- Agree to Meta’s Terms of Service and follow Facebook’s Community Standards.
For business pages:
In addition to the criteria for individual profiles, to verify a Facebook page, you need to meet these additional requirements:
- You must have control of a business portfolio within Meta Business Suite containing a Facebook business Page.
- Your Page must meet the minimum activity standards, showing a healthy level of engagement and posting.
- Your Page must have a profile picture, cover photo, and a category.
- Enabling advanced protection on your Page is necessary.
How to Get Verified on Facebook for Free
The answer for “How do you get verified on Facebook” is simple as it is a straightforward process, but it requires some preparation and attention to detail. Here’s a step-by-step guide on how to apply for Facebook verification for free:
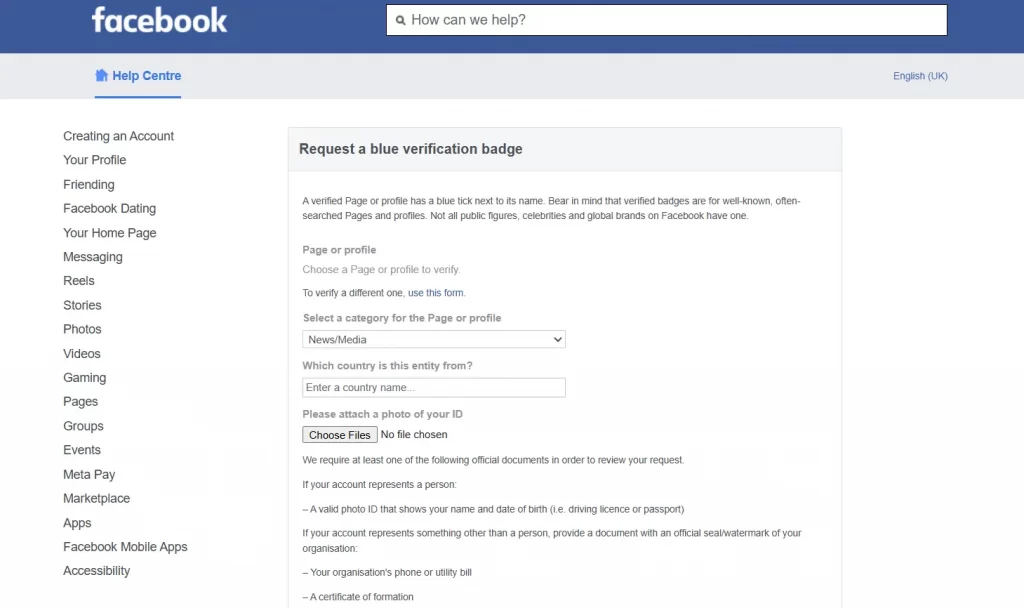
1. Log in to Facebook & access Meta Verification request form
First, log into your Facebook account on your desktop. Next, head to the Meta Verification Request Form.
This is where you’ll submit your verification request.
2. Choose your verification
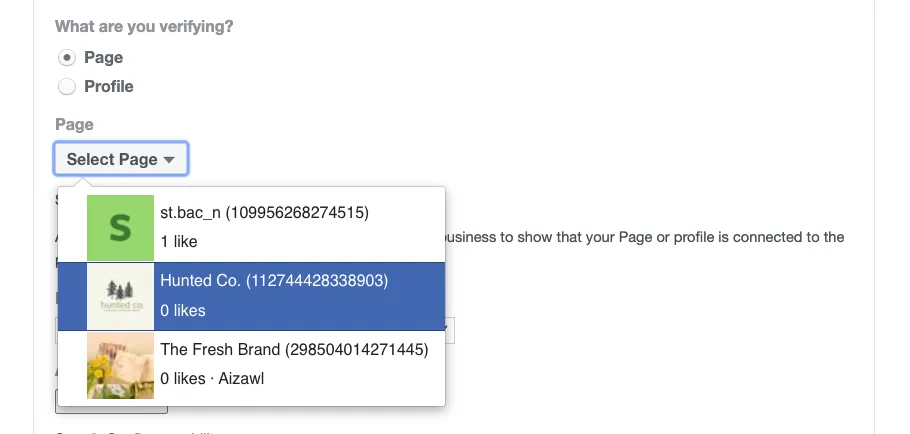
Once you’re on the form, select the type of account you’re applying for verification. You can choose from a page or a profile, depending on what you’re applying for.
3. Upload identity documentation
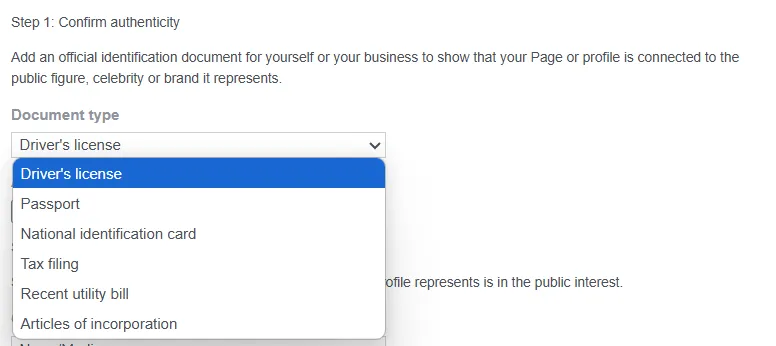
Facebook requires you to prove your identity. Upload a government-issued ID such as a passport, driver’s license, or national ID card. This step ensures that Facebook can verify that you are who you say you are.
4. Provide evidence of notability
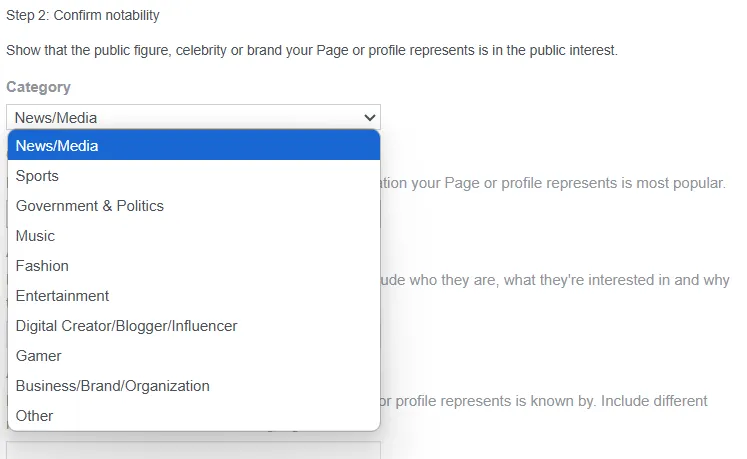
Notability is one of the most crucial aspects of the verification process. You must demonstrate that your profile or page represents a well-known entity.
5. Add your country
Enter your country or region name. This helps Facebook understand where you’re located, which can affect the eligibility criteria and content visibility.

6. Add your audience description and also known as
Provide a brief description of your audience or followers. You’ll also need to include any “also known as” (AKAs) if your name or brand is commonly recognized by a different name, alias, or nickname.

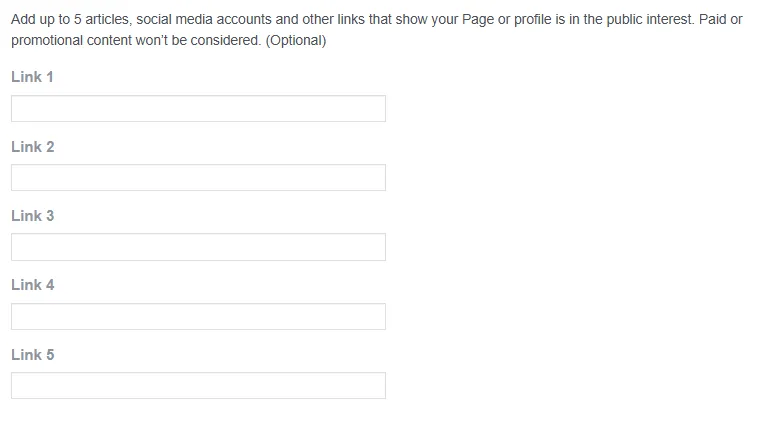
7. Include 5 articles that show your Page or profile is in the public interest
To prove your public interest, you must provide links to at least 5 articles or other online mentions that demonstrate your page or profile’s relevance.
These could be news articles, interviews, blog posts, or other media that highlight your presence and contributions.
8. Submit the form and await a decision
After filling out the form and uploading all required documentation, hit the “Send” button to submit your application. Facebook will now begin the review process.
Facebook evaluates a variety of factors to determine whether you qualify for verification. These factors include the authenticity of your account, your notability, and whether the account is complete with all required information. Facebook will check for a consistent profile, a public presence, and a significant level of recognition in your field or industry.
Once you’ve submitted your request, the review process typically takes about 1 to 2 weeks, although it can sometimes take faster (about 3 business days), or longer (up to 45 days). You’ll receive a notification on Facebook about the outcome of your request.
If approved, you’ll receive a blue verification badge that will appear next to your name, indicating that you’ve been officially verified by Facebook. If denied, Facebook will provide a reason, and you can address any issues before reapplying. In some cases, Facebook allows you to reapply after 30 days.
How to Get Verified on Facebook with Meta Verified
If you’re looking for an even quicker way to get verified on Facebook or want additional benefits, Meta Verified is an option worth considering.
Unlike the free verification process, which relies on meeting specific criteria and providing evidence of notability, Meta Verified is a paid subscription that offers extra features alongside the blue checkmark.
Now, let’s go through how to get verified on Facebook with Meta Verified and highlight the perks that come with it, offering a more streamlined and enhanced verification experience.
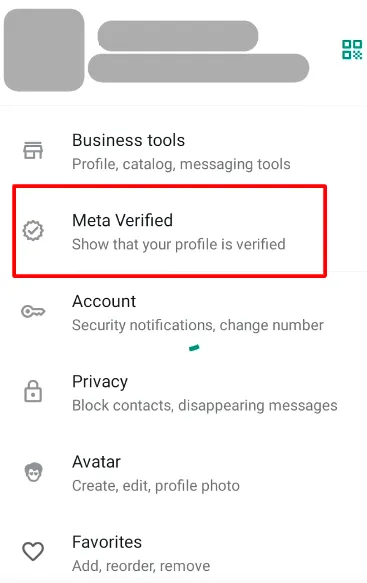
1. Log in to Facebook & access Meta Verified option
– After logging in, go to your Facebook profile.
– Tap the three dots next to your profile photo.
– Scroll down and select “Meta Verified”
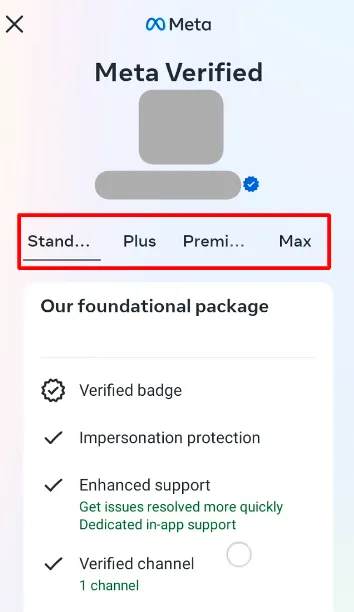
2. Choose your verification plan
You’ll see the 4 pricing plan options of Meta Verified, which are:
- Standard
- Plus
- Premium
- Max
Choose the plan that suits your needs.
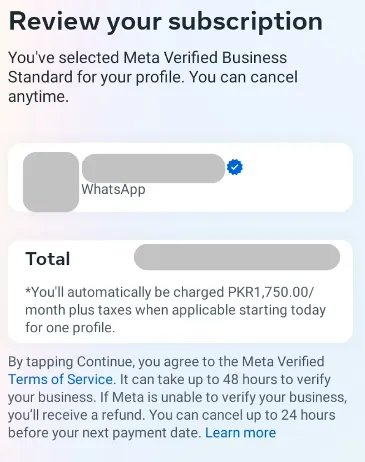
3. Review your subscription
Now, review your subscription and the total amount that you need to pay.
4. Wait for approval
Once done, hit Submit, and Facebook will start taking consideration of your request.
Verification may take up to 48 hours. You’ll receive confirmation once Meta reviews your application.
It’s Time to Promote Products on Facebook & Drive Sales!
Unlock the full potential of your Facebook listings with features like Smart Rules, Advanced Categorization, Field Mapping, and Flexible Sync Schedules. Optimize your product feed and start driving more sales today!
5 Tips to Increase Your Chances of Getting Verified
So, you’re ready to make that blue checkmark yours. But you’re not quite sure how to get verified on Facebook successfully. While Facebook doesn’t hand out verification badges to just anyone, there are smart ways to boost your chances.
Below are five practical tips that can help you build credibility, stand out from the crowd, and show Facebook you’re the real deal.
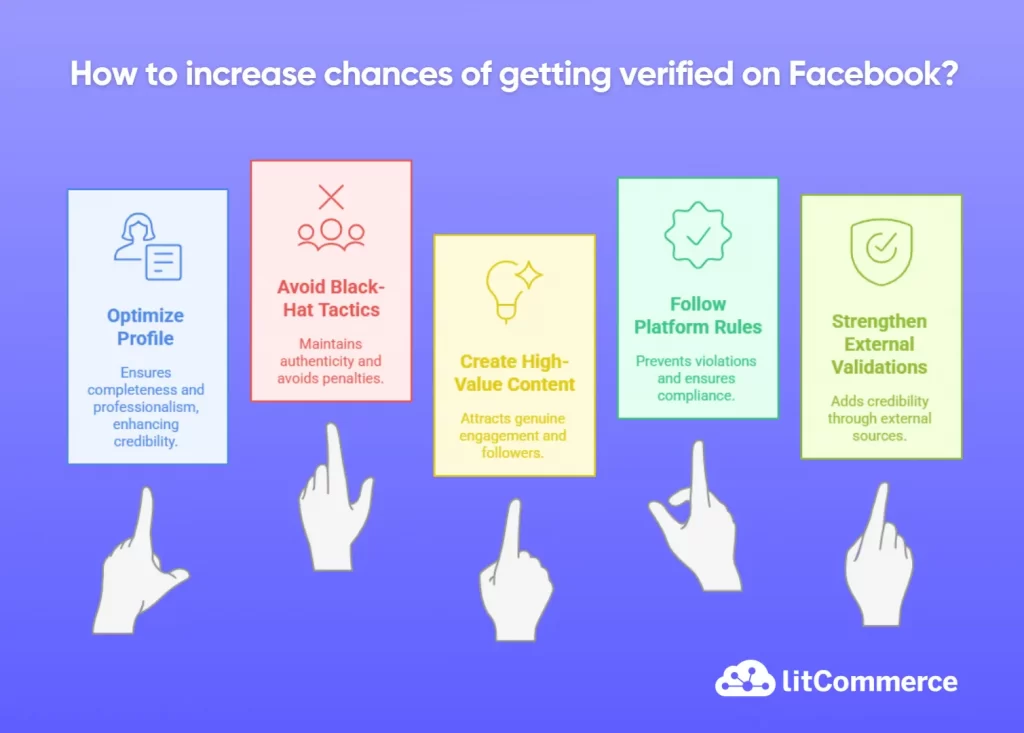
1. Optimize your profile/page completeness and professionalism
Make sure your Facebook page looks 100% legit and filled out. That means uploading a clear, high-resolution profile picture and an on-brand cover photo, writing a solid bio, and filling in every detail from your website to contact info.
Think of it like dressing your profile in a sharp suit – an incomplete or sloppy page (missing info, typos, low-quality images) can raise red flags and even lead to a rejected verification request.
Double-check that everything is up-to-date and polished, so Facebook sees a credible, professional presence at first glance.
2. Avoid black-hat tactics (fake followers, shady press)
Resist the temptation to “hack” your way to verification with sketchy shortcuts. Buying thousands of fake followers or using bots might pump up your numbers, but Facebook’s not fooled; fake followers actually hurt your verification chances (and could get your account flagged).
Also, don’t waste money on spammy press releases or pay-to-play articles hoping to game the system, since Facebook ignores sponsored/promotional content when evaluating notability. Keep it authentic and organic – grow your audience naturally and stick to genuine media coverage.
Black-hat tricks might seem like a quick win, but they can do more harm than good when you’re trying to prove you’re the real deal.
3. Create high-value content and maintain active engagement
Show Facebook that your page is alive and kicking. Regularly post high-value content that your audience loves – for example, share behind-the-scenes peeks, expert tips, or engaging videos that reflect your brand’s personality.
What’s more, Facebook expects well-produced, authentic posts (no spam or sloppy, low-res stuff) from pages worthy of verification. Just as important is interaction – encourage people to comment and react, then respond to them and keep the conversation going.
An active page with consistent engagement signals to Facebook that you have a real, interested fan base and you’re not just a flash in the pan. In short, be present and be valuable, and your credibility will grow.
4. Make sure your Page name follows Facebook’s rules
Before applying for verification, make sure your Page name follows Facebook’s official Page Naming Guidelines. Here’s what not to include:
Avoid these in your Page name:
- Abusive or rights-violating terms: Anything that could be offensive or infringe on someone else’s rights.
- The word “official”: Unless your Page is truly the official page of a brand, public figure, or organization.
- Weird capitalization: No “tHe BeSt CaFe” stuff. Use proper capitalization (acronyms like NASA are fine).
- Symbols or punctuation: Leave out things like ®, ™, or unnecessary punctuation marks.
- Slogans or descriptions: Skip taglines like “The Best Coffee in Town.” Save that for your About section.
- Any form of “Facebook” or “Meta”: Don’t use these in your Page name unless you’re part of the company.
Also, make sure your Page name isn’t just:
- A single, general word (like “Coffee” or “Shoes”).
- A broad geographic term (like “New York”) – unless it’s tied to an official organization, e.g., “New York City – Mayor’s Office.”
Sticking to these rules not only avoids getting flagged but also makes your Page look more credible and ready for that blue check.
5. Strengthen your backlink profile with external validations
Link your official website to your Facebook page and vice versa. This two-way street of links helps prove that your Facebook profile is an official extension of your brand. It’s also a good idea to get other trustworthy sites pointing to you. For instance, listings on industry directories, references on partner websites, or even a Wikipedia page if you’re notable enough.
Facebook’s verification form lets you share external links as proof of your identity and fame, so take advantage by compiling solid evidence (news articles, your other verified social accounts, etc.) that the online world recognizes you. The more external validation and quality backlinks you have, the more Facebook will be convinced that you are who you say you are – and worthy of that blue check.
What to Do if Your Verification Request Is Rejected
Even if you meet all the basic verification criteria, Facebook may still reject your application for reasons that aren’t always clear. Unfortunately, Facebook doesn’t always provide specific feedback on why an application is denied.
Here are some possible reasons why Facebook rejects your request to get verified:
- Missing crucial elements like a profile picture, bio, or contact details
- Lack of notability or insufficient public interest and media coverage
- Suspected impersonation of someone else
- Inactive account with low engagement or irregular posting
- Previous violations of Facebook’s community standards or terms of service
- Use of unusual or misleading names, or excessive keywords in the account name
- Duplicate accounts under the same name or brand
However, understanding common reasons for rejection and knowing the steps you can take to improve your chances will help you in your next attempt.
- Reach out to Facebook support for clarification: While Facebook doesn’t always provide detailed reasons for rejection, reaching out to their support team is a proactive step. If you can gather specific feedback, you’ll have a clearer understanding of what went wrong. Ask targeted questions to identify exactly where your application fell short. Did you fail to meet notability criteria? Was your profile incomplete? Knowing the specifics will allow you to make the necessary adjustments to your profile or strategy before reapplying. This can save you valuable time and improve the quality of your next submission.
- Boost your social media presence across other platforms: If you’re active on other social networks like Instagram, Twitter, or LinkedIn, use these platforms to your advantage. Strengthening your presence across multiple channels signals to Facebook that your brand or persona is influential and well-established, which can be a crucial factor in the verification process. Engaging with your audience consistently and creating high-quality, relevant content will elevate your credibility. Moreover, ensure that your branding is unified across all platforms, this means using consistent names, logos, and messaging. An active and well-curated online presence across multiple platforms enhances your chances of proving notability, which is often a deciding factor in Facebook’s verification decision.
Keep in mind that the process may take some time and patience, but with consistent effort and strategic actions, Facebook verification can become a reality for you.
Staying Verified: How to Keep the Badge (and Your Reputation)
Once you’ve successfully learned how to verify Facebook account, it’s important to maintain both your verified status and your reputation. Here are a few key practices to ensure your blue checkmark remains intact:
- Maintain consistency: Keep your profile and content consistent. This includes using your real name, accurate information, and the same branding across your social media channels. Avoid making major changes that could confuse Facebook’s verification team.
- Follow community guidelines: Always adhere to Facebook’s community standards. Violating these rules can lead to penalties, including the removal of your verification badge.
- Stay active: Regularly update your profile and post high-quality content. Engaging with your audience consistently helps keep your account relevant and trustworthy.
- Protect your account: Enable two-factor authentication and follow best practices for account security to prevent unauthorized access. A compromised account can lead to the removal of your verified status.
- Avoid misleading behavior: Don’t misuse your verified status for misleading or deceptive actions. Transparency is key to maintaining trust with both Facebook and your followers.
How to Get Verified on Facebook – FAQs
What does a blue check mark mean on Facebook?
A blue check mark on Facebook indicates that the account has been verified by Facebook as authentic. It means the account is not fake or impersonating someone else and belongs to the person, brand, or organization it claims to represent. This badge helps users easily identify legitimate profiles or pages, providing a sense of trust and security.
Can you get verified on Facebook and Instagram together?
Yes, you can get verified on both Facebook and Instagram through Meta Verified, which is a paid subscription service. This allows you to receive a blue checkmark on both platforms with a single verification process, offering extra perks like enhanced account protection and direct customer support.
Why should you get verified on Facebook?
Getting verified on Facebook increases your credibility and trustworthiness, especially for businesses, public figures, and influencers. It helps distinguish your authentic profile from fake accounts, boosts your visibility in search results and feeds, and improves your engagement. Verification also protects you from impersonation and adds a layer of professionalism to your online presence.
How do I secure my verified Facebook account?
To secure your verified Facebook account, start by enabling two-factor authentication to add an extra layer of protection. Use a strong, unique password and avoid sharing your login credentials. Regularly review your account’s security settings and ensure that only trusted devices have access to your account. These steps will help safeguard your account from unauthorized access and protect your verified status.
Final Thoughts
Learning how to get verified on Facebook is an essential step for building trust, increasing visibility, and protecting your online presence. While the process might seem daunting at first, following the steps for free verification or opting for Meta Verified can give your account the legitimacy it deserves. Remember, staying active, adhering to Facebook’s community guidelines, and maintaining consistency across platforms are key to keeping your blue checkmark.
If you’re looking to expand your online presence further, LitCommerce product feed management tool can help streamline your eCommerce efforts across multiple channels, ensuring your products are always up-to-date and optimized for each marketplace. To learn more about how you can simplify your multichannel selling process, explore our eCommerce blog for valuable tips, insights, and updates on the latest trends in the industry.

