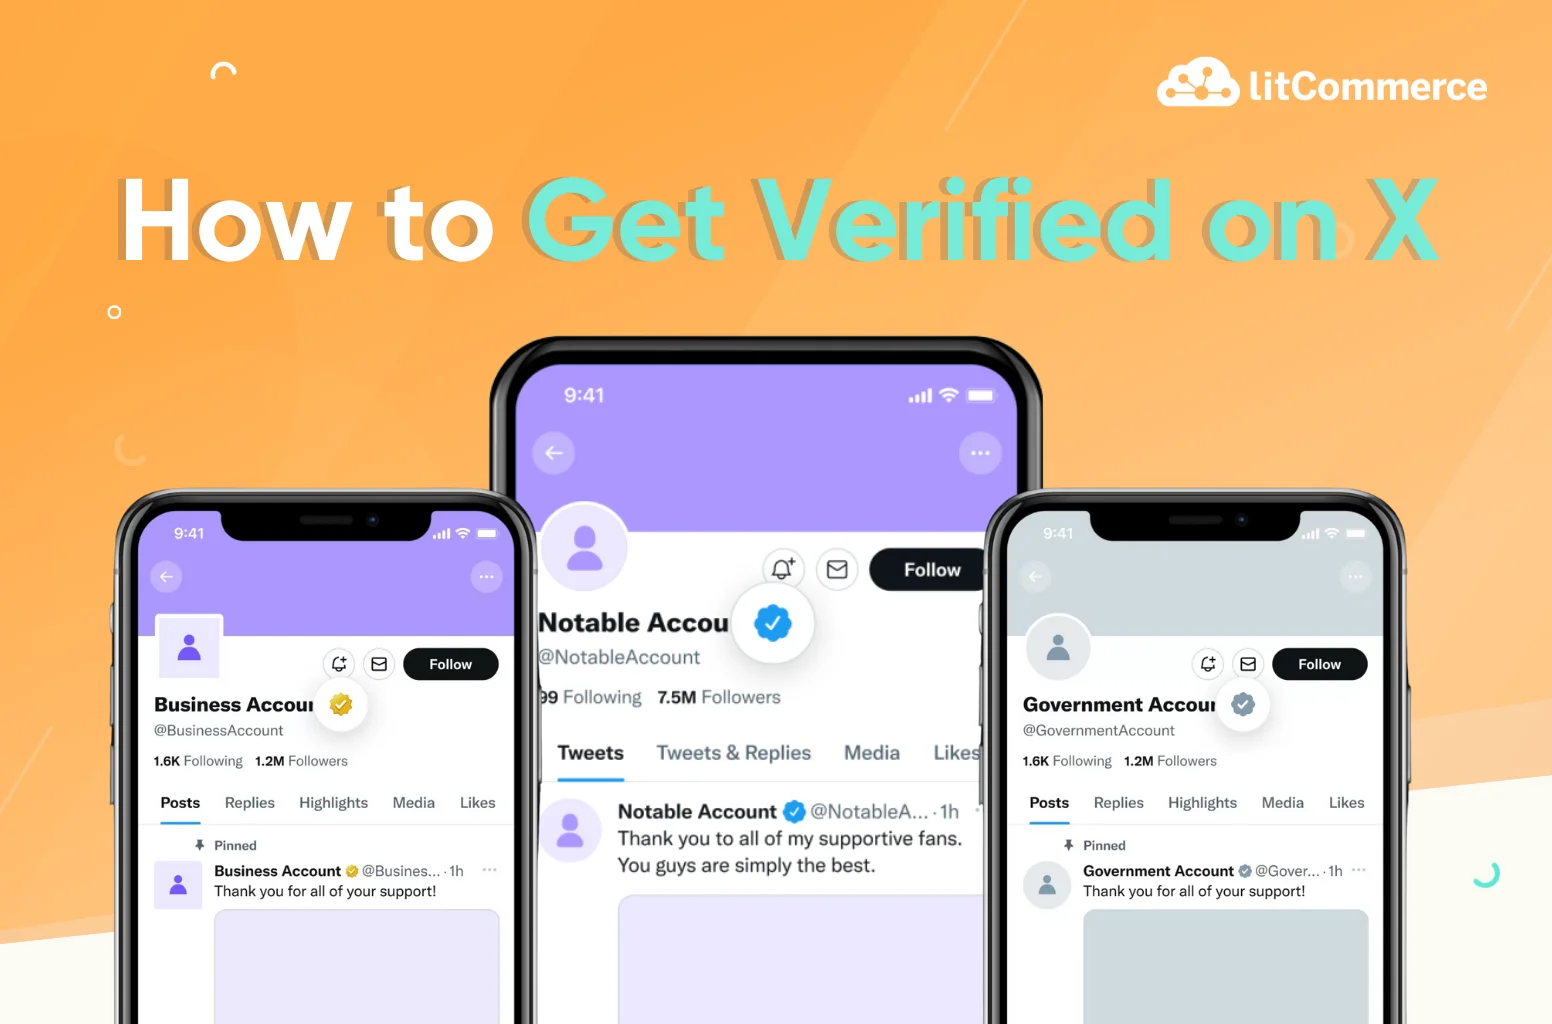
Getting the blue check on X (formerly Twitter) is more than just a symbol. It shows that you are real, trusted, and active. If you’re trying to figure out how to get verified on X, you’re in the right place.
Since Twitter became X, the rules for verification have changed. Many users now feel unsure about what to do next.
Don’t worry! The process is easier than it looks. When you verify your account, you gain more trust, reach more people, and unlock cool tools like longer posts and fewer ads. In this guide, you’ll learn each step clearly so you can get your blue check fast and confidently.
Key takeaways
- X (formerly Twitter) now uses a subscription-based system for verification.
- A verified X account displays a blue checkmark linked to an active X Premium subscription.
- There are several verification badge types: blue (individuals), gold (businesses), gray (governments), plus affiliation and automated account labels.
- To get verified, you must subscribe to X Premium, complete your profile, stay active, and confirm your phone number.
- After applying, you’ll need to wait for account review and approval.
- To improve your chances, keep your tweets public and add links to verified accounts in your bio.
- Show authenticity, highlight achievements, and share engaging content that attracts public interest.
What Does the Blue Check on X Mean?
The blue check on X (formerly Twitter) shows that you are part of the X Premium subscription. When you are X verified, the badge appears next to your username. You will also see it on your tweets and in search results. This blue check helps others know that your account is active, real, and follows X’s rules.

Since April 1, 2023, you must join X Premium to get the blue check. To qualify, you need a profile photo, a display name, and a verified phone number. You also need to use your account at least once every 30 days. X reviews each account to make sure it doesn’t break any rules or mislead other users.
However, remember that the blue check does not mean X supports or endorses you. It only shows that your account has an active Premium subscription. The badge always has the same white checkmark shape, but its color can change based on your account type.
If you break the rules or your account looks suspicious, you may lose your verification. Knowing this helps you understand what to do next when learning how to get verified on X.
Types of Verification Badges on X (Twitter)
X uses different verification badges to show what type of account you have. Each color and design means something unique about your role or identity on the platform. Understanding these badges will help you know what to expect when learning how to get verified on X.
1. Blue Check – Individuals / X Premium subscribers
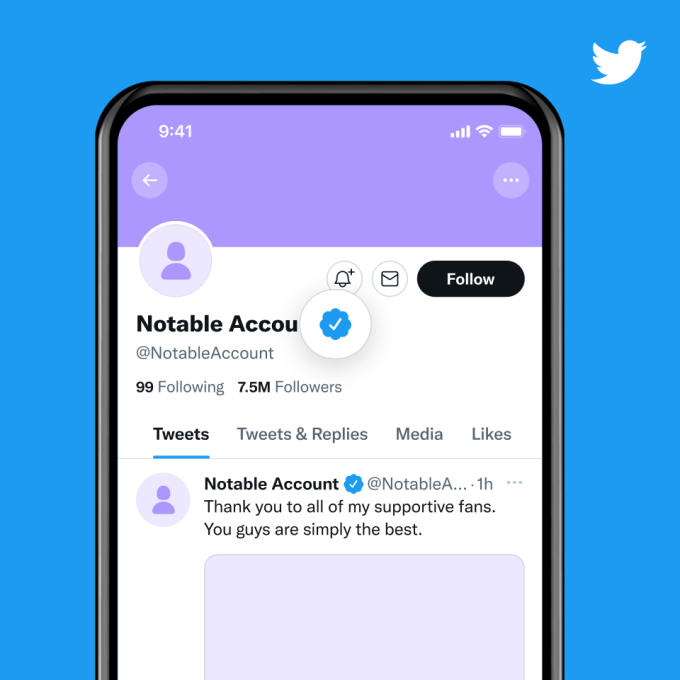
The X blue checkmark is the most common verification badge on the platform. It’s for individual users with an active X Premium or Premium+ subscription. Anyone who meets the eligibility rules and pays for the plan can get this badge.
While it no longer marks someone as a public figure, it shows that the account is active and approved through the X verification process.
Unlike the old system, these accounts aren’t reviewed based on active, notable, and authentic criteria. This change highlights X’s move toward a subscription-based model for verification, with premium plans starting at $3/month or $32/year. The blue check also helps your account look more credible and trustworthy.
2. Gold Check – Verified businesses
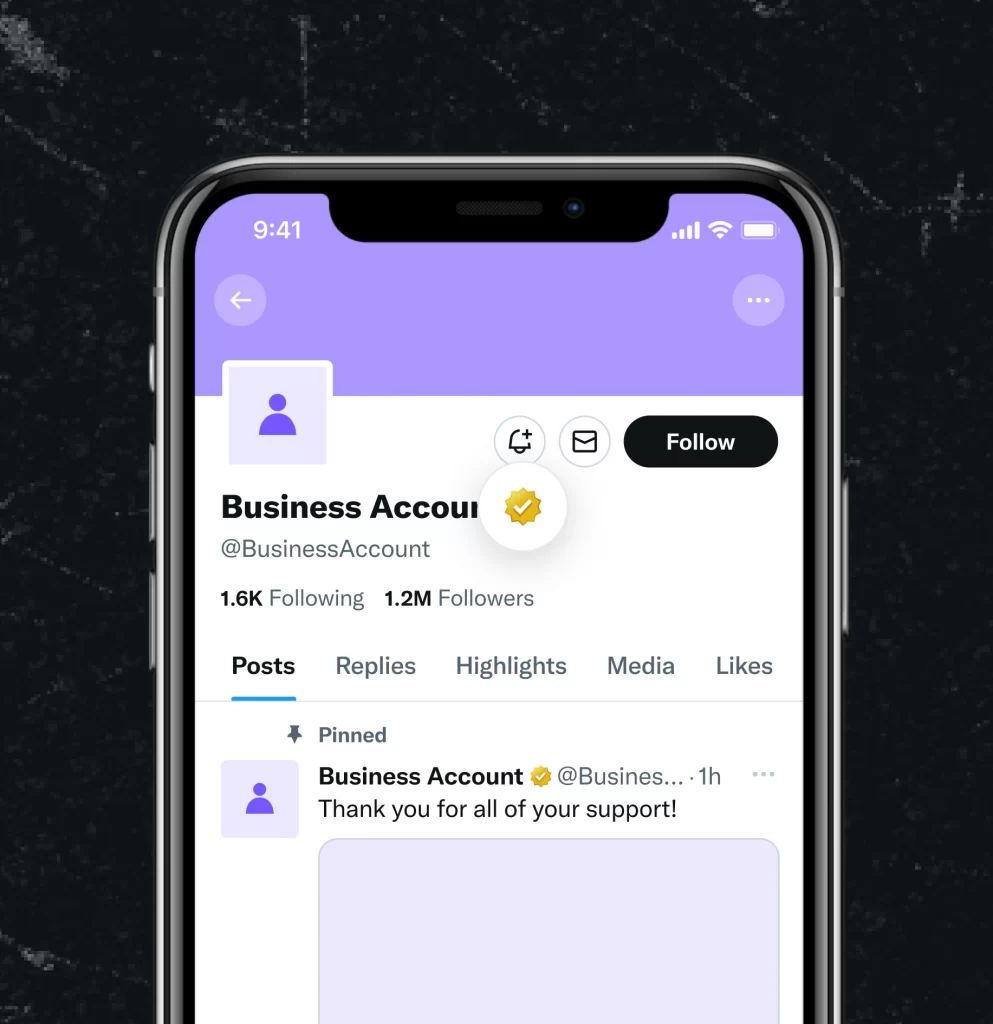
The gold checkmark, which appears with a square profile picture, is for verified organizations. This includes companies, brands, and nonprofits. The gold badge comes with a higher subscription fee and includes tools for managing multiple connected accounts.
Prices for this type of subscription begin at $200 per month, which is a significant drop from the original $1,000 per month. For that price, organizations get access to advanced features, including the ability to verify affiliated accounts.
For example, a news company can mark its reporters as official members, or a brand can verify its regional branches. The gold check makes it clear that the account belongs to a legitimate and recognized organization.
Want to know more about what X is for businesses? Check out our detailed article to learn: X for Business: Features, How to Get Started & Grow.
3. Gray Check – Government or organization accounts
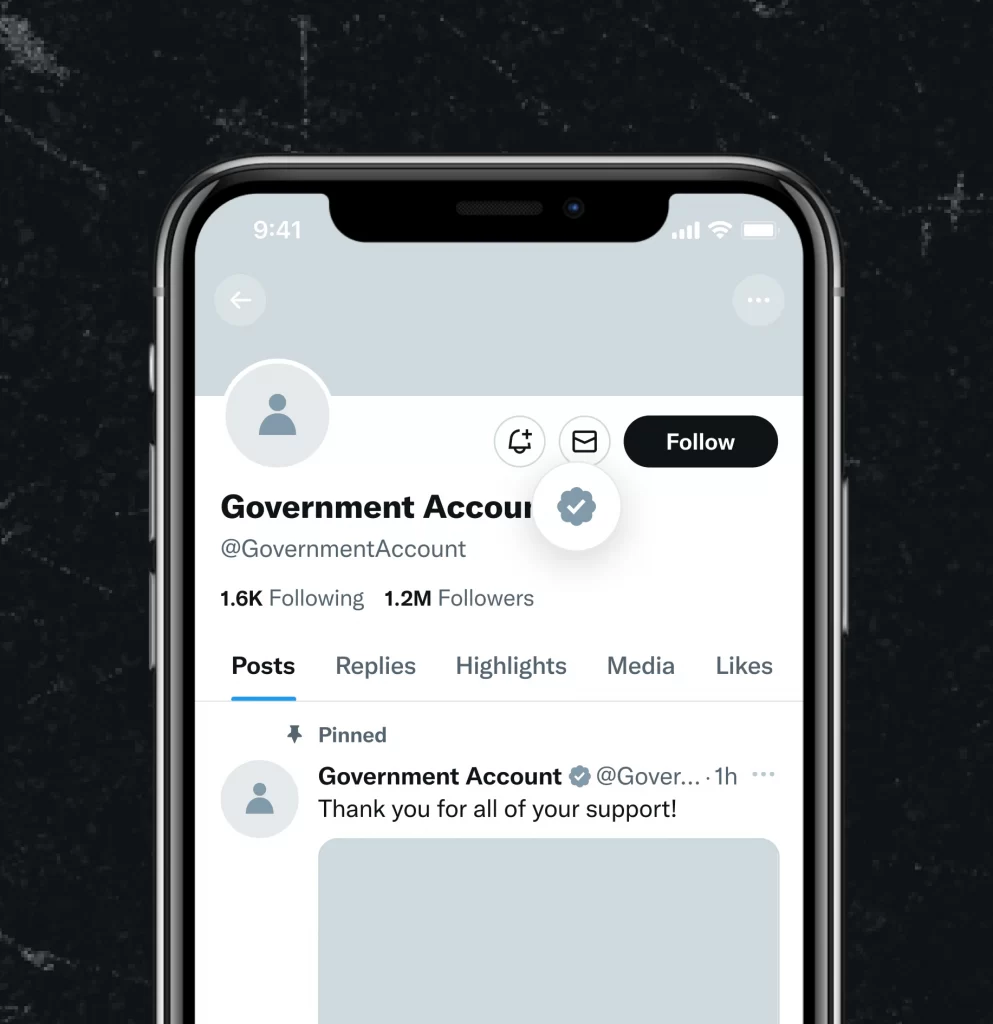
The gray checkmark is designated for government agencies and their officials. It applies to all levels of government, both national and local, including heads of state, cabinet members, embassies, and military leaders. This badge helps users easily identify official government accounts that share verified information or public announcements.
Here are the main categories eligible for a gray check on X (Twitter):
- Government organizations: Executive office accounts, agency accounts for specific policy areas, embassy and consulate accounts, and parliamentary or committee accounts.
- State and local government organizations: Executive office accounts, public safety agencies, law enforcement, regulatory offices, and crisis response units.
- Individuals: Heads and deputy heads of state (such as presidents, monarchs, or prime ministers), national-level cabinet members, members of parliament or congress, and official spokespeople.
- Multilateral organizations and officials: Headquarters-level accounts, regional or country-level accounts, and accounts belonging to heads or deputy heads of international organizations.
The gray checkmark ensures that information shared from these verified government and institutional accounts is credible and easily recognizable.
4. Affiliation badges and automated account labels
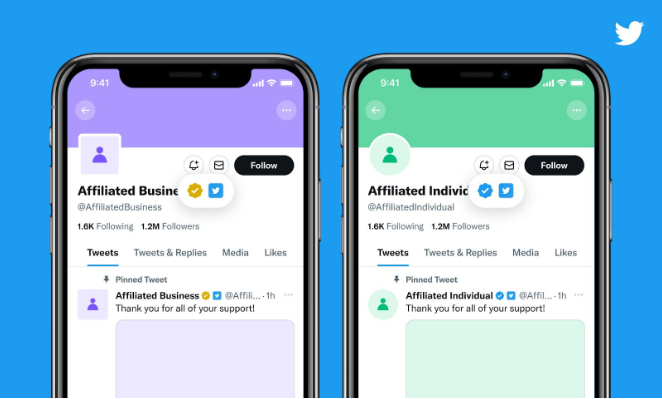
Affiliation badges extend X’s verification system by connecting individual accounts to verified organizations. These badges include the organization’s profile photo, helping users easily recognize that the person is officially linked to that verified entity. For example, a journalist may have their publication’s logo next to their name, or a company employee may display their brand’s logo on their profile.
X may independently confirm these affiliations through business partnerships or direct outreach to ensure authenticity and prevent misuse.
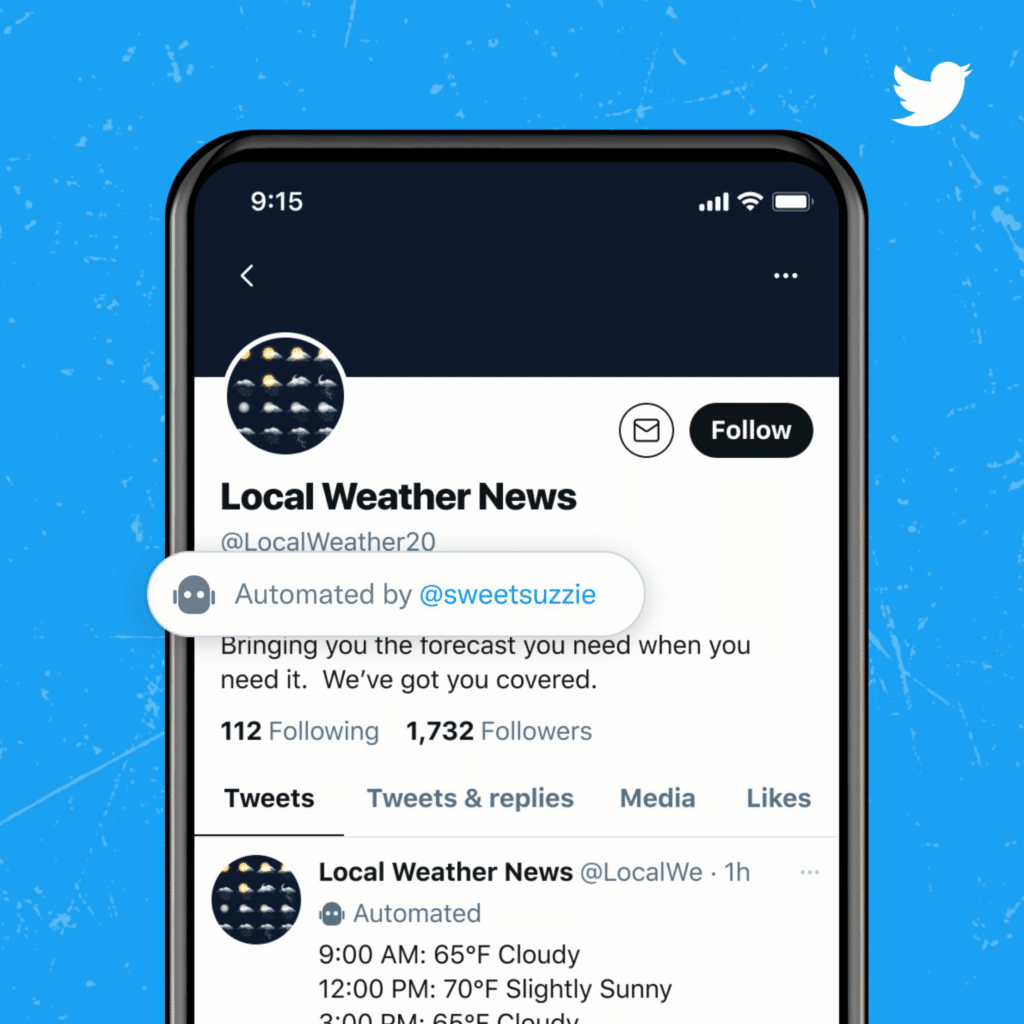
Meanwhile, automated account labels are being tested to identify bot or automated accounts. These labels make it clear when posts come from automated systems instead of humans. By showing which content is generated by automation or AI, X helps users better understand the source and supports the fight against misinformation.
Eligibility Criteria Before Applying for Verification
Getting verified on X is now easier than ever. You no longer need to be a public figure, celebrity, or journalist to earn the badge. As of 2024, anyone can get the Twitter verified checkmark by subscribing to X Premium. Still, X has specific rules you must meet before applying.
Here are the current eligibility criteria for how to get verified on X:
- Complete profile: You need a profile photo and a display name that clearly represent you or your brand.
- Recent activity: Your account must be active and used at least once within the past 30 days before applying.
- Confirmed phone number: You must verify your phone number to activate your X Premium subscription.
- Non-deceptive behavior: Your account cannot impersonate others, post spam, or manipulate the platform. You should also avoid frequent or recent changes to your username, profile name, or photo.
Meeting these criteria ensures your account appears trustworthy, active, and ready for X’s verification process.
How to Apply for Twitter Verification (X Premium) – Full Process
If you’re wondering how to get verified on X, the process is now faster and easier than ever. You no longer need to prove that you’re a public figure, journalist, or celebrity. As of 2025, anyone can earn the Twitter verified checkmark by subscribing to X Premium.
Here’s a simple step-by-step guide to help you get verified in just a few minutes:
Step 1: Log in and open X Premium
Start by logging in to the X account you want to verify. You can do this from your desktop or mobile app.
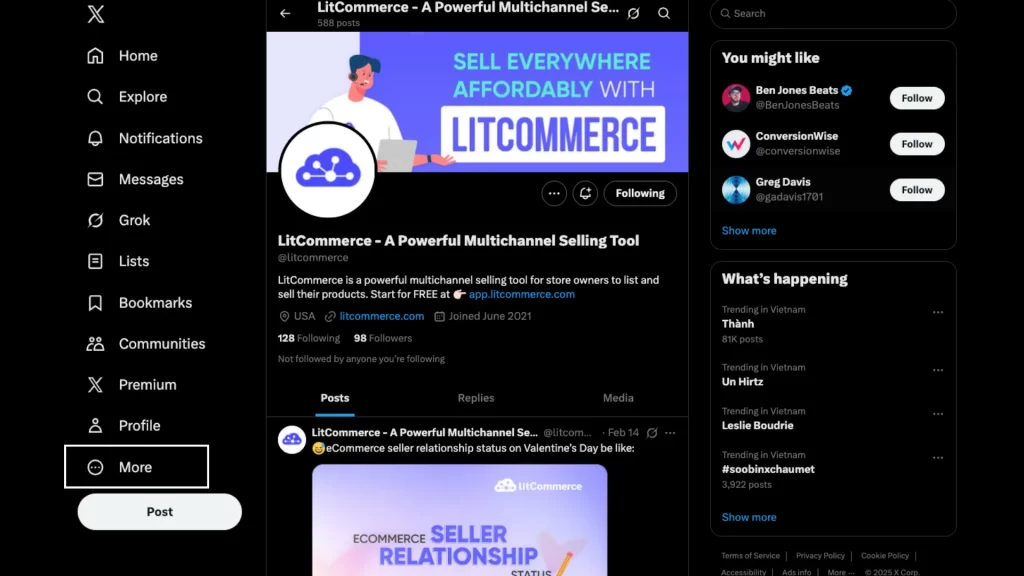
- On desktop: Click More from the left-hand menu, then go to Settings and Privacy → Premium.
- On mobile: Tap your profile picture in the top-left corner, scroll down, and select Premium.
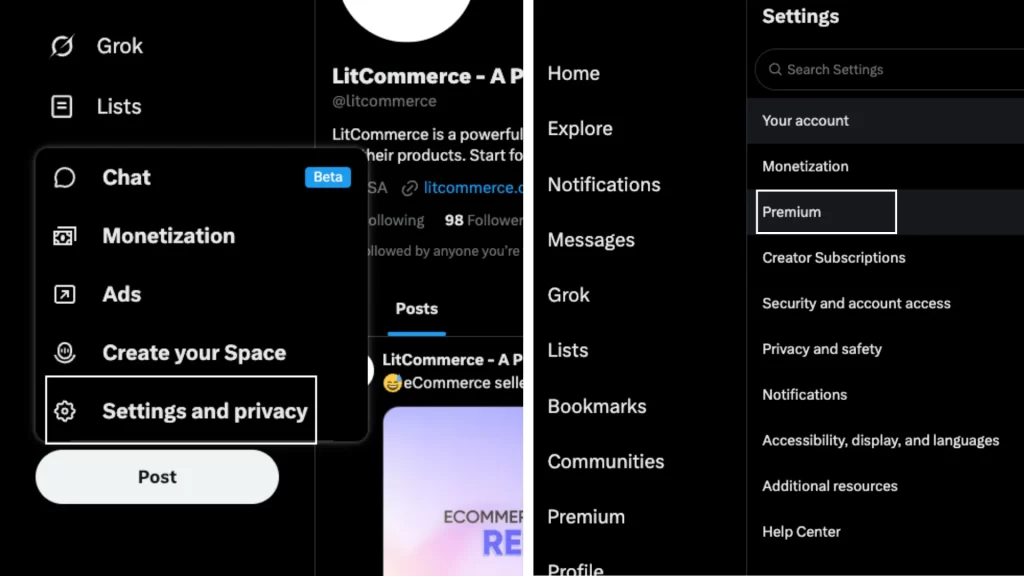
Step 2: Choose a verification plan
You’ll see three plan options: Basic, Premium, and Premium+.
Only Premium and Premium+ plans include the blue verification badge.
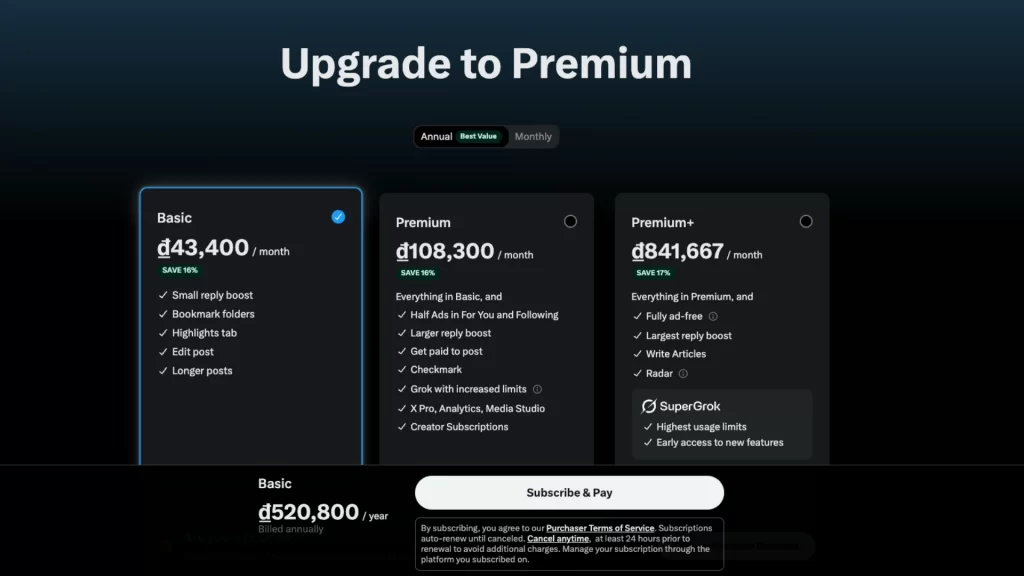
Select your preferred plan and review the included features before subscribing.
Step 3: Add payment details and confirm subscription
Click Subscribe & Pay, then follow the on-screen instructions to complete your payment. Once successful, your account will automatically enter the verification queue.
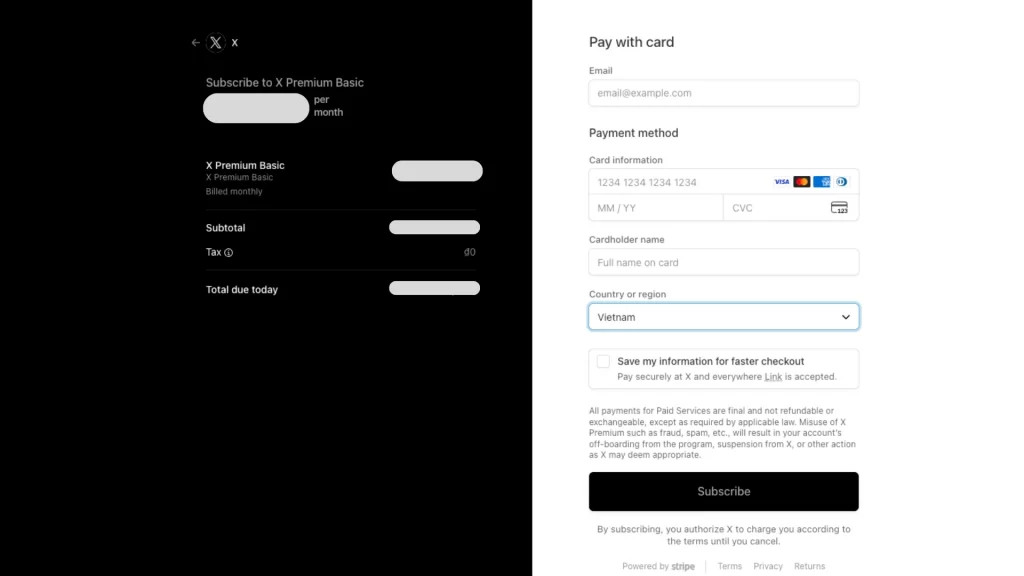
Step 4: Verify your phone number and identity
X requires every verified account to have a confirmed phone number. If you haven’t verified your number yet, you’ll be prompted to do so before your account is approved.
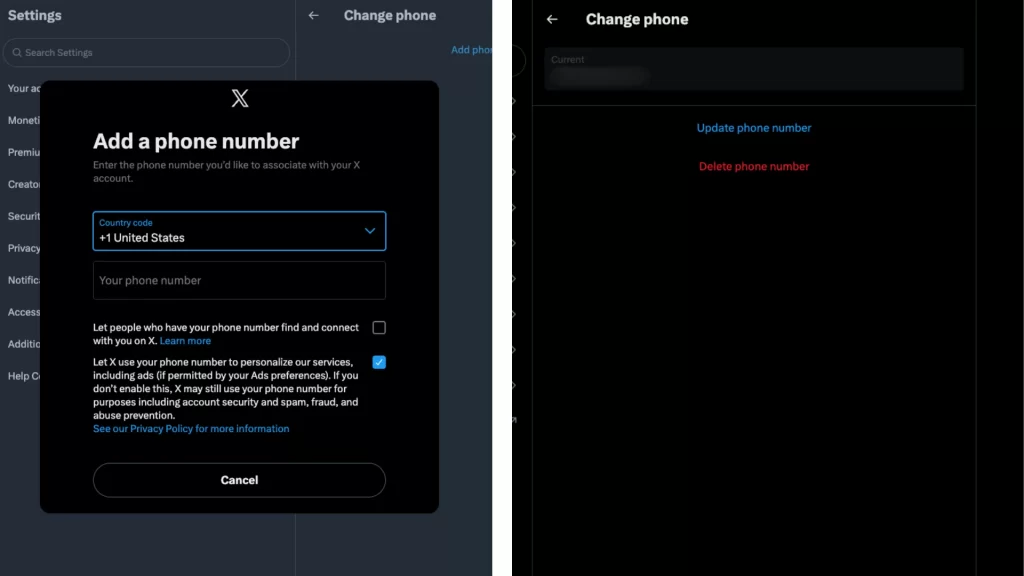
Step 5: Wait for your blue check to appear
After payment and verification, X will briefly review your account for suspicious or deceptive activity. If everything checks out, the blue badge will appear on your profile, usually within a few minutes to 24 hours.
How Long Does It Take to Get Verified on X?
The time it takes to get verified on X (formerly Twitter) can vary. It usually depends on your account type and how complete your information is. For most users, the process takes anywhere from a few minutes to up to two weeks.
1. Individual accounts (Blue Check, X Premium)
If you subscribe to X Premium and meet all the requirements, like having a profile photo, display name, verified phone number, and active account, your blue check is usually approved very quickly. Most users receive their verification within a few minutes after payment and account review.
If your account is new or needs manual review, such as confirming your identity, the process can take 24 to 48 hours, or slightly longer.
2. Age or ID verification (individuals)
Some users may be asked to upload ID or verify their age. X uses automated systems for this step, which often complete the process within a few minutes.
If your images are unclear or require further checking, your verification might be flagged for manual review. This can take one to two days to complete.
3. Business accounts (Gold check, X verified organizations)
For companies and organizations applying for the gold checkmark, verification takes longer. X usually completes these reviews in three to fourteen business days, depending on the workload and how easily your organization’s information can be confirmed.
In short, when learning how to get verified on X, timing depends on your account type and accuracy of your details. Individual Premium users are often verified almost instantly, while business accounts may take up to two weeks.
Pro Tips to Increase Your Chances of Getting Verified on X
Although X has made the verification process subscription-based, there are still smart ways to strengthen your profile and improve your chances of success. These best practices not only help you earn the Twitter verified checkmark faster but also boost your visibility and credibility on the platform.
Here are five practical tips for how to get verified on X:
1. Make your tweets public
Private accounts are less likely to get verified. X views public activity as a sign of authenticity and openness. When your tweets are public, more users can discover and interact with your content, helping you build a stronger online presence.
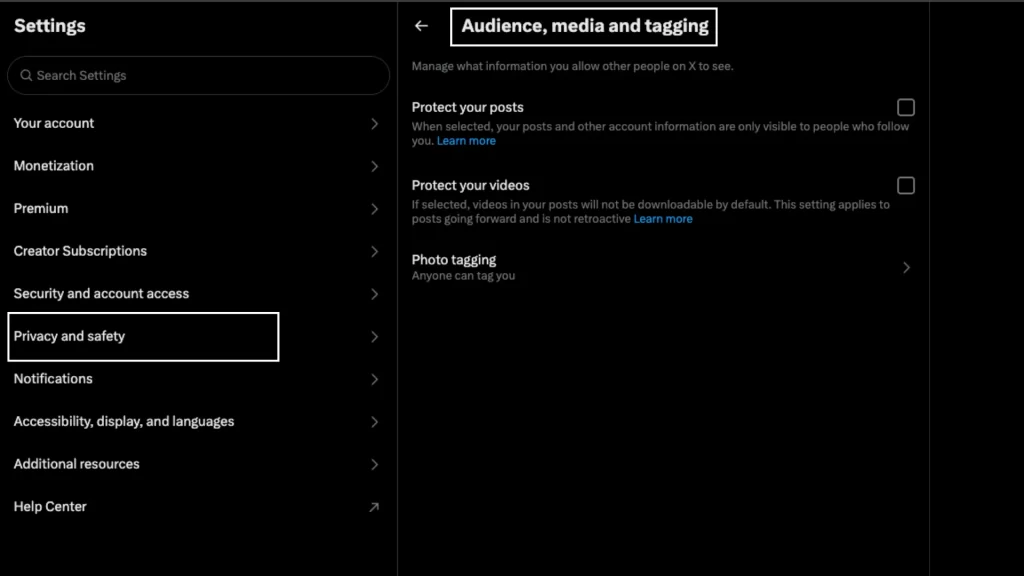
Here’s how to make your tweets public:
- Click More on the bottom-left corner of your screen.
- Go to Settings and Privacy.
- Select Privacy and Safety.
- Under Audience and Tagging, make sure the Protect your Tweets box is unchecked.
This setting shows X that your account is active and open, meeting the basic requirements for the X blue checkmark. The more accessible your posts are, the better your engagement, and that can speed up the verification process.
2. Include links to verified accounts in your bio
Adding links or mentions of verified accounts in your bio helps build trust. It signals that you are part of a credible network or organization.
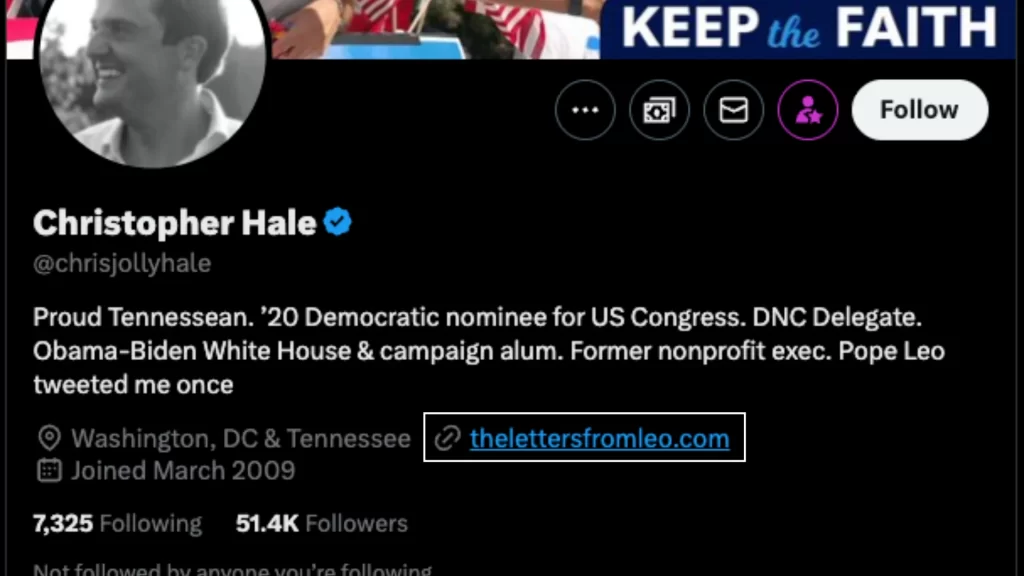
You can include your company handle, your employer, or any verified organization you’ve collaborated with. For example, if you write for a publication or run a startup, mention it in your bio. It’s a simple yet powerful way to make your profile look more legitimate and appealing to both users and X’s system.
3. Showcase your authenticity
Authenticity matters more than ever on X. Use your bio to describe who you are and what you do. For businesses, include your services and how they help customers. For individuals, specify your role or expertise.

Instead of writing “Writer,” say “Columnist @PublicationName” or “Author featured in @NewsOutlet.” This small detail gives your audience instant context and adds professionalism to your profile. You can also include a short quote, call-to-action, or line that reflects your personality.
The more context you give, the more trustworthy your account appears.
You might also want to read: 100+ Twitter Username Ideas to Inspire Your Perfect Handle in 2026.
4. Highlight your achievements

Achievements help you stand out. Share what makes you credible: awards, education, certifications, or special projects. You can list them in your bio or display them in your cover photo for more impact.
Here are a few ideas you can include in your bio:
- “Certified Project Manager”
- “Marketing Specialist at XYZ Company”
- “Graduate of ABC University”
- “Organizer of @LocalEventName”
- “Featured in @LocalNewsOutlet”
You don’t need to be a celebrity to look credible. Even small achievements can show effort, expertise, and authenticity. All qualities help you earn the Twitter verified checkmark.
5. Position your account for public interest
When your content serves the public interest, you attract more followers and engagement. Share posts that educate, inform, or inspire others in your field or community.
If you’re a medical professional, activist, journalist, or organizer, your content can contribute to public discussions. For instance, you can create polls, share your opinion on important topics, or post helpful resources.

This kind of engagement shows X that your account adds value to conversations, which can help you get recognized faster when applying for verification.
By following these steps, you’ll strengthen your profile and improve your overall credibility. Whether you’re focused on growing your brand or simply learning how to get a blue check on Twitter, these best practices can help you stand out and make it easier to earn your Twitter verified checkmark with confidence.
How to Keep Your X Account Verification Long-Term
Getting verified is only the first step — keeping it is just as important. Once you’ve learned how to get verified on X, you’ll want to make sure your badge stays visible. X regularly reviews verified accounts to ensure they remain trustworthy, active, and compliant with its rules. Losing your badge can happen easily if you ignore a few simple but important guidelines.
Here’s what you should do to maintain your verified status long-term:
1. Keep your subscription active
Your blue checkmark depends on your active X Premium or Premium+ plan. If your payment fails or you cancel your subscription, your badge will disappear immediately. Always ensure your payment method is up to date.
2. Avoid frequent profile changes
Changing your profile photo, display name, or username triggers a re-review of your account. During this review, your badge might temporarily vanish and reappear only after confirmation. Too many profile edits can even lead to permanent badge loss. Plan major updates carefully.
3. Maintain a complete profile
Always keep a display name and profile photo visible. Leaving these blank or making drastic changes may cause X to remove your verification status. A complete and consistent profile shows reliability.
4. Stay active on the platform
Post and interact at least once every 30 days. Inactive accounts may lose verification over time. If you plan to take a break, use scheduling tools to keep your account active and engaging.
5. Keep a verified phone number
Make sure your account always has a confirmed phone number. This helps X verify your identity and adds another layer of trust to your account.
6. Follow X’s rules and stay authentic
Avoid impersonating others or using spammy, automated tactics. X monitors verified users for compliance with platform guidelines. Any form of manipulation, misleading behavior, or policy violation can result in badge removal, sometimes without warning.
7. Comply with laws and regulations
X also checks for violations of international trade laws or sanctions. To keep your verification, make sure your account activity and affiliations comply with all legal standards.
8. Legacy accounts must subscribe
If you were verified under the old Twitter system, you now need to subscribe to X Premium to keep your badge. Legacy verification is no longer supported.
Special notes for Gold and Gray badge holders
1. Gold check (Businesses and organizations):
Keep your information accurate and your Verified Organizations subscription active. Major profile changes or policy issues can trigger a review or even badge removal.
2. Gray check (Government or public entities):
This badge is strictly monitored. Any major change in your role or purpose may prompt X to revalidate your eligibility.
Common Issues with Twitter Verification and How to Fix Them
Even after learning how to get verified on Twitter (X), some users still face problems with their verification or badge status. Most issues are easy to fix once you understand what causes them. Below are the most common problems and practical tips to help you solve them quickly.
1. Verification denied or failed
Problem: Your badge disappears or your application gets rejected. This usually happens due to recent profile changes, rule violations, or failed payments.
How to fix it:
- If you recently changed your profile photo, display name, or username, wait 24–48 hours for X to recheck your account. You can also revert your changes to restore your badge faster.
- If your account violated X’s rules or seems spammy, remove suspicious links, delete automation tools, and appeal through X Support once the issue is resolved.
- If your payment failed or your subscription expired, update your card details and resubscribe to X Premium to regain verification.
Tip: Keep your profile stable and ensure your subscription renews automatically to avoid losing the badge.
2. Age or ID verification issues
Problem: Your age or identity check fails due to poor photo quality, expired documents, or mismatched information.
How to fix it:
- Retake your photos in a well-lit area, showing your full face and a clear ID.
- Ensure your ID is valid and up to date, and your profile name matches your ID.
- If you don’t see an age verification prompt, try applying for monetization or contact X Support directly.
- Always verify your email and phone number inside Settings before submitting documents.
Tip: Take time to upload clear, well-lit ID photos that match your account details exactly, as it speeds up the process.
3. “Verify Your Age” message won’t go away
Problem: The system keeps asking for age verification even after you’ve completed it.
How to fix it:
- Check that your birthdate is entered correctly in your profile. Editing or adding it often resolves the issue instantly.
- Log out and back in, clear your cache, or try an incognito window.
- If you’re in a region with stricter privacy laws, use a desktop browser to upload your ID and selfie again.
Tip: Always double-check your profile information before re-uploading your ID to avoid repeated verification loops.
4. Badge removed without warning
Problem: X sometimes removes badges directly without explanation. This can happen after policy updates, technical bugs, or platform reviews.
How to fix it:
- Appeal through X Support if available.
- If your appeal is denied or unanswered, reapply after confirming your profile meets all requirements and follows X’s current verification rules.
Tip: Avoid drastic profile changes or controversial content during policy shifts — X often reevaluates verified accounts during those times.
5. Persistent technical errors or slow support
Problem: You’ve tried fixing the issue but still can’t restore your badge, and X Support isn’t responding.
How to fix it:
- Go to the X Help Center and submit a detailed ticket. Include screenshots or photos of your issue.
- If your ticket remains unresolved, reach out via X’s official support account (@Support) or alternative contact forms.
Tip: When contacting support, stay clear and polite. Providing full context (screenshots, device info, timestamps) helps speed up responses.
FAQs About How to Get Verified on X (Twitter)
Can a private account get verified on X?
No. Private accounts aren’t eligible for verification. X requires your tweets and activity to be public to confirm authenticity and engagement. If you want to learn how to get verified on X, start by making your tweets visible to everyone.
How do you get verified on X if you’re a business?
Businesses can apply through the Verified Organizations program. This gives your brand the gold checkmark, along with tools to verify affiliated accounts like employees or regional pages. You’ll need to subscribe to the program and provide accurate company details for review.
Is there a free way to get verified on X?
Currently, no. Verification is part of the X Premium subscription model. There’s no free option, and even legacy verified users must subscribe to keep their blue badge.
What happens if I cancel X Premium?
Once you cancel your subscription or if a payment fails, your verification badge will be removed right away. If you decide to rejoin later, you’ll need to resubscribe and go through the verification process again.
How long does it take to get verified on X?
The time varies by account type. For most X Premium users, the blue check appears within minutes to 24 hours after payment. For businesses applying for the gold check, the review can take up to two weeks.
Final Thoughts – Is X Premium Verification Worth It?
Getting verified on X is more than just earning a blue checkmark, it’s about building trust, visibility, and opportunity. For creators, brands, and businesses, X Premium verification helps you stand out and connect with a wider audience.
And if you’re selling online, tools like LitCommerce’s Twitter (X) Product Feed Management make it even easier to showcase and sync your products directly to X, helping you drive traffic and sales effortlessly.
Want more growth insights like this? Explore the LitCommerce Blog and LitCommerce resources – your go-to guides for eCommerce strategies, selling tips, and practical ways to grow across every sales channel.

