Setting up Square is a breeze, and this guide is here to walk you through the simple steps. Whether you’re a small business owner or just diving into the world of digital transactions, Square offers a user-friendly platform that streamlines your payment processes. Our guide covers everything you need to know about how to set up Square.
So, let’s get started.
Go Beyond Square — Sell Everywhere
You’ve set up your Square store. Now it’s time to expand! With LitCommerce Square Integration, you can connect Square to eBay, Amazon, Etsy, and TikTok Shop — all syncing back to one dashboard.
Getting Started with Square
Start your Square journey by connecting every part of your business effortlessly. Whether you sell goods or services, Square offers apps, features, integrations, and hardware designed to simplify your daily operations.
But before learning how to set up Square, let’s gather crucial details to ensure your account is ready to roll.
Here is the necessary information you need when setting up Square:
- Full legal name
- Date of birth
- Email address
- Phone number
- Home address
- Shipping address
- A US-based bank account
- Social security number
Additionally, it’s recommended (but not mandatory) to have an Employee Identification Number (EIN) and a business bank account.
Now, you’re ready to set up Square. The following sections guide you through the step-by-step Square setup process.
You might want to read more Square reviews for sellers before setting up your Square account.
Step 1: Setting up a Square account for free
You’ll learn how to set up Square online or in the app, starting by creating a Square account for free.
Sign up for Square online:
- Visit squareup.com and click Get Started.
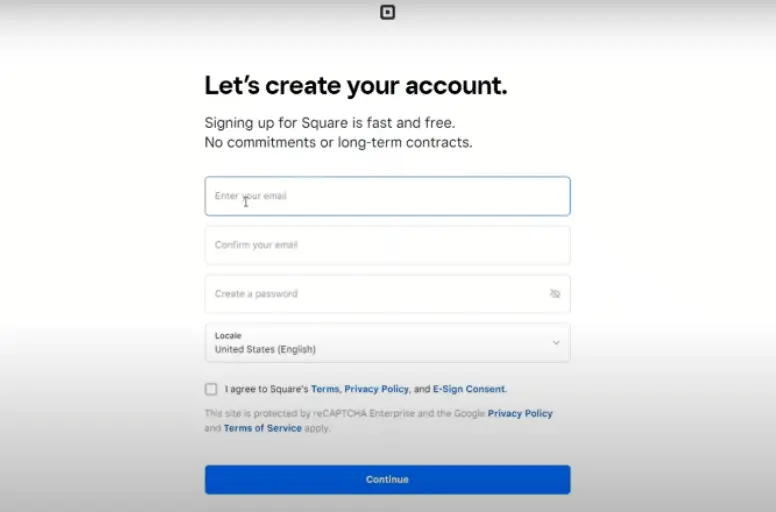
- Enter your email, create a password, and select your region, then click Continue.
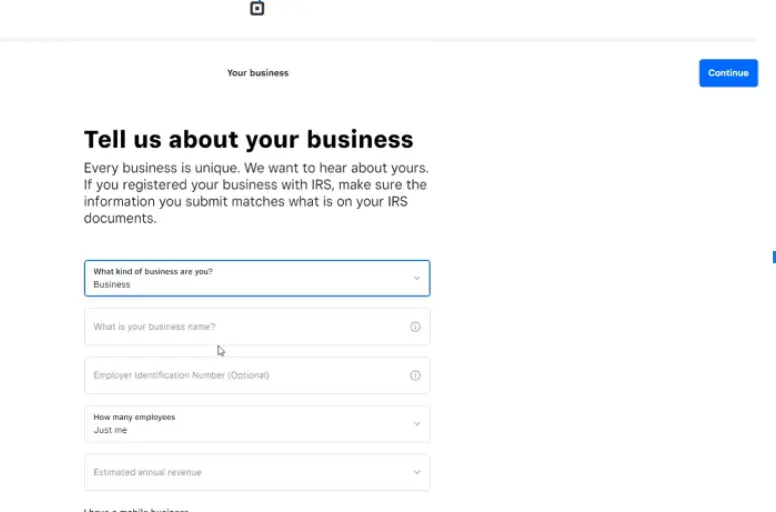
- Choose your business type from the drop-down, provide the required information, and hit Continue.
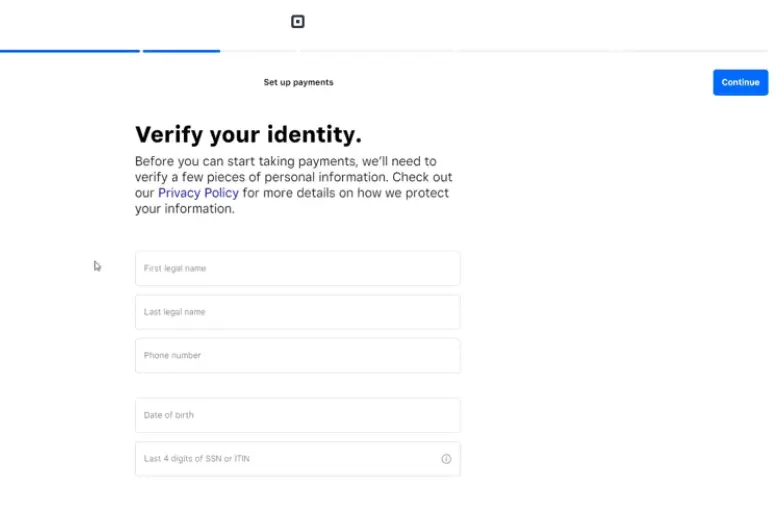
- Answer a few identity verification questions to set up your payments. Then click Continue.
- Link your bank account by filling in the routing number, account details, account holder, and type, then click Continue.
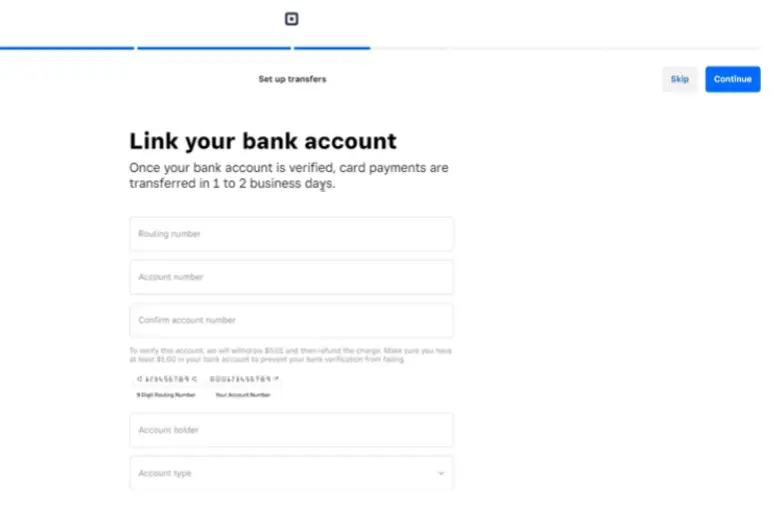
Congratulations! Your Square account is ready.
When you make a Square account, you get a free Square Reader for Stripe. You can decide to order hardware immediately or later.
Sign up for Square in the app:
You can also download the Square App and sign up for a free account there.
- Go to Google Play or the App Store, find Square Point of Sale, and download it.
- Follow the on-screen instructions to complete your free Square account signup.
Once finishing setting up your Square account, you can move on to the next Square guide to setting up your online Dashboard.
Don’t Just Sell on Square — Grow Across Channels
Keep your products, orders, and inventory synced automatically. LitCommerce Square Integration helps you reach new customers across top marketplaces while managing everything from Square.
Step 2: How to Set up Square Dashboard
Your online Square Dashboard is just like your business headquarters. It’s where you do things like add employees, locations, and items, customize your account, and view sales reports, etc.
Let’s delve into the details of setting up Square Dashboard.
Secure your account
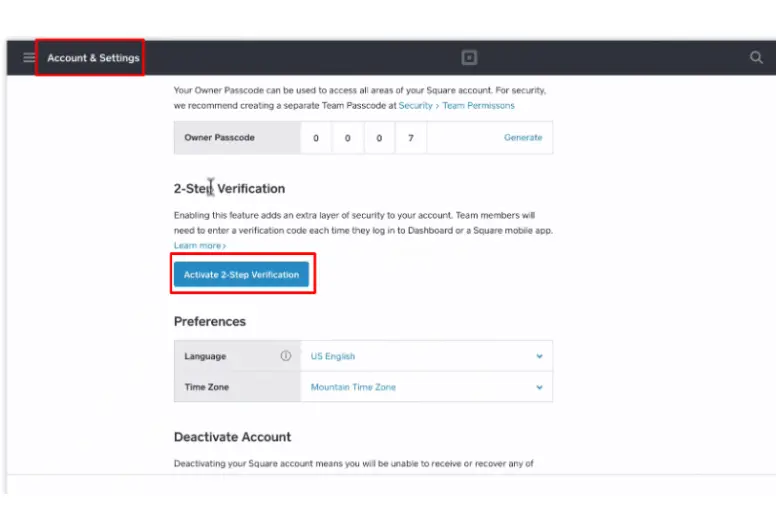
The first step in learning how to set up Square Dashboard is to enable your account security with the 2-Step Verification feature. After you’ve set up and activated your Square account, follow these steps to turn on two-step verification:
- Choose Account & Settings in your Square dashboard. Click Activate 2-Step Verification.
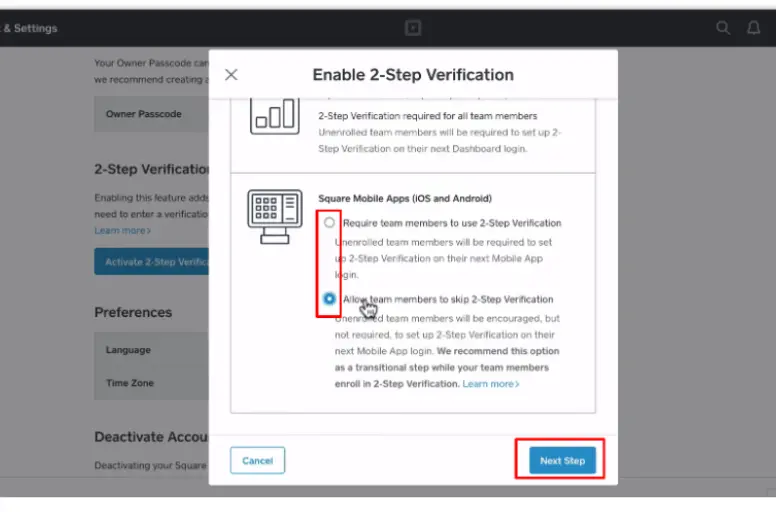
- Select “Require team members to use 2-Step Verification or Allow team members to skip 2-Step Verification. Then, click Next Step.
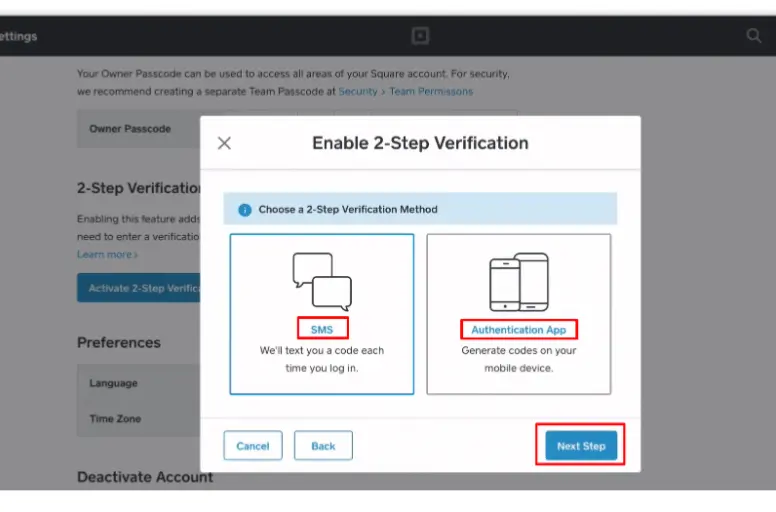
- Choose your preferred 2-step verification method, SMS or Authentication App. Let’s go with SMS for this example. Then, click Next Step.
- Enter your mobile phone number and click Next Step.
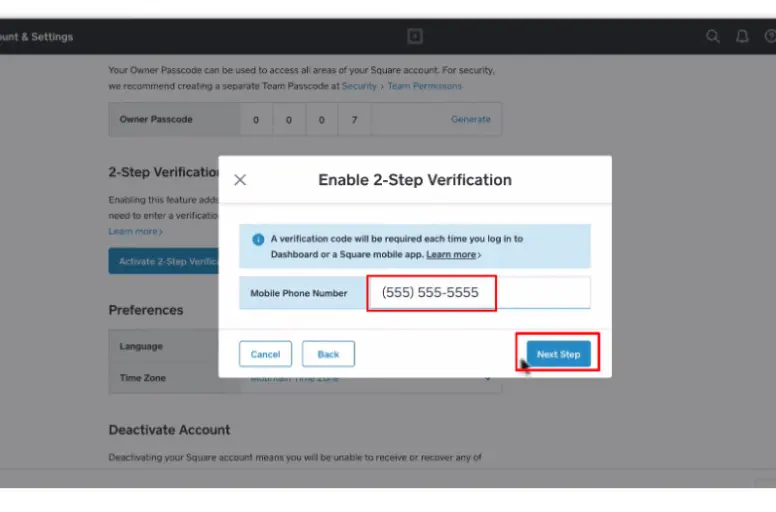
- Square will send you the verification code via text. Enter the code and click Verify.
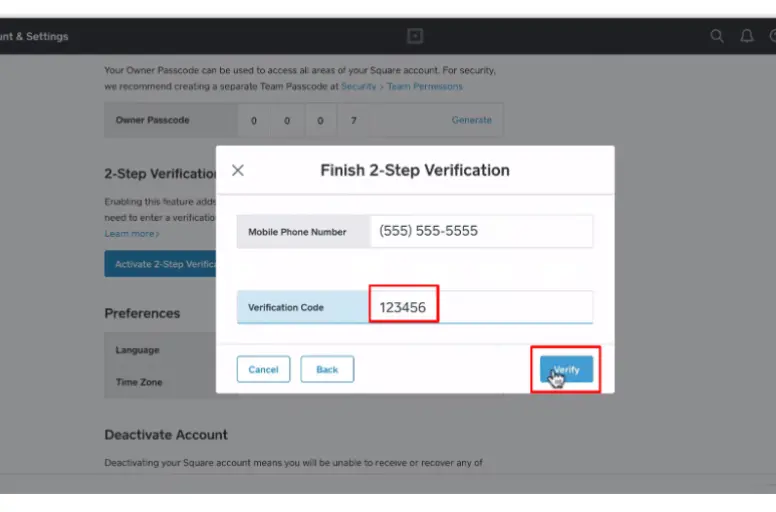
Now that your Square account is secure, let’s explore how to set up transfers to receive your funds conveniently.
Set up Transfers
Square allows you to decide when you get your money. You can choose from its standard schedule, a custom one based on your business hours, or transfer funds to your Square Card.
By default, your funds go to your bank account every night, Sunday to Thursday.
You can stop automatic nightly transfers and switch to manual transfers right from your Square Dashboard, either from your Square app or online Square Dashboard:
Here’s how to set up Square transfers from your online Dashboard:
- In the main menu, choose Balance.
- Pick a location and click Transfer settings.
- Under Transfer Schedule, select Manual.
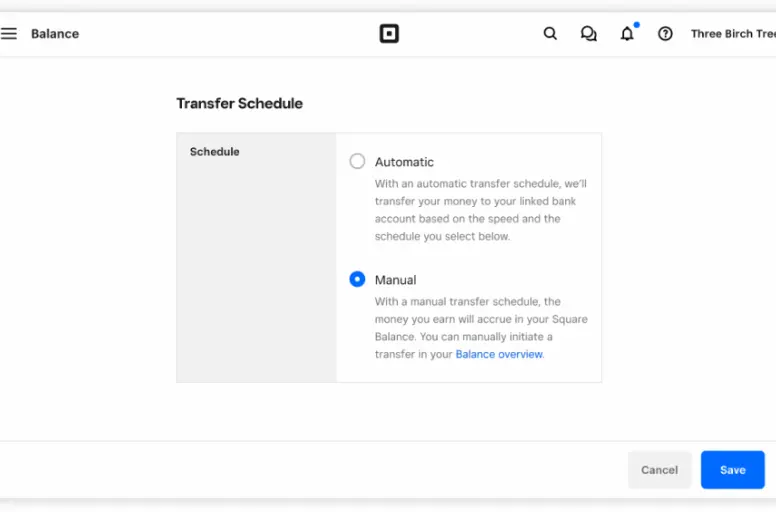
To start transferring manually from your online Square Dashboard:
- Log in to your Dashboard, and choose the Balance tab.
- Choose a location in the Locations section.
- Then, click Transfer out.
And here’s how to set up Square transfer options from your Square POS app:
- Access the transfer option by tapping More and clicking Balance from the main menu.
To manually transfer from the Square app:
- Open the Square app on your mobile or iPad, select More, then choose Balance,
- Then, tab Transfer out.
You can also customize your daily closing time for each day of the week with these simple steps:
- In your online Square Dashboard, go to Balance and choose Settings.
- Choose a day of the week and set your time zone and closing time. It’s suggested to set it one hour after your actual closing time to account for last-minute sales.
- Apply these settings for the entire week.
- Then click Save.
Set up Location
If your business has different locations, you can control everything from your online Square Dashboard. You can create special profiles for each place with specific hours and separate bank accounts or tags for transfers.
Before you learn how to set up Square locations, remember these things:
- A maximum of 300 locations is allowed per master account.
- Once you create a location, it’s permanent. Deletion isn’t possible, but you can deactivate it if needed.
Now, let’s create additional business locations:
- Go to your online Square Dashboard, and click Account & Settings. Click Locations under the Business tab. Then, click Create Location.
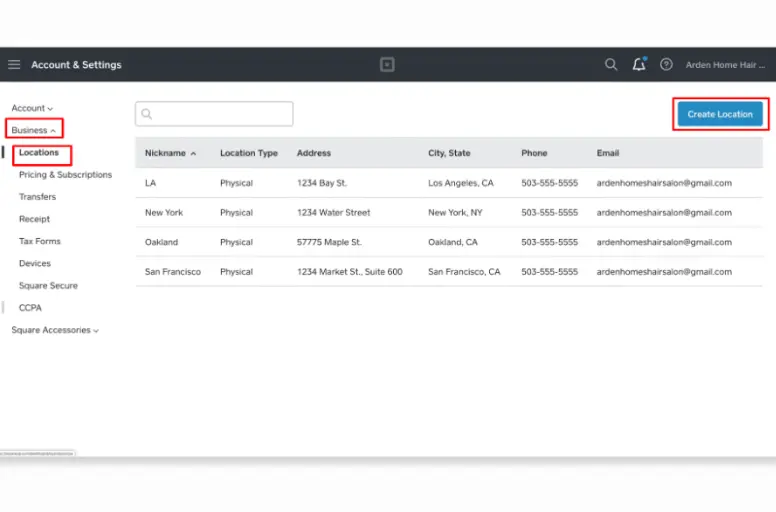
- From here, you can enter your location details in the Basic Information, Business Address, Contact Information, Branding, Business Hour, Bank Information, Language, Match Item Library, and Team Members sections.
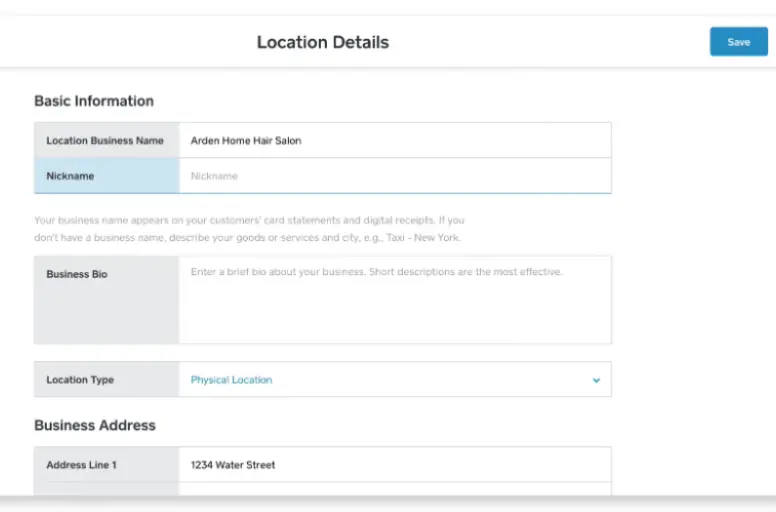
- Then, click Save to add your new location.
Set up Receipt
You can customize receipts for each of your locations on the Square Dashboard. Here’s how:
Here’s how to set up Square receipts from your online Square Dashboard:
- Go to Account & Settings. Then, click Business information and choose Receipts.
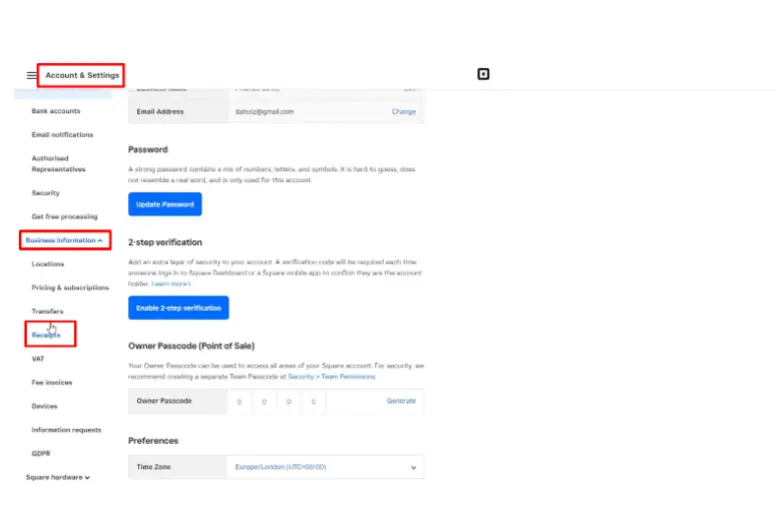
- Now, you can start customizing your receipts. Optimization options include logo, brand color, item information, business location, contact information, return policy, and custom text.
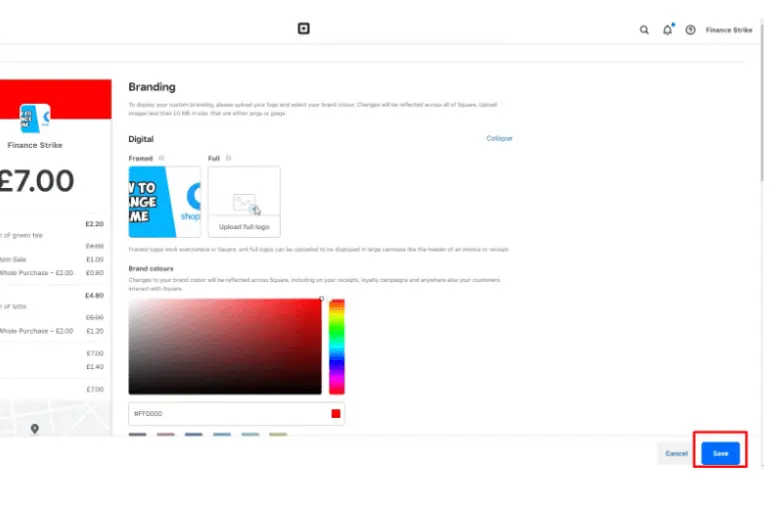
- Then, click Save.
Now, let’s move on to the next Square set up guide for your Dashboard Library.
Set up Dashboard Library
You can head to the Square Item Library in your Dashboard to create, edit, and handle items as you put your business information into Square. Doing this will automatically update most item details across various Square platforms, like Square POS and Square Online.
Here’s how you can create items from your online Dashboard:
- Go to Items, and click Create an item.
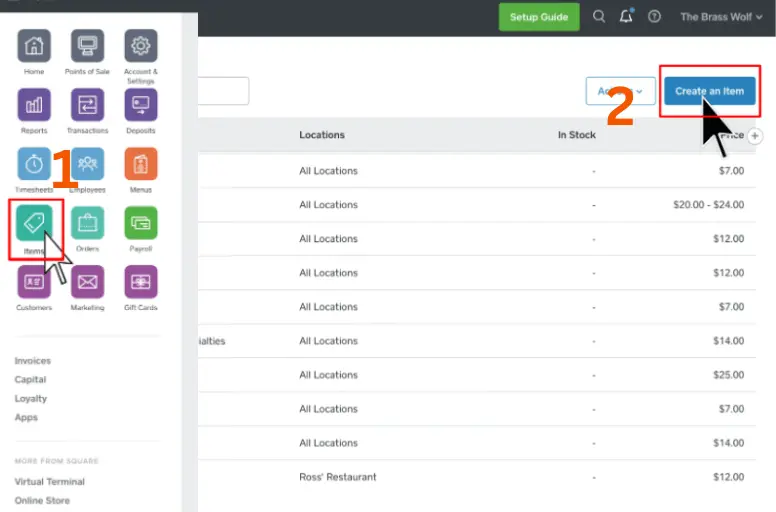
- Enter the item information in the Details, Price, and Inventory, Add to Menus sections.
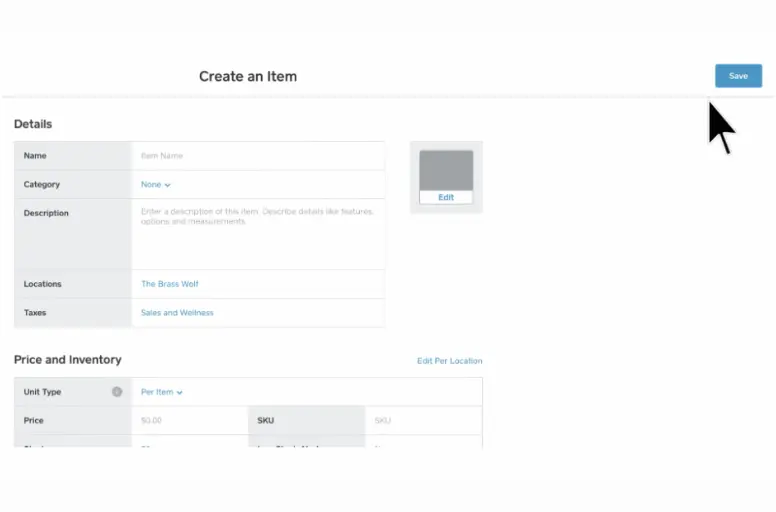
- Then, click Save.
Set up Taxes
You can also use Square POS to add taxes to your sales and make custom taxes. Here’s how:
- Choose Account & Settings on your dashboard.
- Click Sales Taxes under the Business tab. And then click Create Tax.
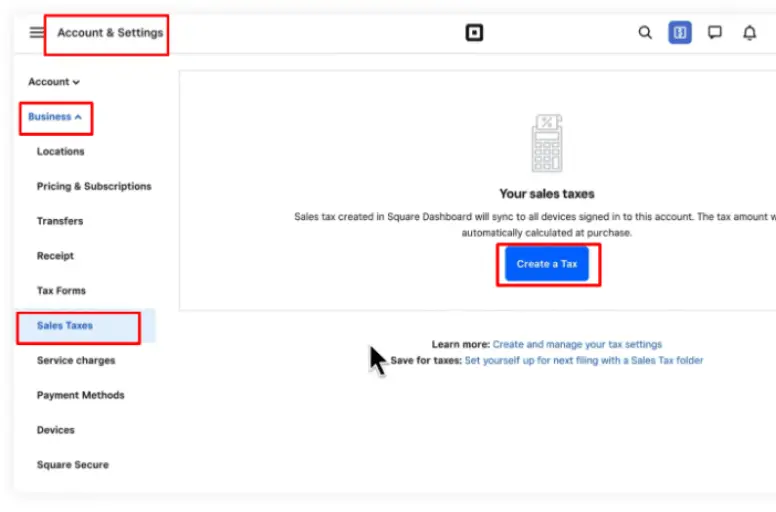
- Enter the tax information in the Details, Tax application, and Exempt tax sections.
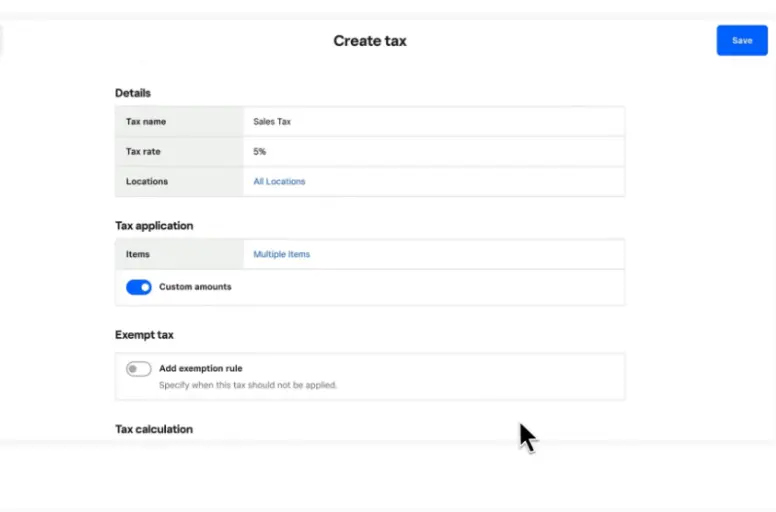
- Then, click Save.
Set up inventory
Besides tax, Square also lets you swiftly set up, track, and handle inventory from your item library. When you put in inventory levels, your stock count updates automatically after each sale.
Here’s how to set up Square inventory levels per item:
- Go to your online Square Dashboard, and click Items.
- Select a product from your list in the Item Library tab.
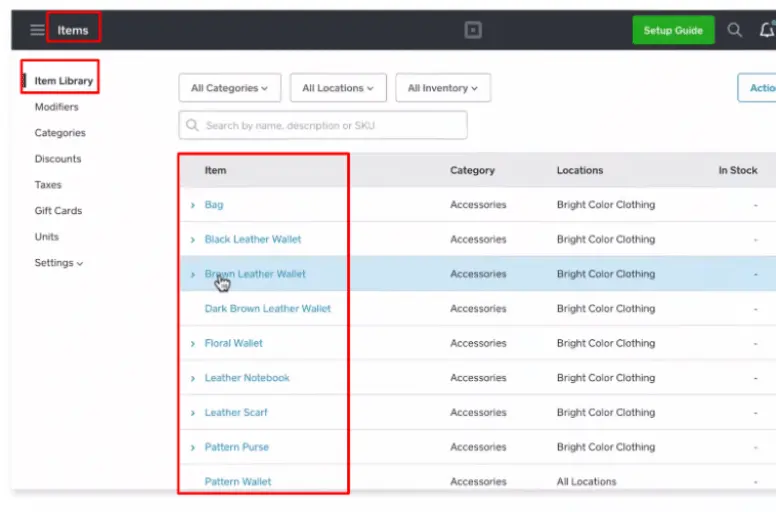
- Edit inventory for item variations by clicking on the variation row
- In Stock Action, choose the reason why you’re adjusting stock.
- Turn on stock tracking and put in your current stock.
- Switch on Alerts. If the stock goes below the alert threshold, an alert will show up.
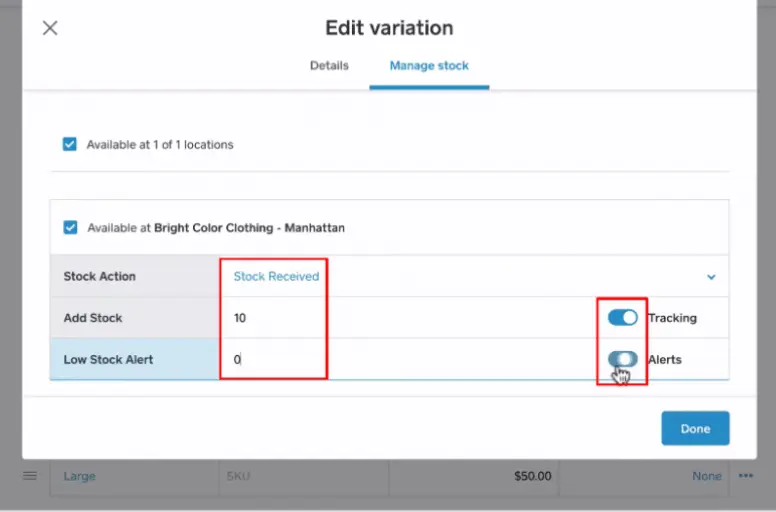
- Then, click Done and Save to confirm the update.
Once your Dashboard Library is set up, you can proceed to the next section for a detailed Square guide on setting up your team.
One Square Store, Unlimited Selling Opportunities
Why limit your sales to one platform? With LitCommerce Square Integration, your inventory and orders flow smoothly between Square and leading marketplaces — no double work needed.
Set up Team
Square Team Management makes it easy to handle your team, no matter where they are or what they do. It offers a free plan and a paid plan called Team Plus.
Before you add team members and give them tasks, make sure to create an owner passcode. Here’s how:
- In your online Square Dashboard, go to Staff & Payroll, choose Team, and click on Team members list, and choose the account owner’s name.
- Click Edit under the Permissions tab.
- Make a custom 4-digit passcode or click Generate for a random one. Then, click Save.
Now, you’re ready to learn how to set up Square Team by adding your first team member:
- Click Staff, choose Team, and then Team members in your online Square Dashboard.
- Choose + Team member. Alternatively, in the Square POS app, tap Team to add a team member.
- Fill in the team member’s Profile with their name, email address, and/or phone number (you need a unique one for each team member). The team member ID is optional but recommended.
- Then, click on Next.
On the Jobs screen, give a main job title and choose hourly or salary pay.
- Enter an hourly rate or annual salary and weekly hours based on the pay type.
- If the employee will have more than one job, then click Add another job.
- Then hit Next.
You can assign permission to your team member on the Access screen. Here’s how:
- Choose an existing permission set or click Create new permission set. Choose a starting point like Standard, Advanced, or Full for the intended access level.
- Hit Locations to choose the right work location for your team member.
- Make a personal passcode for the team member to log in and track time. You can customize it or generate one randomly by clicking Generate.
- Click Save & review.
Set up View Analytics
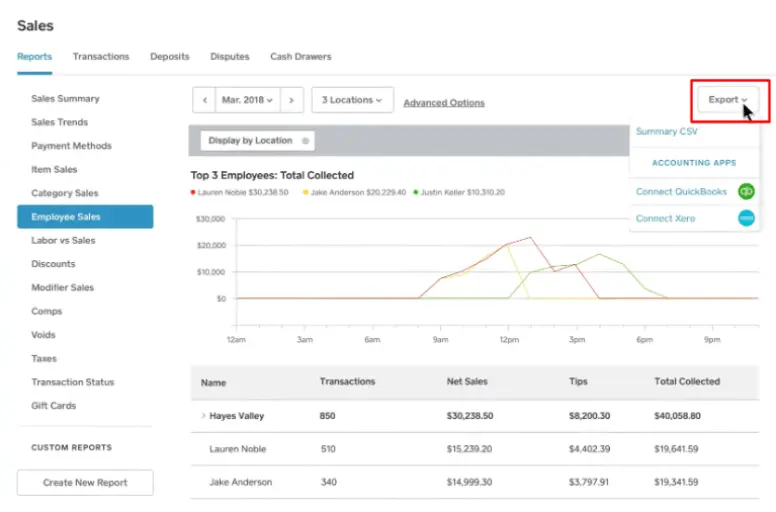
Square analytics and advanced reporting options let you explore valuable insights into your business. From there, you can easily export your data to keep it in your records. Here’s how:
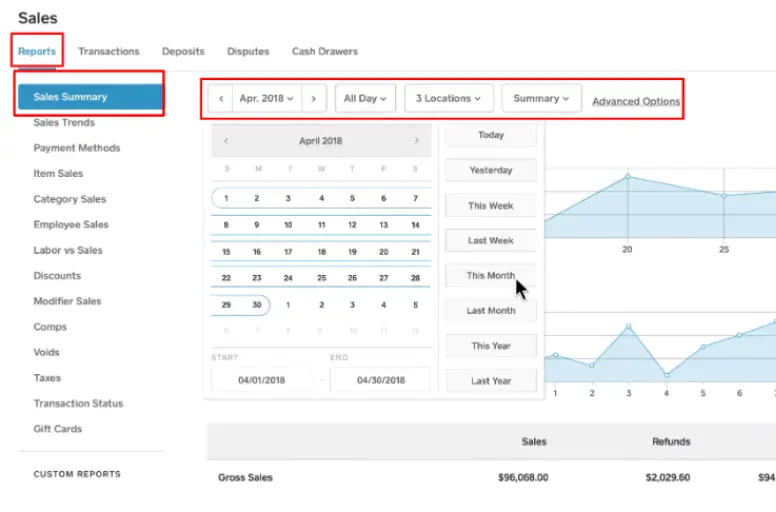
- In your online Square Dashboard, go to Reports, and choose Sales Summary.
- Filter sales by date, time, location, and more.
- Click Export to download a CSV file to your computer.
Step 3: How to Set up Square Hardware
When you set up your Square account, choose if you want to order hardware now or later. If you’ve already ordered it and got the hardware, connect it to your Apple or Android device to start taking payments. This part shows you how to set up Square hardware.
Set up Square Restaurant POS
The steps in this guide are the basic setup instructions for Square for Restaurants.
First, you need to create a menu:
- Choose Menus in the navigation. Click Create a Menu, and then Build your menu manually.
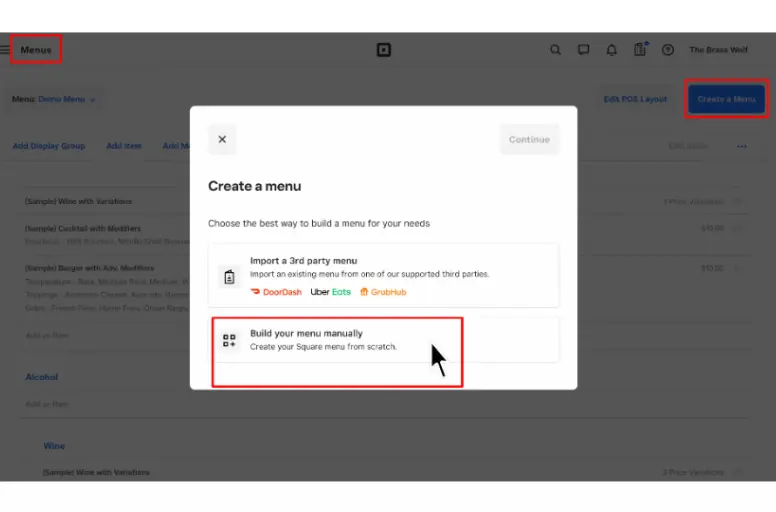
- Fill out the Menu Name blank with your menu’s name. Click Save.
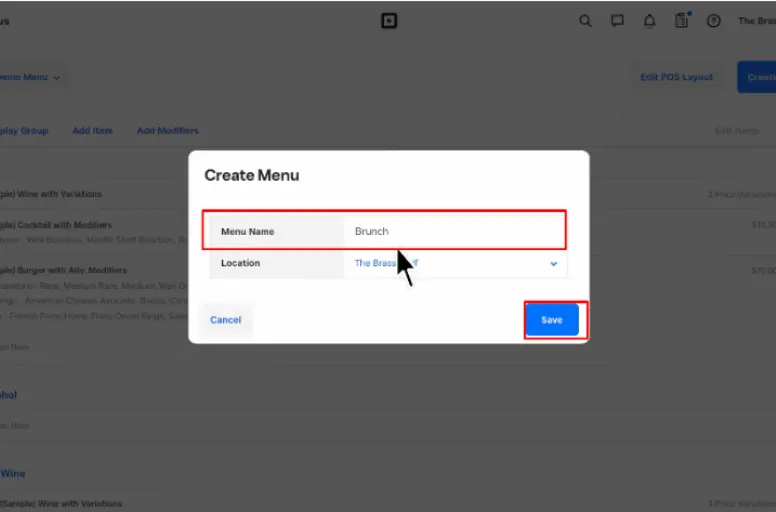
- Click Add Display Group, a group of items. Name it, and click Create a New Display Group.
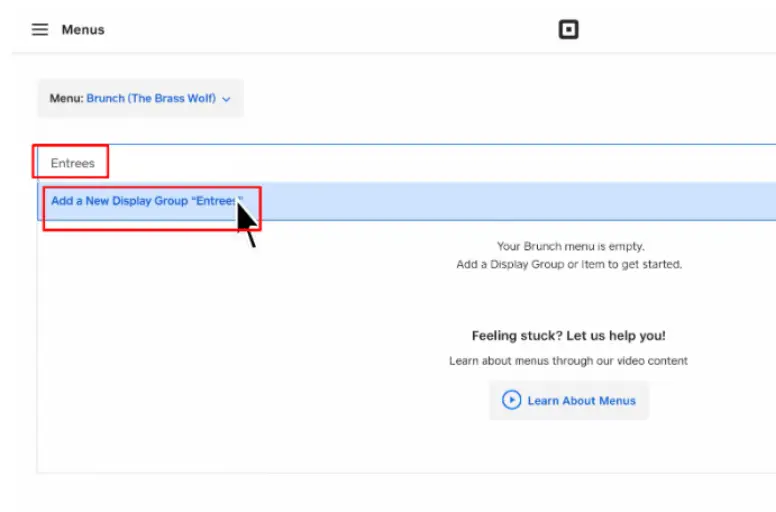
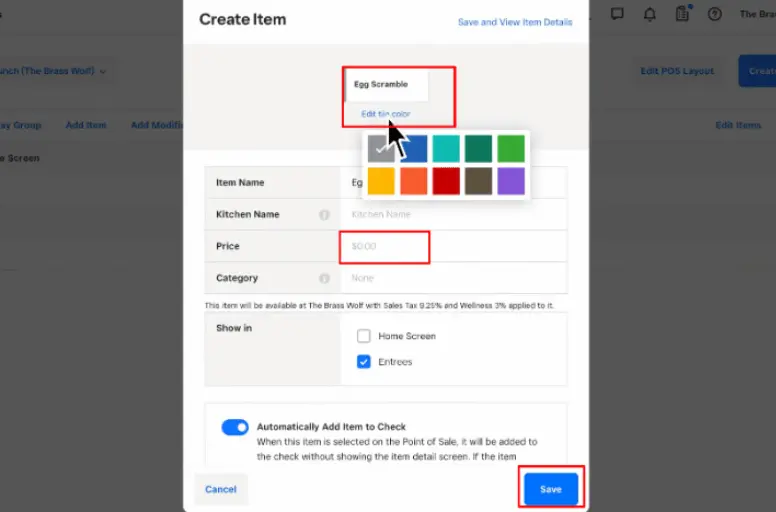
- Pick a color and click Save.
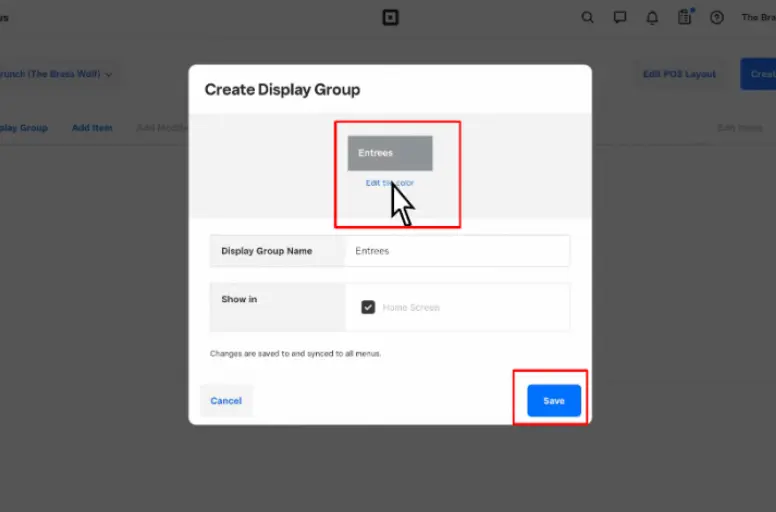
- Add item to the Display Group. Click Create a New Item.
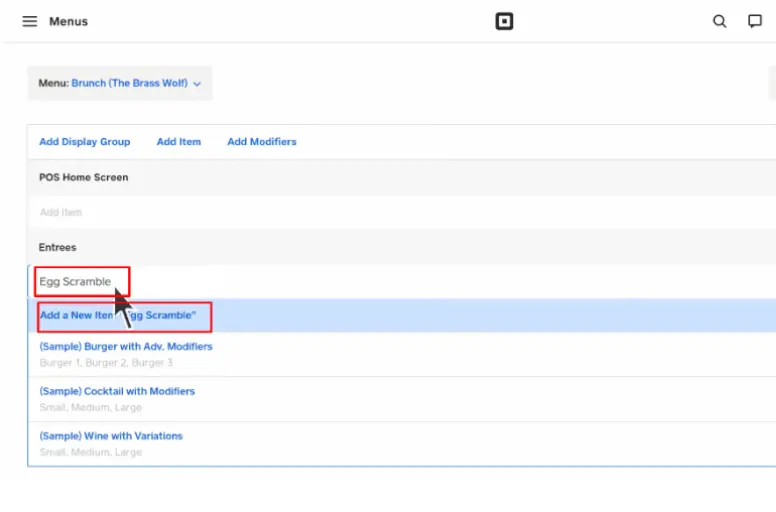
- Give it a color and price. Click Save.
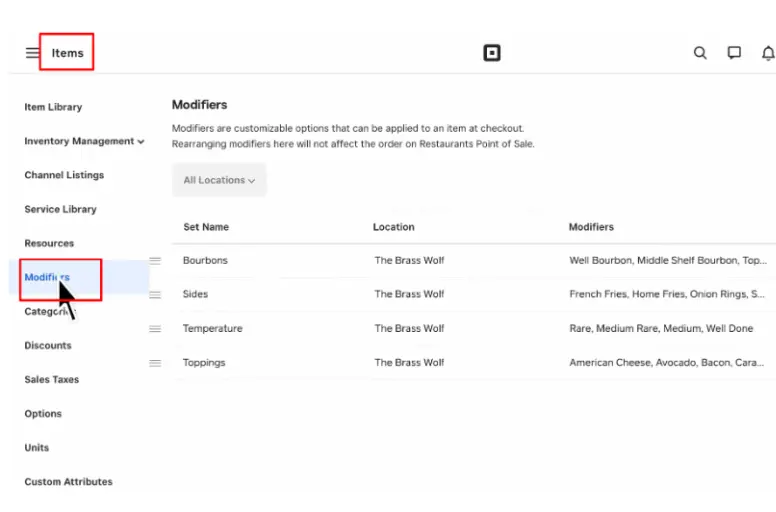
Now, let’s add modifiers to your dish:
- Click Items in the navigation. Then, choose Modifiers on the left-hand side.
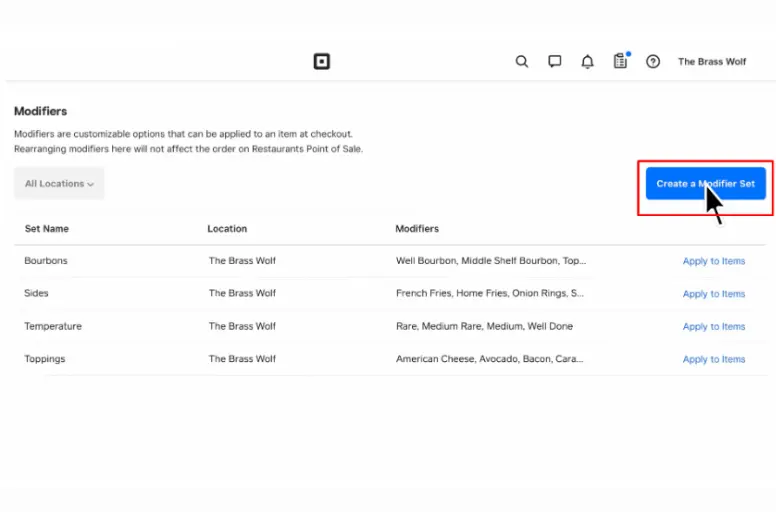
- Click Create a Modifier Set.
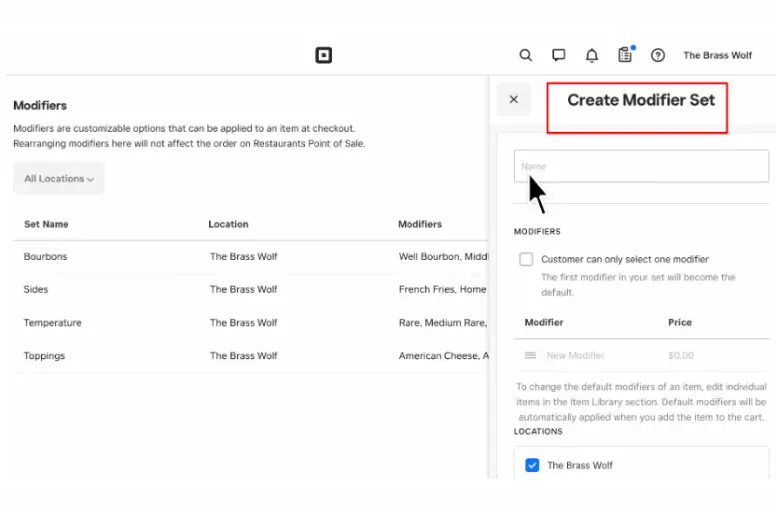
- Give the Modifier Set a name. Then, add the names and prices of your modifiers.
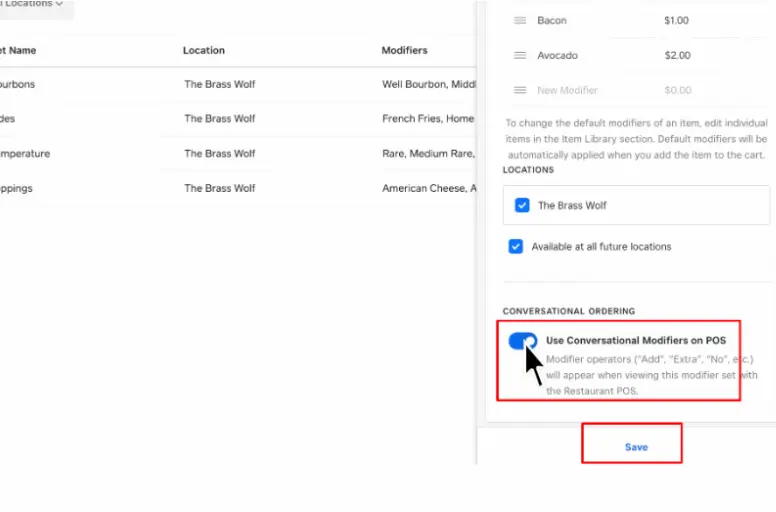
- Enable Use Conversational Modifiers on POS. Then click Save.
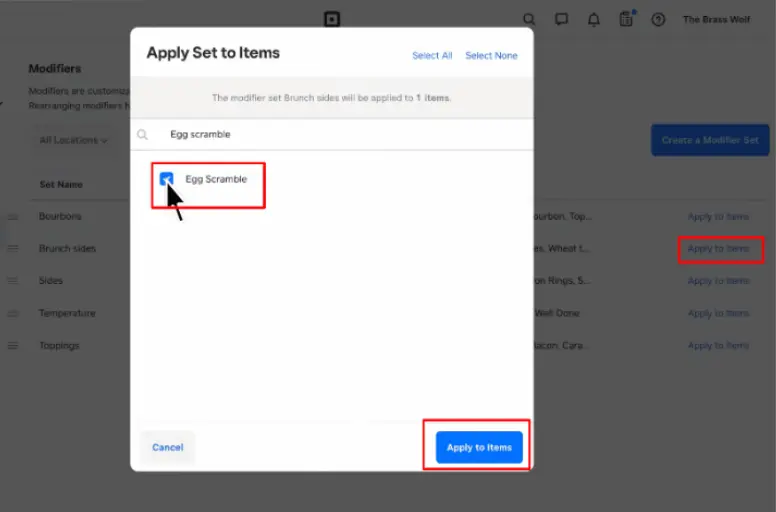
- Apply these modifiers to the item in the Display Group you’ve just created.
Then, let’s create Floor Plans:
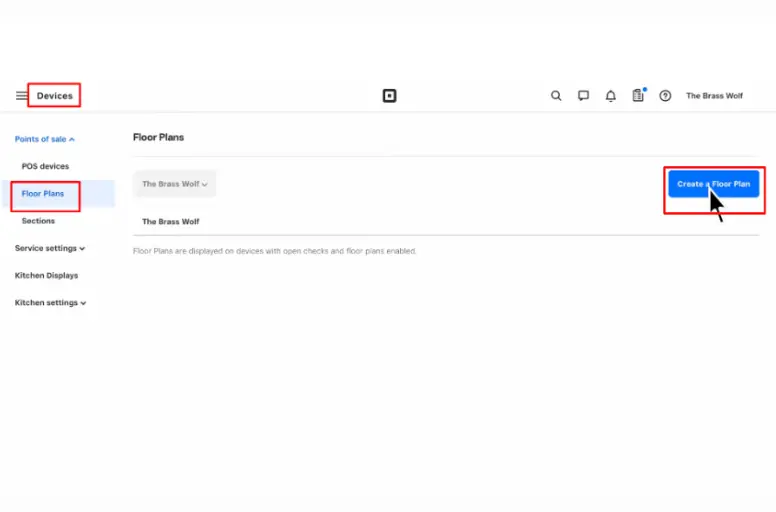
- Click Devices in the navigation. Choose Floor Plans on the left-hand side and click Create a Floor Plan.
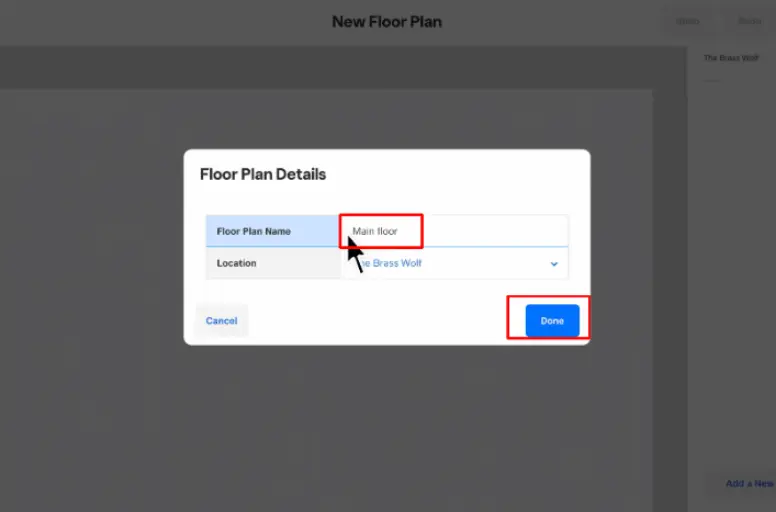
- Give it a name, then hit Done.
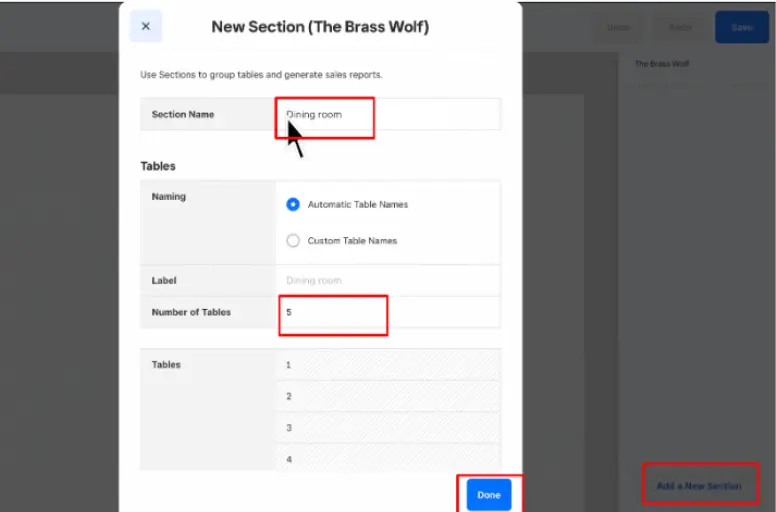
- Click Add a New Section. Fill out the section details. Let’s say we’re creating a Dining Room with 6 tables. Then click Done.
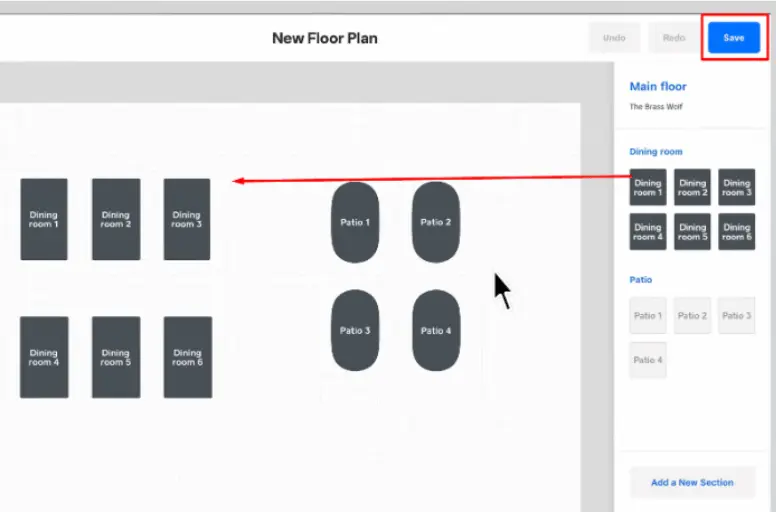
- Click tables to add them to your Floor Plan. Match them up to match your restaurant layout. Then, click Save.
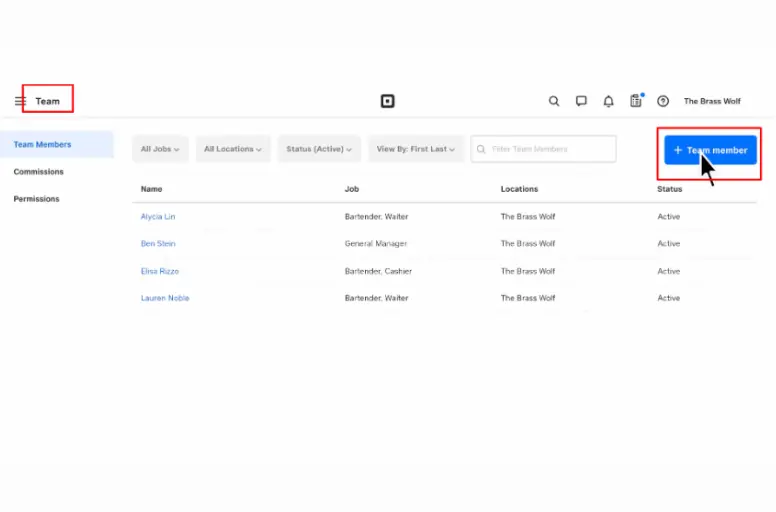
It’s time to add your first team member:
- Click Team in the navigation. Then click + Team Member.
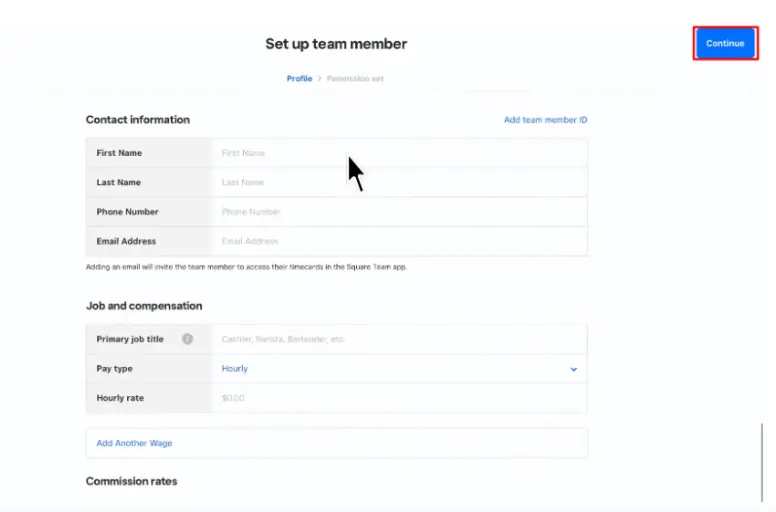
- Enter the member details. Then click Continue.
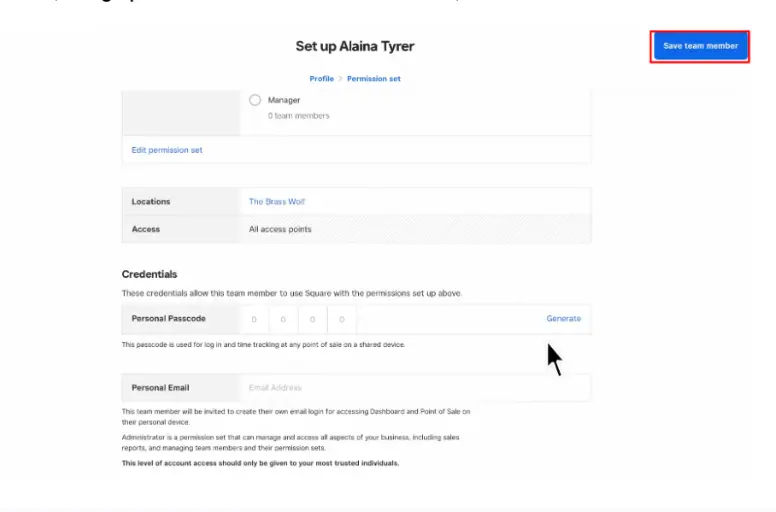
- Next, assign permission to the team member. Then, click Save Team Member.
The final step is to set up your POS device:
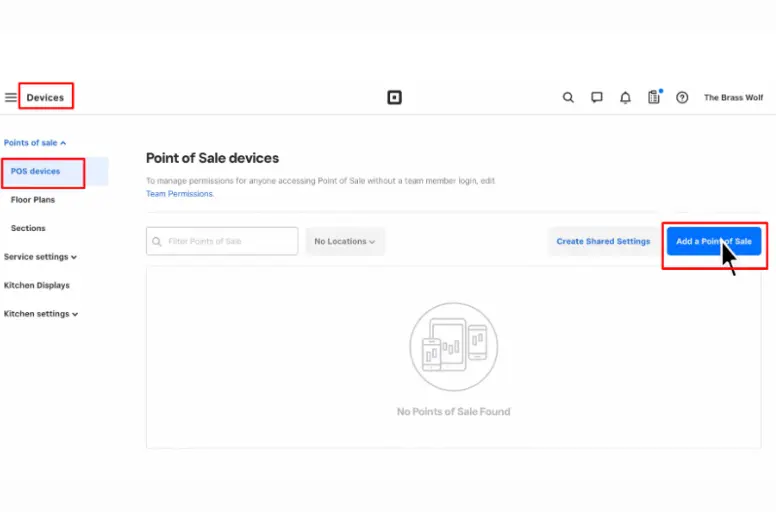
- Go to Devices on the left-hand side and click Add a Point of Sale.
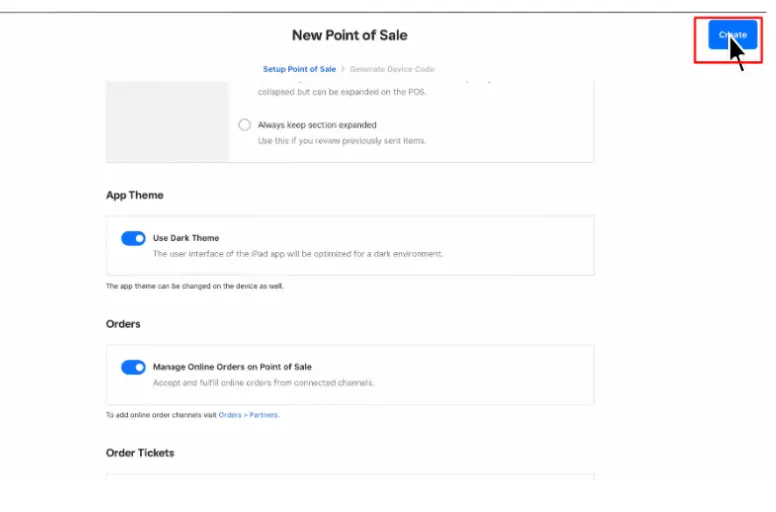
- Enter new POS details like its name, receipts, tips, etc. Then, click Create.
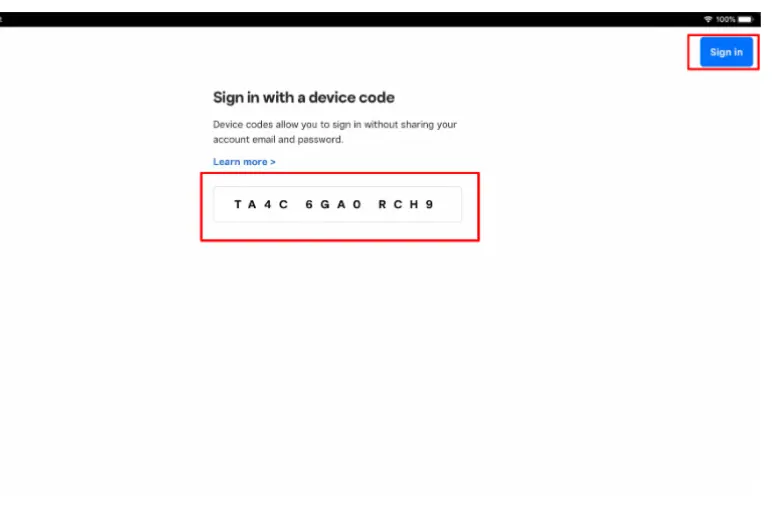
- You’ll see your device code, which is used to log into your POS app.
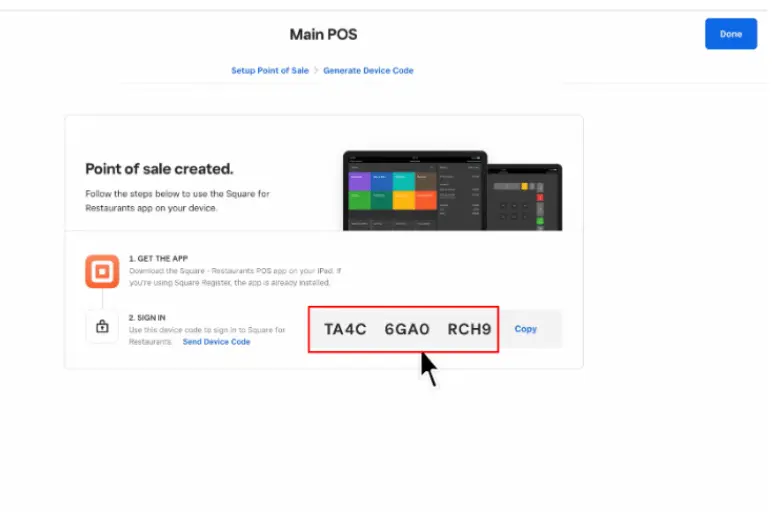
- Download the Square for Restaurant POS app. Then, enter the device code you’ve just created. Click Sign in.
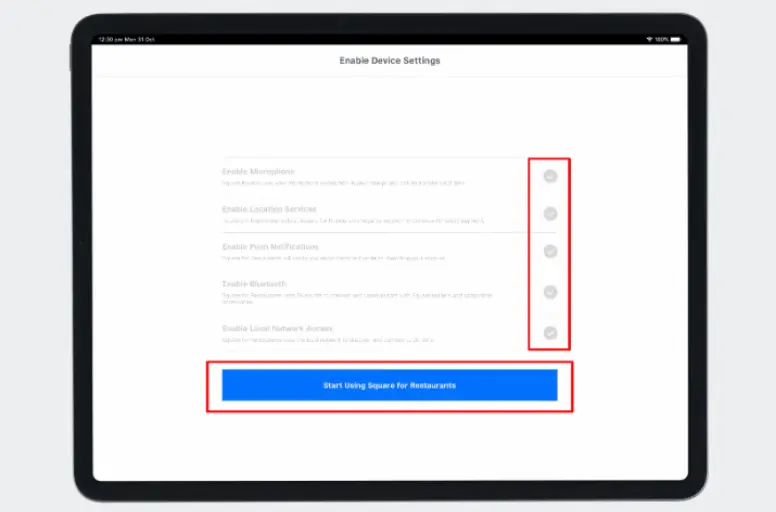
- Enable device settings. Then, click Start Using Square for Restaurants.
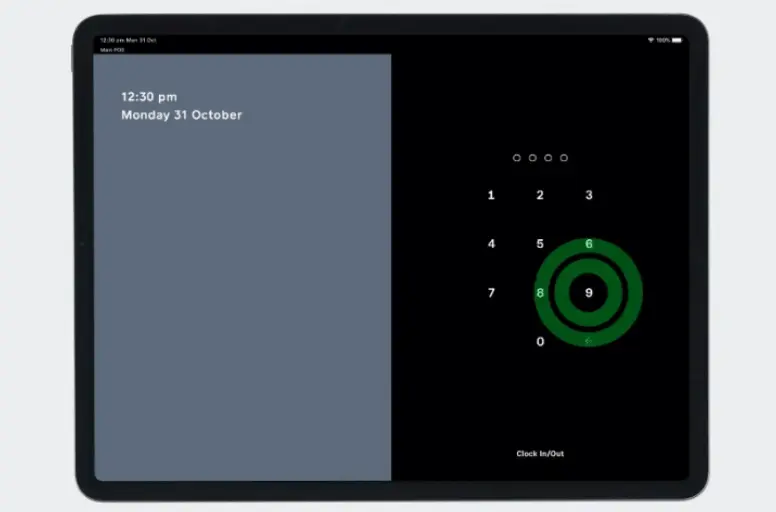
- Then, log in with your employee’s 4-digit PIN.
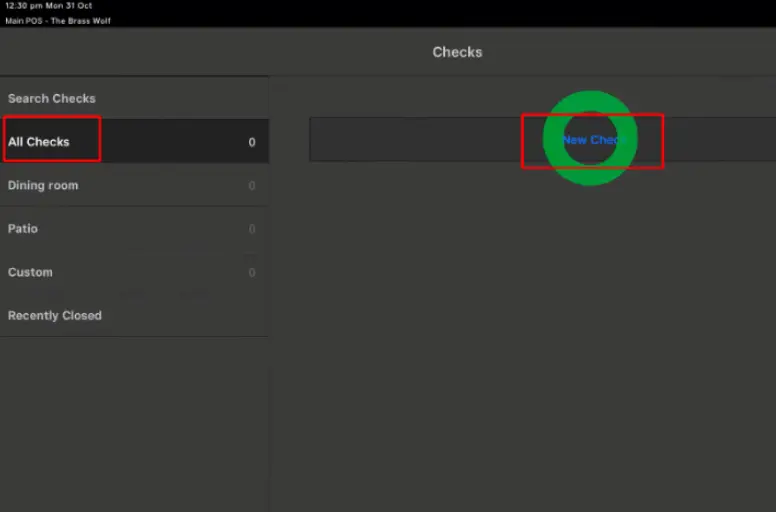
Now, you can start creating your first check:
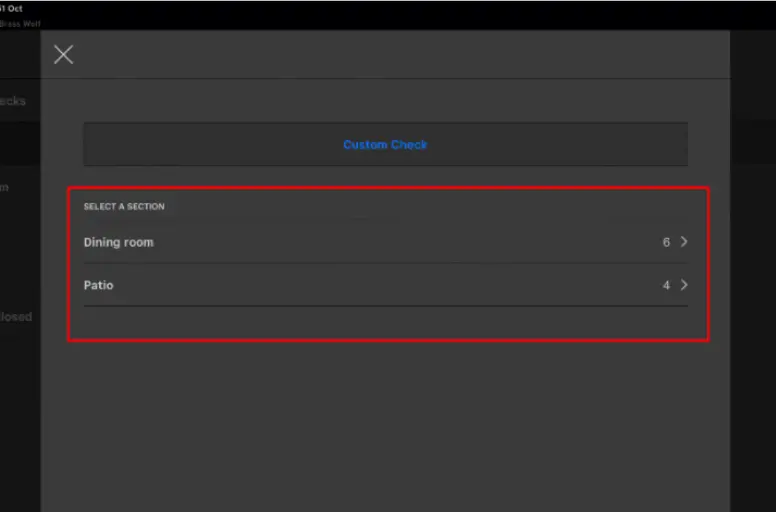
- After logging into your Square for Restaurant POS app, swipe right and tab New Check.
- Select a section, pick a table and number of guests.
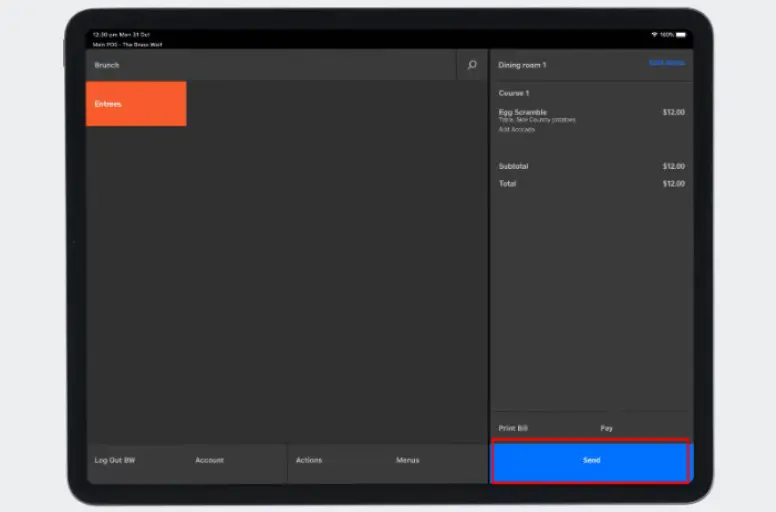
- Choose modifiers then tab Send. This will print a ticket for the kitchen staff.
Set up the Square Reader for Contactless and Chip
Before learning how to set up Square Reader for Contactless and Chip, ensure your device works with the newest Square app version.
Here’s how to connect your Square Reader:
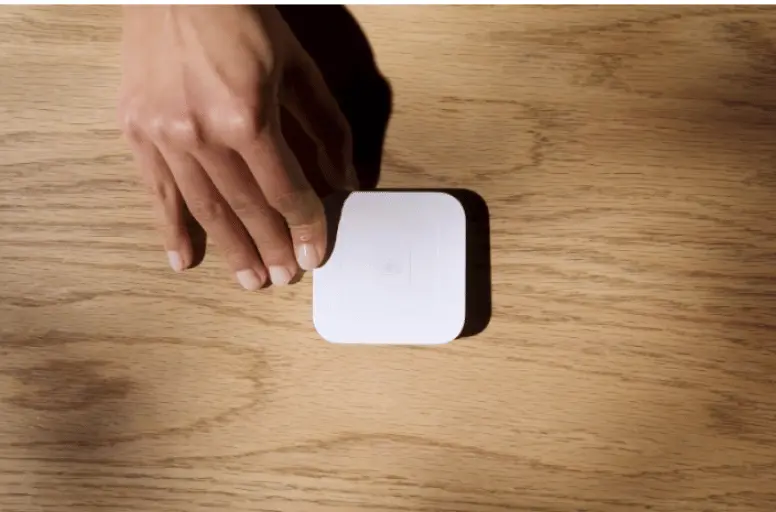
- Turn on your reader by pressing and releasing its button.
- Check that your device’s Bluetooth is on in the settings.
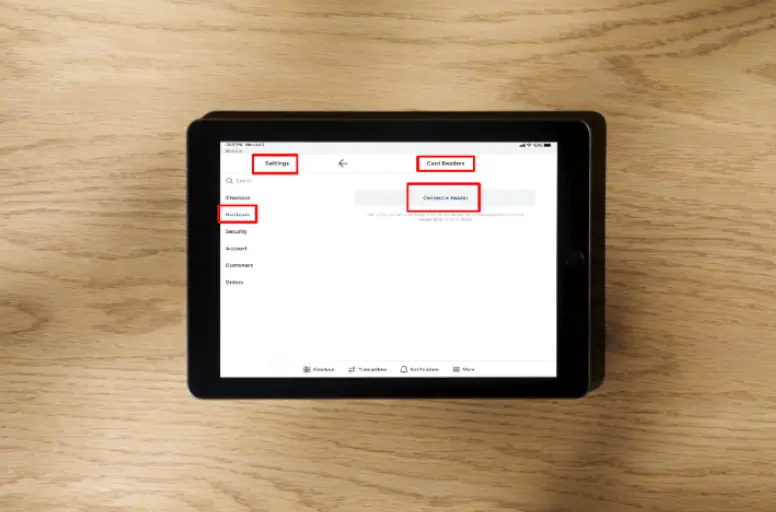
- Open the Square POS app and tap More at the bottom.
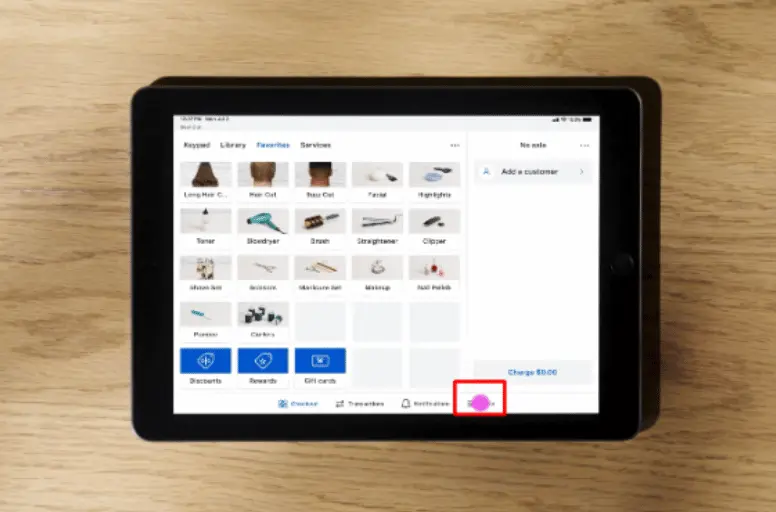
- Choose Settings, tab Hardware, and Card Readers, and then Connect a Reader.
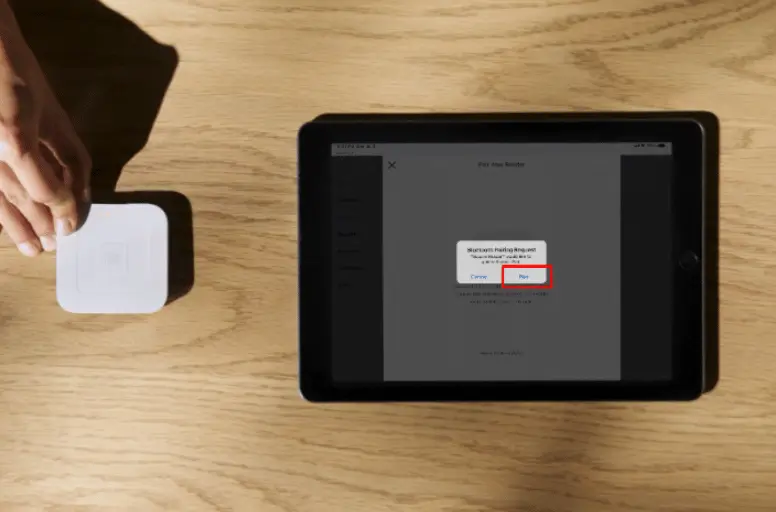
- Activate pairing mode on your reader by holding the button for three to five seconds. Release when orange lights flash; redo if you see red lights.
- In the app, confirm the pairing by tapping Pair.
Square Setup – FAQs
You can start setting up Square by creating a free Square account. Make sure you prepare your full legal name, date of birth, Individual Taxpayer Identification Number (ITIN) or Social Security number (SSN), and US home mailing address to activate your account. Download the Square Point of Sale app on an Android or iPhone. After downloading, sign in to take payments or send invoices. Yes, the basic signup takes just a few minutes. You can spend a bit more time setting up credit cards, items and use all Square products for your business. Yes, Square requires a bank account for transactions (not prepaid or online-only). Get your routing and bank account numbers ready to link your account quickly.
Setting Up Your Square Now
So, now you know how to set up Square, which will transform the way you manage payments and run your business. With Square, you’re not just processing payments; you’re streamlining operations and gaining valuable insights.
Remember the key steps:
- Sign up for a Square account online or in the app
- Link your bank
- Set up your online Square Dashboard
- Manage your hardware
And explore the various features from inventory management to insightful analytics.
Your journey with Square is now underway. Also, feel free to contact us if you need help relating to Square integration for growth opportunities.

