So, if you want your products to stand out among other competitors on this platform, you should know how to capture appealing and high-quality photographs. Except for selling templates on Etsy or other digital goods, most sellers need to know photography skills to master their Etsy listing. This is because neglecting good photography can hinder sales. Even if product photography seems challenging, this guide will equip you with useful and practical tips on how to take pictures for Etsy.
We’ll cover:
- #1. Equipment and setup
- #2. Composition and framing
- #3. Lighting techniques
- #4. Product styling
- #5. Camera settings & shooting modes
- #6. Editing and post-processing
Wait no more. Check it out to learn how to take good pictures for Etsy!
How to Take Pictures for Etsy An Ultimate Guide
If you wonder: Is selling on Etsy worth it? The answer is certainly “Yes”. But that also means once you join the platform, you should compete with many other sellers.
As stated, good Etsy product photos mean sellers can attract more potential buyers and get more sales on Etsy. Hence this guide on how to take pictures for Etsy will provide readers with some helpful Etsy photo tips and techniques for capturing compelling product photos. From choosing the right cameras to background setup, we’ve got your back.
#1. Equipment and setup
Choosing the right equipment and setup is the very first step you should know when learning how to take Etsy photos. Check out the list below for recommendations and make your product photography stand out:
1. Camera options: DSLR, smartphone, or point-and-shoot
There are many options you can consider when choosing the best photo taken tools for your Etsy shooting. However, in this How to take pictures for Etsy guide, we suggest you 3 main types of cameras mostly used:
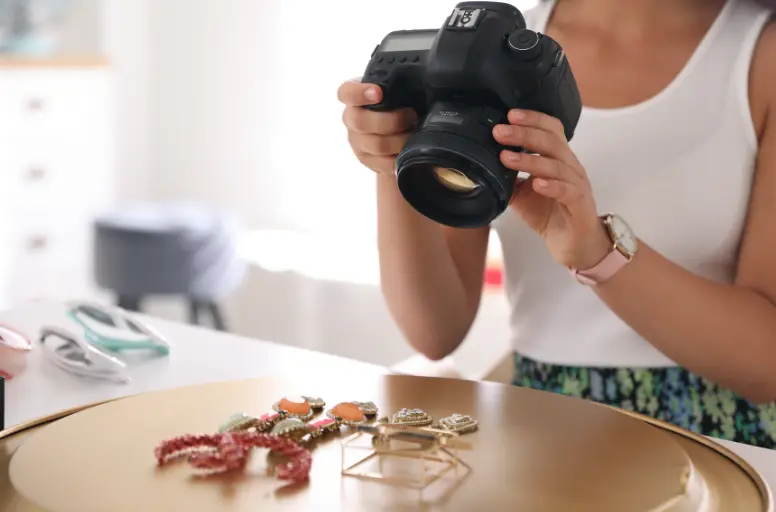
# – DSLR (Digital Single-Lens Reflex) Cameras
DSLRs offer excellent image quality and versatility with interchangeable lenses, making them ideal for taking professional photos of Etsy products.
- Pros: Superior image quality, extensive manual controls, a wide range of lenses available, optimal for low-light situations.
- Cons: Bulky and less portable, higher cost, steeper learning curve for beginners.
# – Smartphone Cameras
Smartphone cameras are convenient and readily accessible, allowing for quick and easy product photography on the go.
- Pros: Portability, easy to use, instant editing and sharing options, suitable for simple product shots.
- Cons: Limited manual controls, smaller image sensors may affect image quality in certain conditions, and less flexibility with lens options.
# – Point-and-Shoot Cameras
Point-and-shoot cameras are compact and user-friendly, suitable for beginners or those seeking simplicity.
- Pros: Portability, affordability, straightforward operation, various automatic shooting modes.
- Cons: Limited manual controls, smaller sensors impacting low-light performance and dynamic range, and less versatility compared to interchangeable lens cameras.
It is clear to see that these options are different in setting modes, picture quality, and prices. So, depending on your budget and needs, you can pick the right tools for your needs. If you don’t know how much you should pay for a camera, check the article about how much it costs to start an Etsy shop first to acquire the main fees you should pay as a seller. Then, you can pick the right camera on your budget.
2. Tripod and stabilizing tools
# –Tripods
When taking photos for Etsy, tripods are indispensable for capturing steady shots, even smartphones, irrespective of the camera type. Opting for a tripod with adjustable legs allows you to easily customize the camera’s height and angle to showcase your products effectively.

# – Camera remotes and triggers
Camera remotes, and triggers are valuable additions to your photography setup. They help eliminate camera shake caused by pressing the shutter release button with your finger. These tools are handy when capturing self-portraits or modeling garments and accessories, ensuring your camera remains perfectly still during the exposure.
3. Lighting considerations: Natural light vs. artificial lighting
Natural light, derived from the sun or daylight, provides a soft and diffused illumination to enhance your product’s features. You can utilize tools such as bounce cards or reflectors to harness natural light effectively. These accessories redirect and manipulate the available natural light, reducing shadows and adding fill light to your subjects. Using white clothing during the photo shoot can also help reflect light onto your products, enhancing their appearance.
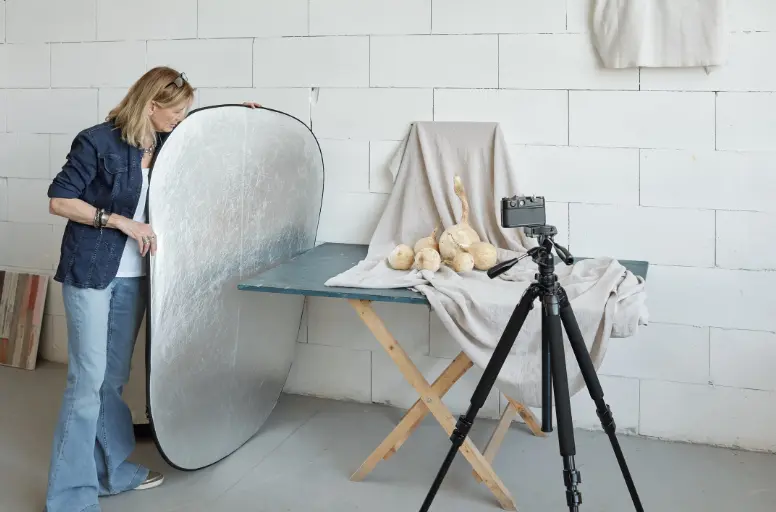
On the other hand, artificial lighting gives you greater control and consistency over the lighting conditions. You can consider the following tools if you want to take the best photos under artificial lightning:
- Softbox lights: Utilize diffused artificial light to illuminate larger items and minimize harsh shadows.
- Light boxes and light tents: Create a controlled lighting environment with consistent backdrops for smaller items.
- External flashes or Speedlights: Overcome limitations of built-in flashes and achieve greater control over lighting.
- Flash diffusers: Soften and disperse artificial flash light for a more pleasing lighting effect.
4. Backgrounds and props: Choosing appropriate options for your products
Picking the right background is another essential element when it comes to how to photograph products for Etsy. The background serves as the canvas for your product, setting the stage and creating a visual atmosphere. Opting for solid colors, such as white or light tones, can provide a clean and neutral backdrop that allows your product to stand out. Alternatively, you can experiment with textured surfaces or subtle patterns to add depth and interest to your photos.

Props can be used strategically to enhance the story or purpose of your Etsy product photos. They should complement your product without stealing the spotlight. You should select relevant props and provide context, ensuring they are proportionate in size and scale to your product. Remember, less can often be more when it comes to props. A minimalist approach can create an uncluttered composition where the product remains the focal point.
As an Etsy seller, you might also want to read:
#2. Composition and framing
Composition and framing are vital for creating aesthetically pleasing images that effectively showcase your products and attract potential buyers. This guide on how to take pictures for Etsy will highlight some key considerations for you to keep in mind:
1. Rule of thirds
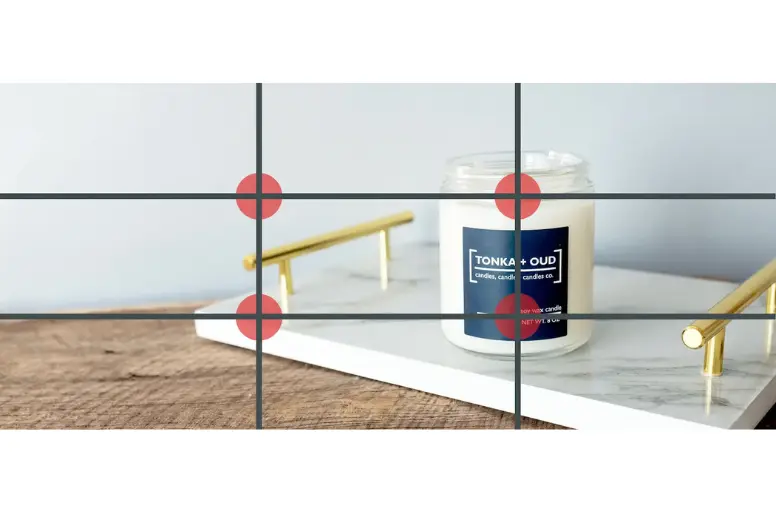
The rule of thirds is a fundamental principle in photography composition whenever you learn how to take product photos. Imagine dividing your image into a grid of nine equal parts using two horizontal and two vertical lines. You create a balanced and visually pleasing composition by placing your subject along these lines or at their intersections. You can try different product placements within the frame to find the most appealing arrangement.
2. Using negative space effectively
Negative space refers to the empty areas surrounding your subject. Leaving some empty space can enhance the visual impact of your product by providing breathing room and emphasizing its presence. You can incorporate negative space to create a sense of simplicity and elegance in your photos. It can also be helpful for adding text or other graphic elements in post-processing.
3. Showcasing multiple angles and details
Presenting your product from different angles and showcasing its unique details can give potential customers a complete understanding of your offering. You can try close-up shots to highlight intricate features and textures and wider shots to provide a holistic view.

4. Using props to enhance the visual appeal
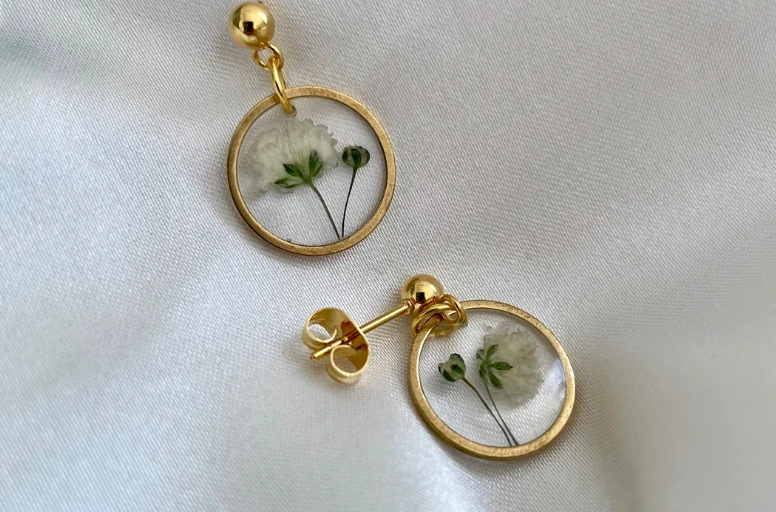
Props can be powerful tools to enhance the overall aesthetic of your product photos. Choose props that complement your product and its story. For example, if you’re selling handmade jewelry, consider including items like a jewelry box, silk fabric, or natural elements like flowers or leaves.
#3. Lighting techniques
Lighting can significantly impact the overall mood and visual appeal of your images. Here are some essential lighting techniques to consider:
1. Natural lighting
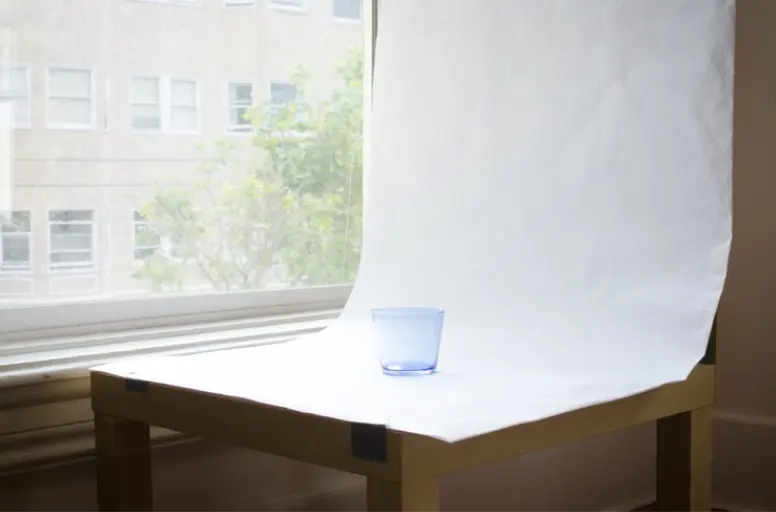
Utilizing natural light can result in stunning product photos. The best times of the day for soft, diffused light are typically early morning or late afternoon. The ideal place to take pictures to take advantage of this natural light is near a window or in an outdoor shaded area. Don’t forget to experiment with different angles and distances from the light source to achieve the desired effect.
2. Artificial lighting options
When natural light is limited or inconsistent, artificial lighting becomes essential. This continuous lighting provides a constant light source, making it easier to set up and adjust. Common artificial lighting options for Etsy include continuous lighting, studio lighting kits, lightboxes, ring lights, and LED panels. You can opt for the option that suits your setup and desired lighting effects.
3. Diffusing harsh light and avoiding glare
Harsh lighting can create unflattering shadows and glare on your Etsy product photos. To overcome this, consider using diffusers, softboxes, or reflectors to soften the light and create a more even illumination. These tools help distribute light and reduce harsh shadows, producing a more balanced and professional look.
4. Experimenting with different lighting setups
Every product has unique lighting requirements. It would help if you tried different lighting setups, such as side lighting, backlighting, or using multiple light sources, to enhance the appearance of your products. Take test shots and evaluate the results to determine each item’s most flattering lighting setup.
#4. Product styling
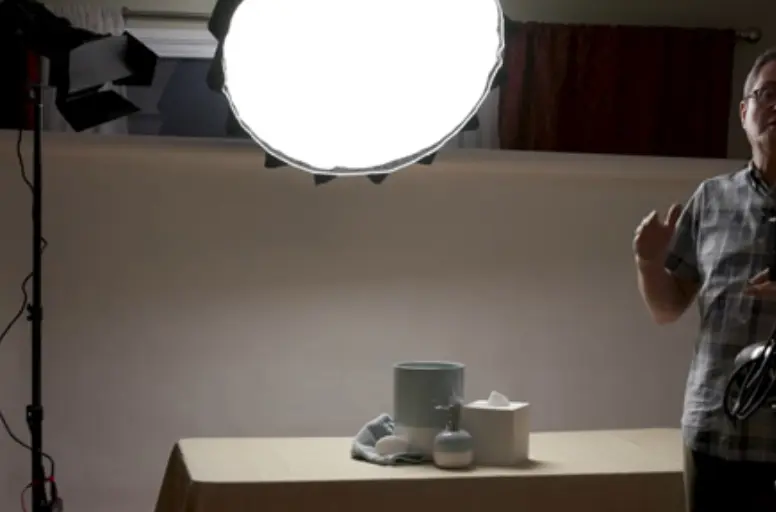
Staging photos for Etsy in the right way is important to showcase your products and attract potential buyers effectively. To achieve this, this guide on how to take pictures for Etsy has listed some Etsy photography tips in styling that will make a significant difference.
1. Arranging products in an appealing manner
You should consider each item’s size, shape, and unique features to arrange it thoughtfully if you want to know how to take good product photos. For example, flat or small items can be laid flat or placed on a clean surface, while vertical items should be positioned upright to showcase their shape. You can also experiment with different compositions, such as grouping things together to create visually pleasing arrangements.
2. Consideration of color schemes and complementary props
When selling on Etsy, sellers should make thoughtful choices regarding color schemes that complement the products. Also, you should select props that enhance the story or purpose of the products without overshadowing them. That can elevate the overall aesthetic and captivate potential buyers.
For example, if you are selling handmade ceramic mugs on this best-selling platform, you may choose a color scheme that includes earthy tones to enhance your products’ rustic and artisanal feel. Adding props like a wooden coaster or a small succulent plant alongside the mugs can create a visually appealing composition.

3. Creating a lifestyle or contextual setting for the product
Developing a lifestyle or contextual background for the product can enhance customer engagement. This approach allows customers to envision how the products can be used or integrated into their lives. By staging items in a relevant background, sellers can create a deeper connection with theory buyers on Etsy.
For instance, suppose your products are handmade candles on this top marketplace. You can create a lifestyle setting by staging the candles in a cozy living room with soft lighting, plush blankets, and a cup of tea on a side table. This helps potential buyers visualize the candles creating a cozy atmosphere in their homes.
4. Keeping the focus on the product while adding visual interest
It is important for sellers to strike a balance between highlighting the product and adding visual interest to the photos. The product should remain the primary focus while incorporating other elements. This can be achieved through the use of textures, patterns, or creative angles that add depth and visual appeal.
Take selling handmade jewelry on Etsy as an example. When photographing it, you can add a textured fabric as a background for the jewelry. This adds visual appeal and depth to the photo while still keeping the focus on the product itself.
#5. Camera settings & shooting modes
When learning how to take pictures for Etsy, camera settings and shooting modes cannot be missed out on. Whether you learn how to take product photos with iphone or camera, you should familiarize yourself with your camera’s capabilities and invest time in learning to optimize settings. Here are some criteria you can consider when adjusting your camera settings.
1. Choosing the appropriate shooting mode for your camera:
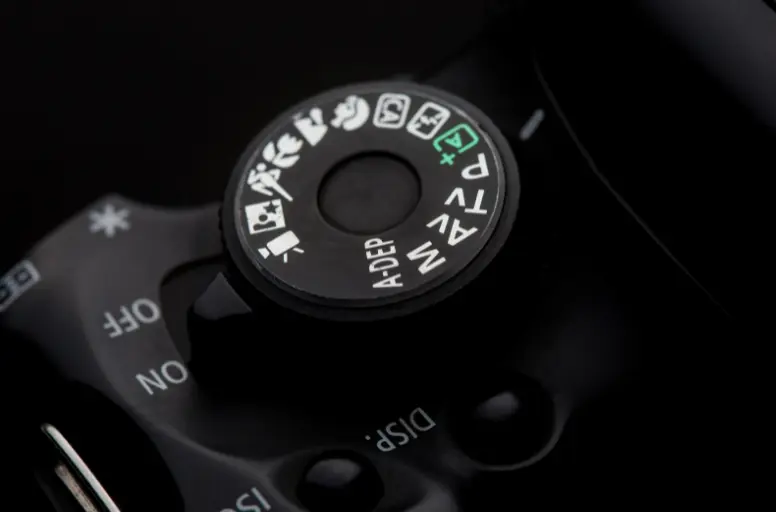
There are some standard camera shooting modes that Etsy sellers often utilize when taking photos of products. This How to take photos for Etsy guide recommend you some of the widely-used ones:
- Auto Mode: This mode is ideal for beginners or situations where you want the camera to handle most of the settings automatically.
- Manual Mode (M): Manual mode allows you to fully control all camera settings, including aperture, shutter speed, and ISO, providing maximum flexibility but requiring a good understanding of exposure.
- Macro Mode: Macro mode is specifically designed for close-up photography, enabling you to focus on small details with a closer focusing distance.
- Landscape Mode: Landscape mode emphasizes a large depth of field to ensure that the scene’s foreground and background are in focus, ideal for capturing wide scenic views.
- Night Mode: Night mode is designed to capture low-light scenes by using slower shutter speeds and adjusting other settings to ensure proper exposure in dimly lit environments.
2. Adjusting exposure, white balance, and focus
# – Exposure
Exposure refers to the amount of light that reaches the camera sensor. Proper exposure ensures that your photos are neither too bright nor too dark. Adjusting exposure involves controlling the amount of light that reaches the camera sensor by modifying settings such as aperture, shutter speed, and ISO.
# – White Balance
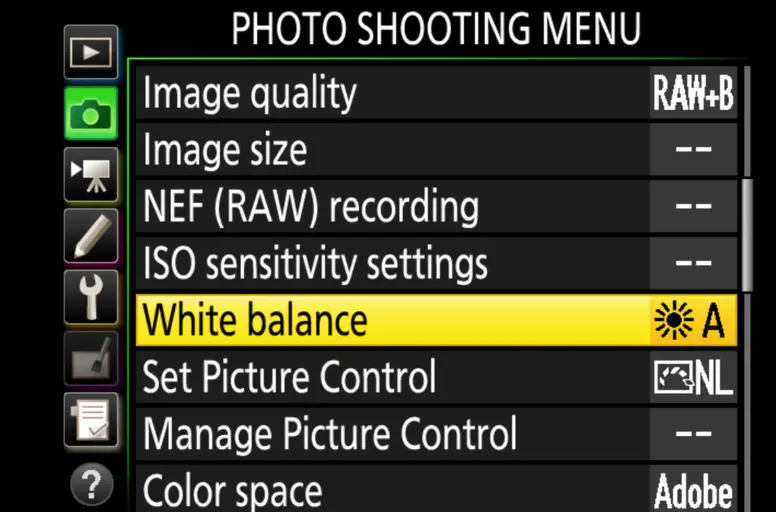
White balance determines the image’s color temperature, ensuring an accurate representation of colors. Different lighting conditions, such as a warm or cool tint, can create color casts. So, setting the appropriate white balance ensures your product colors appear true to life. You can manually adjust the white balance settings on your camera or use post-processing tools to fine-tune color accuracy.
# – Focus
Focus determines the sharpness and clarity of the subject in the image. You can use autofocus (AF) mode or manually adjust the focus to ensure the main subject is crisp and well-defined. When taking photos, pay attention to critical areas of your product, such as intricate patterns or textures, and ensure they are in focus.
3. Utilizing macro or close-up mode for detail shots
Close-up shots are highly effective for pictures on Etsy as they allow you to capture your products’ intricate details and unique features. You can utilize the macro or close-up mode on your camera to attain this kind of shot.
Macro lenses are available in various focal lengths, typically ranging from 50mm to 200mm, providing different magnification levels and working distances. You can opt for something around 100mm for the best Etsy shooting.
On the other hand, close-up mode is a shooting mode that helps optimize settings for capturing close-up shots without needing a macro lens.
4. Shooting in RAW for post-processing flexibility
Sellers who desire greater control over the final appearance of their photos should consider shooting in RAW format. RAW files contain unprocessed data, allowing for more flexibility during post-processing to adjust exposure, color balance, and other settings. Hence, sellers will have more latitude for correcting exposure errors, recovering highlights and shadows, and fine-tuning colors than other formats.
#6. Editing and post-processing
The last step in this guide on how to take pictures for Etsy is editing and post-processing. Effective editing and post-processing can significantly elevate the impact of your Etsy photos. You can refer to the following points to gain a fundamental understanding of post-editing your Etsy shots.
1. Selecting the right photo editing software
Sellers should choose a photo editing software that suits their needs and skill level. Popular options include Adobe Photoshop, Lightroom, or free alternatives like GIMP or Canva.
Professional-level software like Adobe Photoshop and Lightroom offer extensive features and advanced editing capabilities, suitable for photographers with advanced skills. For amateurs or those seeking user-friendly options, software like Canva or GIMP.

2. Enhancing colors, contrast, and sharpness
It can be disappointing when photographs of products with intricate design elements fail to capture their depth. However, you can bring out the smaller details and textures by making subtle adjustments to sharpen the images using a photo editor. Similarly, increasing the contrast can help create more defined contrasts between light and dark areas in the image.
About color enhancement, you can adjust color saturation, temperature, and tint to achieve the desired look and make the colors more vibrant.
3. Removing imperfections and distractions
After changing the lighting and clarity of your Etsy product photos, you may want to address the background to ensure your item stands out. Advanced photo editing features can assist if the background is cluttered or if there are dust particles. Tools like blur or clone in Photoshop application can help remove distractions, while blemish tools can eliminate minor imperfections. Working with larger image sizes, such as RAW files from DSLR cameras, provides more editing flexibility.
4. Resizing and optimizing images for Etsy listings
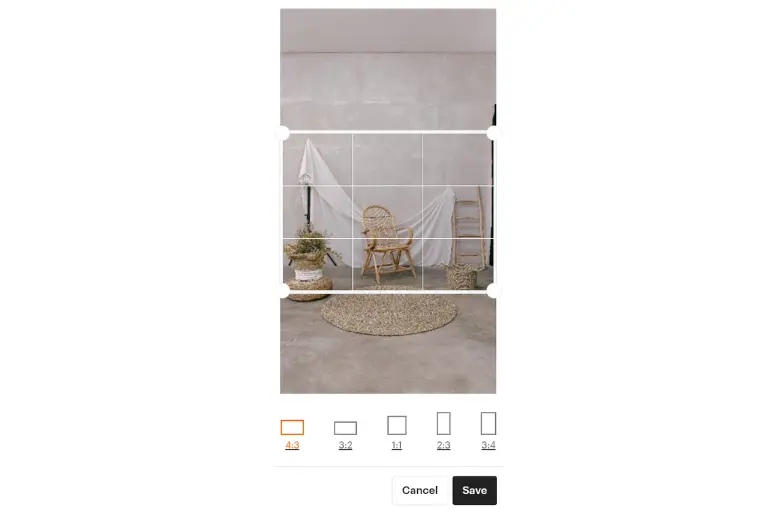
When optimizing Etsy listing photos, it’s essential to consider the “rule of thirds”. By doing so, you can attract viewers’ attention and significantly enhance the effectiveness of your photos. To take full advantage of this approach, crop your shots to align your products with these lines and intersection points.
Furthermore, since many Etsy users browse the platform on mobile screens, you should resize your photos appropriately to cater to these customers. To further emphasize your product as the main focal point in each image, use a cropping tool to reframe the item and eliminate excessive space.
How to Take Pictures for Etsy – FAQs
Sellers are advised to use high-resolution photos with a minimum of 1000 pixels on the shortest side to ensure clarity and detail. JPEG is the best photo format since its compatibility and small file size allow for faster loading on Etsy. While there is no specific rule, it is generally recommended to include multiple pictures showcasing different angles, details, and product variations. This helps potential buyers get a comprehensive view and make informed purchasing decisions. Do you struggle with listing products? Our Etsy listing tool guide will offer you some effective way to do so smoothly. The decision between hiring a professional photographer or taking pictures yourself depends on various factors such as budget, photography skills, and the desired outcome. Hiring a professional can ensure high-quality, visually appealing images, but it can be costly. Taking pictures yourself allows for greater control and flexibility, especially if you invest time in learning photography techniques and product styling.
Conclusion
In short, taking high-quality product pictures on Etsy requires careful consideration of equipment choice, composition, lighting, and editing techniques. By following this How to take pictures for Etsy guide, you can create visually appealing images that attract and engage potential customers.
If you just start selling on Etsy, LitCommerce offers various guides on Retailers Blog. Our 24/7 live chat support is available to address any concerns you may have, so don’t hesitate to contact us.
You can also join our Facebook Community for valuable eCommerce insights and advice. LitCommerce is delighted to be your trusted companion on your selling journey!

