Are you looking to build a website using Squarespace, one of the best-selling platforms, but have no idea where to start? Great, you are in the right spot. This is a website builder that allows anyone to create a professional-looking website without coding experience.
In this article, we will show you how to use Squarespace to create a website that is both functional and visually appealing. Here are the 4 major steps we’ll cover:
- Step 1: Getting started with Squarespace
- Step 2: Building your website
- Step 3: Using Squarespace’s advanced features
- Step 4: Managing your site
So, let’s get started and learn how to use Squarespace to create a website.
How to Use Squarespace for Beginners
Welcome to our Squarespace tutorial! In this section, we’ll guide you through the first steps of creating your own website using this website builder platform.
Step 1: Getting started with Squarespace
Creating an account
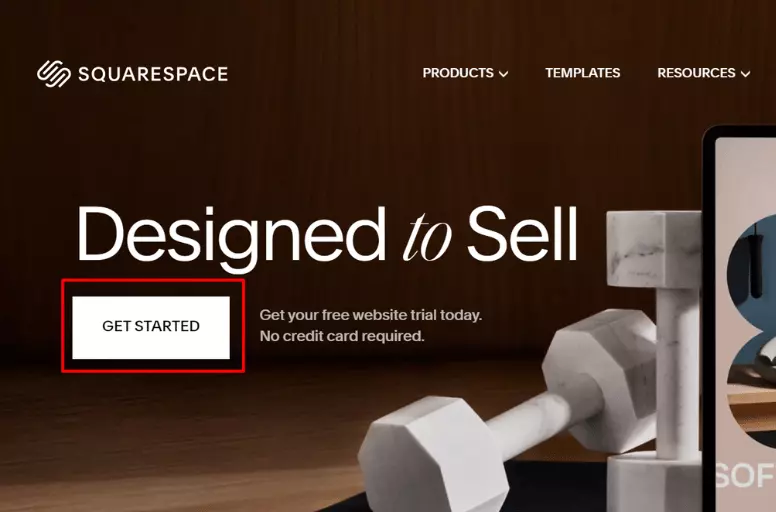
The first thing you need to do is create an account. To do this, go to the Squarespace website and click on the “Get Started” button.
You will have to answer a few questions about your website and business, which helps personalize your experience. You can skip these steps and customize them later on. Then, you can create an account using your Google account or your email.
If you’re new to this system, read our detailed Squarespace eCommerce review.
Choosing a template
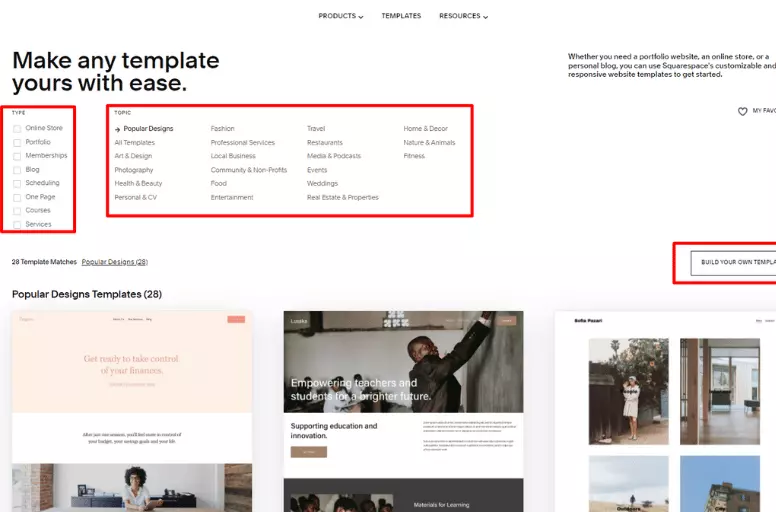
Now that you’ve created your account, you’ll need to choose a template for your website. Squarespace offers various templates to choose from, so take your time and browse through them until you find one that suits your needs.
You can preview every template by clicking on it and filter your search by category (e.g., business, portfolio, blog, etc.) to help narrow down your options. That’s the first step of Squarespace how to use.
Before you move on to the next part, it’s good to know that if Bigcommerce allows for more control over the functionality and design of your site, then Squarespace makes this step effortless for beginners.
You can read our thorough comparison of BigCommerce vs Squarespace for more details.
Step 2: Building your website
So, now you have chosen your Squarespace template, it’s time to start building your website.
Think about which category pages you want to include in your website; then, in this Squarespace tutorial section, we will cover the three main tasks you need to complete to get your site up and running: adding/removing pages, editing pages, adjusting designs and adding branding.
Adding/Removing pages
A website contains several pages divided by categories. To add a new page, you can click on the Pages tab in the left-hand menu.
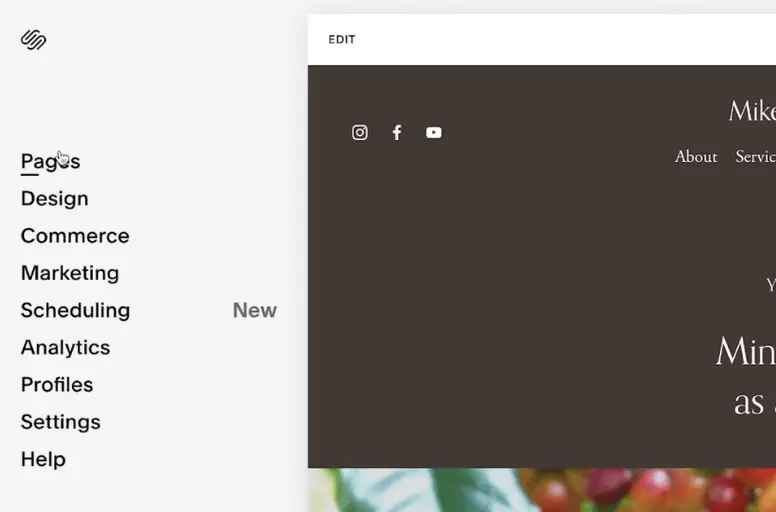
and then click the + “Add Pages” button.
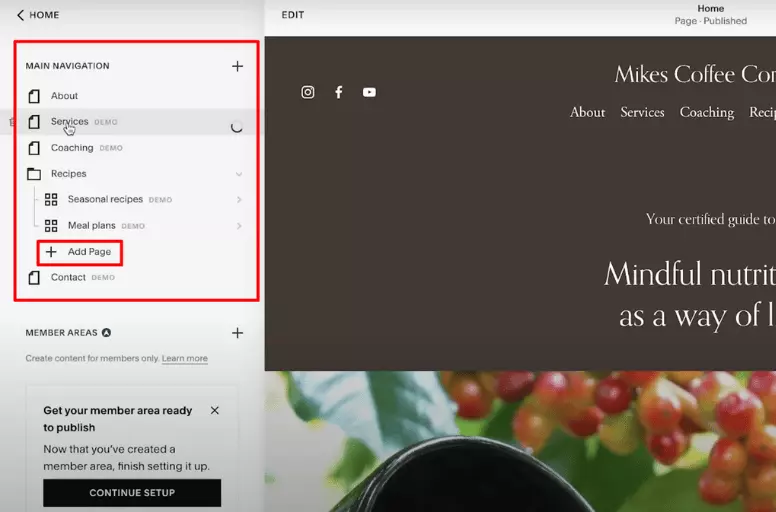
From there, you can choose from a variety of page types, including page layouts, blogs, events, and more. Once you have selected your page type, you can customize it with your own content and images.

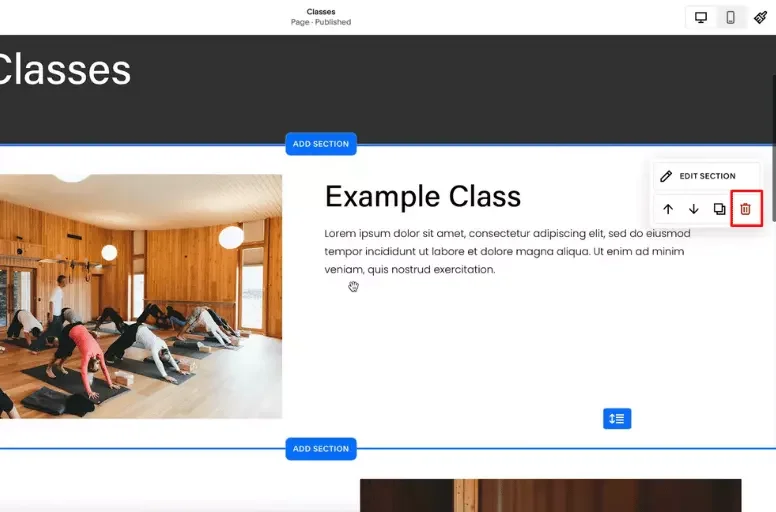
To remove a page, simply click on the page you want to delete and then click the trash can icon. Squarespace will prompt you to confirm that you want to delete the page before it is permanently removed from your site.
Editing pages
Simply click on the page you want to edit and then click the Edit button. From there, you can change your page’s content (text), images, and layout. Squarespace offers various editing tools, like drag-and-drop functionality. So you can effortlessly move elements around your page.
Adjusting designs and adding branding
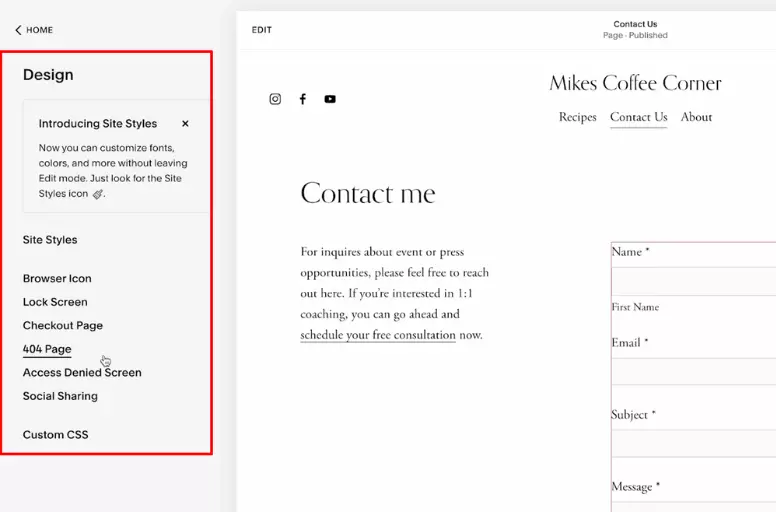
One of the best things about Squarespace is its flexibility when it comes to design. You can choose from various pre-built templates or customize your site’s design to your heart’s content. Click the Design tab in the left-hand menu to adjust your site’s design. You can customize your site’s colors, fonts, and layout from there.
Adding branding elements like your logo is also easy on this platform. Simply click on the Design tab and then select Browser Icon. You can upload your logo and adjust its size and placement on your site there.
Step 3: Using Squarespace advanced features
In this training section, we’ll explore how to integrate eCommerce and use marketing tools to take your Squarespace website to the next level.
Integrating eCommerce
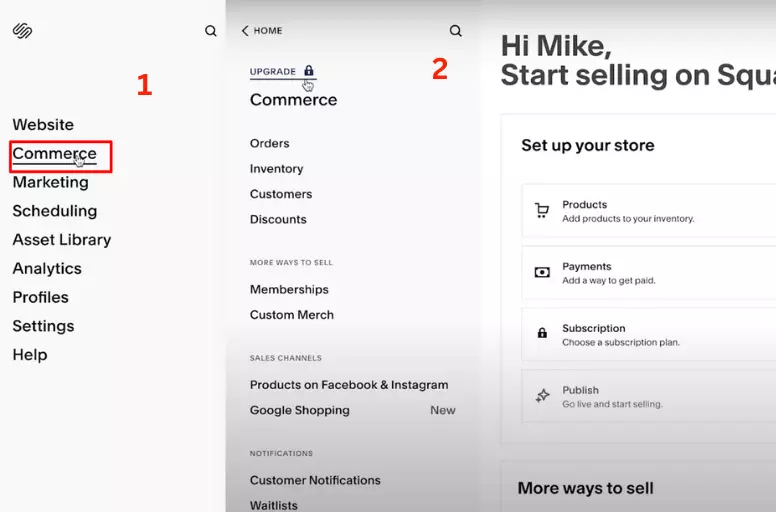
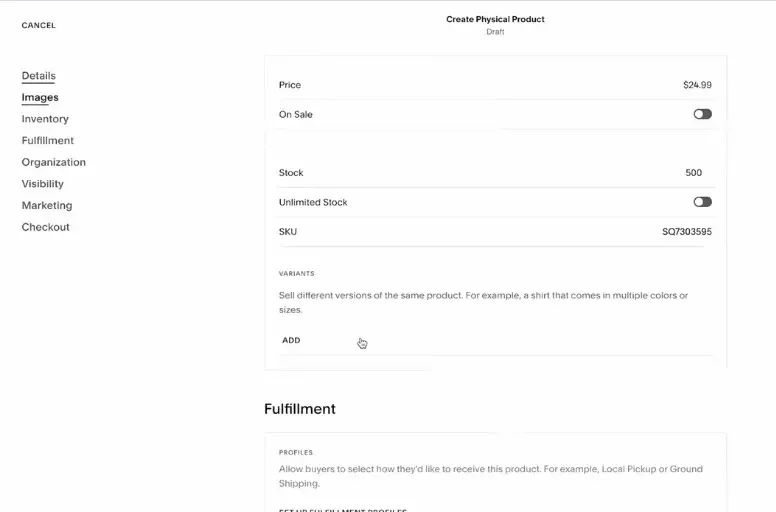
One of the best things about Squarespace is that it allows you to sell products directly from your website. To get started with eCommerce, navigate to the Commerce section of your dashboard. From there, you can set up your store, add products, payments, subscription, manage your inventory, and more.
Once you’ve set up your store, you can customize the look and feel of your product pages to match your brand. You can also add different product variants, such as various colors and sizes, and set up shipping and tax rules.
Besides, Squarespace allows you to install other plugins to optimize your site easily. Here are the best Squarespace plugins to consider.
Own online stores on both Etsy and Squarespace and want to increase your chance of online shoppers finding your items?
Learn more in our comprehensive guide to Squarespace Etsy integration.
Using marketing tools
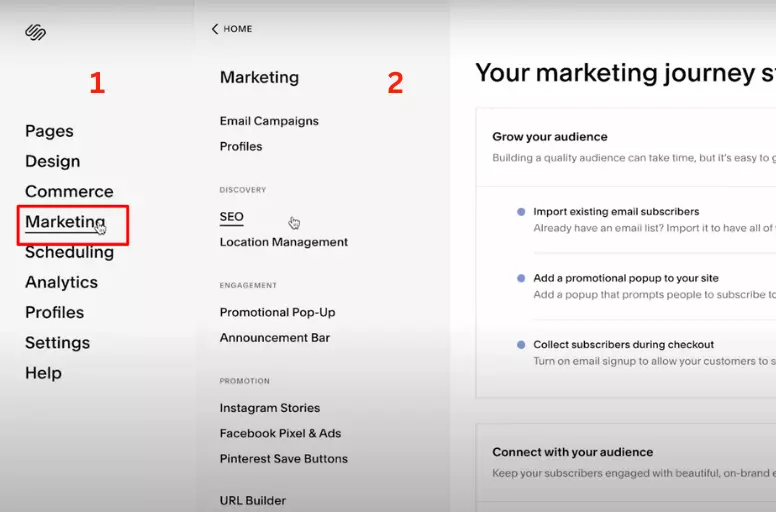
You can learn Squarespace marketing tools effortlessly to promote your website and expand your audience. One of the most powerful tools is email marketing. With Squarespace Email Campaigns, you can easily create and send your subscribers beautiful newsletters and promotional emails.
To get started with email marketing, navigate to the Email Campaigns section of your dashboard. From there, you can create a new campaign, choose a template, and add your content.
Squarespace also allows you to manage your site’s SEO appearance to control how your page appears in search results and browser tabs. Some details you can edit include your site information, site design, domain and URL setup, and location information.
Besides, you can connect your social media accounts to your website and automatically share your content on platforms like Facebook, Twitter, and Instagram. This can help you reach a wider audience and drive more traffic to your website.
Step 4: Managing your site
Congratulations! By this point, you should have created a beautiful website using Squarespace. Now, it’s time to manage your site and make it even better. In this tutorials section, we will cover the following topics:
Connecting a domain
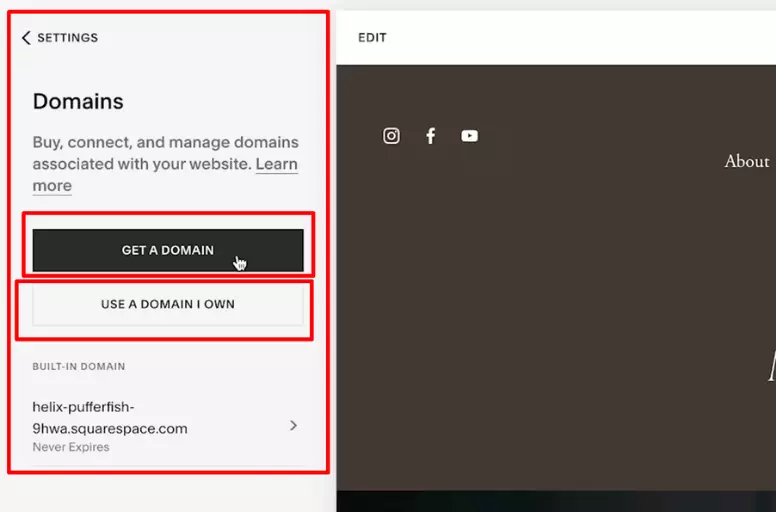
Your website needs a domain name to be accessible to the public. You can connect your domain name to Squarespace if you haven’t already. Don’t worry if you don’t have a domain name yet, Squarespace offers domain registration services. Here’s how to connect a domain:
- Go to the “Settings” menu in your Squarespace dashboard.
- Click on “Domains“.
- If you already have a domain, simply click on “Connect a Domain“. If you need to register a new domain, click on “Get a Domain“.
- Follow the steps to either connect or register your domain.
Adding business and location information
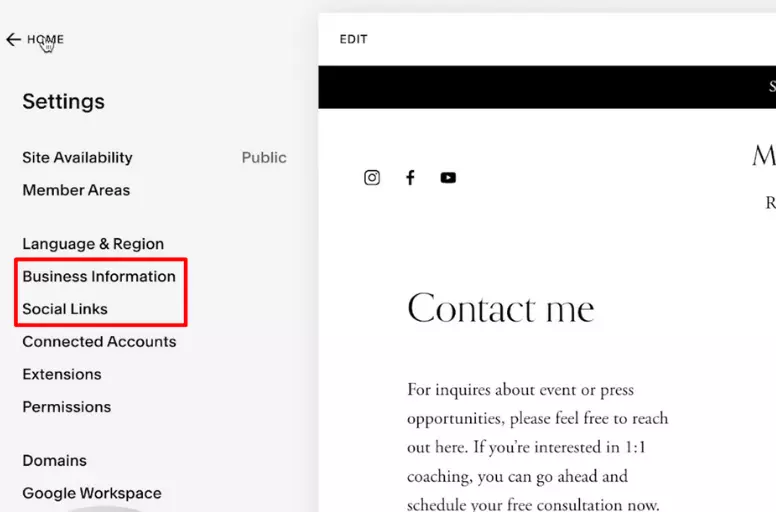
If you have a business website, it’s important to add your business information and location. This will help potential customers find you. Here’s how to add business and location information:
- Go to the “Setting” menu in your Squarespace dashboard.
- Click on the “Business Information” page or create a new page if you don’t have one.
- Add your business information, including your phone number, email, and physical location.
Adding social media links
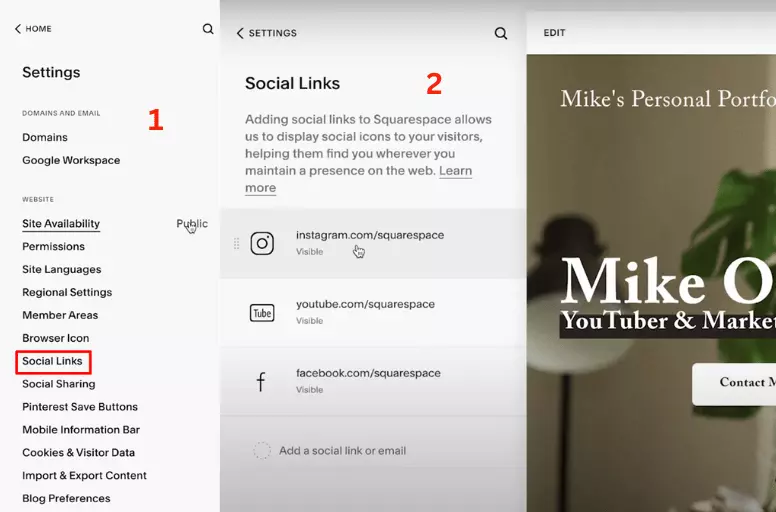
Social media is a great way to promote your website and engage with your audience. Learn how to use Squarespace by adding social media links with these steps:
- Go to the “Settings” menu in your Squarespace dashboard.
- Click on “Social links“.
- Click on the social media platform you want to add.
- Follow the steps to connect your social media account.
Preview your website
Before making your website live, it’s important to preview it to make sure everything looks good. To preview your website, follow these steps:
- Go to the “Preview” button in your Squarespace dashboard.
- Click on “Preview Website“.
- Check each page to make sure everything looks good.
- Make any necessary changes.
That’s it! You now know how to use Squarespace with our detailed tutorial 2023. Keep exploring and experimenting it to make the most of your website.
Squarespace Tutorials – FAQs
Yes, Squarespace is easy to use for beginners. The platform has an intuitive interface and drag-and-drop feature that allows easy website creation and customization. Additionally, Squarespace provides vast templates and design options to meet your needs. Squarespace is a popular website builder that enables you to build and personalize your website without requiring coding expertise. The platform provides a wide range of features and tools that you can use to design a website that meets your requirements. These include templates, design options, and integrations with third-party services. To use Squarespace to create a website, you can follow these simple steps: No, Squarespace is not free to use. However, the platform offers a 14-day free trial that you can use to test out the features and tools available before committing to a paid plan. Squarespace offers a range of pricing plans that you can choose from based on your needs and budget.
Start Using Squarespace Now!
Now, you know clearly how to use Squarespace. This website builder stands out as an awesome choice for building and personalizing your website. With a user-friendly interface and many features, this is the ideal pick for beginners seeking to craft a website from the ground up effortlessly.
To wrap up our tutorial for beginners, here are the major steps to use Squarespace:
- Sign up for an account on Squarespace
- Choose a template that fits your needs
- Customize your site by adding pages, images, and text
- Integrate payment gateways to sell products or services
You can join our Facebook Community and Blog to learn more about eCommerce strategies and best practices to make the most of your Squarespace website.
Also, contact us any time if you need help to integrate your current website with marketplaces to increase sales.

