Importing products manually into your WooCommerce store can be time-consuming, especially when you’re managing a large inventory or scaling your business. That’s where WooCommerce CSV import comes in.
With the right approach, you can upload hundreds or even thousands of products in minutes. In this guide, we’ll walk you through a simple 6-step WooCommerce CSV import process to seamlessly import products into your WooCommerce store, saving you time, reducing errors, and helping you scale smarter.
- Step 1: Prepare your CSV files
- Step 2: Create your LitCommerce account
- Step 3: Set up a CSV file on LitCommerce
- Step 4: Connect Your WooCommerce Store to LitCommerce
- Step 5: List and import products from WooCommerce
- Step 6: Set up inventory sync & price sync
Let’s find out!
WooCommerce Integration Made Easy with LitCommerce
At LitCommerce, we offer the quickest WooCommerce integration with absolutely NO hidden fees! Click to discover how it works and how many platforms you can connect.
How to Perform WooCommerce CSV Import using LitCommerce
If you’re looking for a quick and seamless way to upload your products in bulk, using LitCommerce for your WooCommerce CSV import is the easiest solution.
Reminder: Make sure you’ve already set up and connected your WooCommerce store. You’ll need it active before you can start listing products.
Step 1: Prepare your CSV files
Before importing products into WooCommerce via LitCommerce, a well-organized CSV file is required. This file should contain essential product details like:
- Product title
- SKU (Stock Keeping Unit)
- Price
- Quantity
- Description
- Images
- Category
Make sure each column is clearly labeled, and your data is clean. It means there should be no missing or mismatched values.
Template tips
Once your file is ready, you’re good to go for the next step in the WooCommerce CSV Import guide: create a LitCommerce account.
Step 2: Create your LitCommerce account
Now that your CSV file is ready, the next step is to integrate LitCommerce with your WooCommerce store. This will allow you to import your product data seamlessly from the CSV file.
Now, let’s create a LitCommerce account to access to WooCommerce CSV import feature.
- To register, simply visit the LitCommerce sign-up page.
- Fill in the required fields, such as your Name, Email Address, and Password, then click Create Account.
You can also quickly sign up using your existing Facebook or Google account. By registering, you agree to LitCommerce’s Terms & Conditions and Privacy Policy.

Once connected, you can start syncing your product data, including the CSV import functionality.
Step 3: Set up a CSV file on LitCommerce
Next, as part of the WooCommerce CSV import process, you’ll need to set up your CSV file in LitCommerce. Once you’ve logged in to LitCommerce and your CSV file is ready, it’s time to import the file.
This file will work as your Main Store. It is where all your product data will come from, and LitCommerce will use it to sync with WooCommerce.
Here’s how to set up your CSV Feed on LitCommerce:
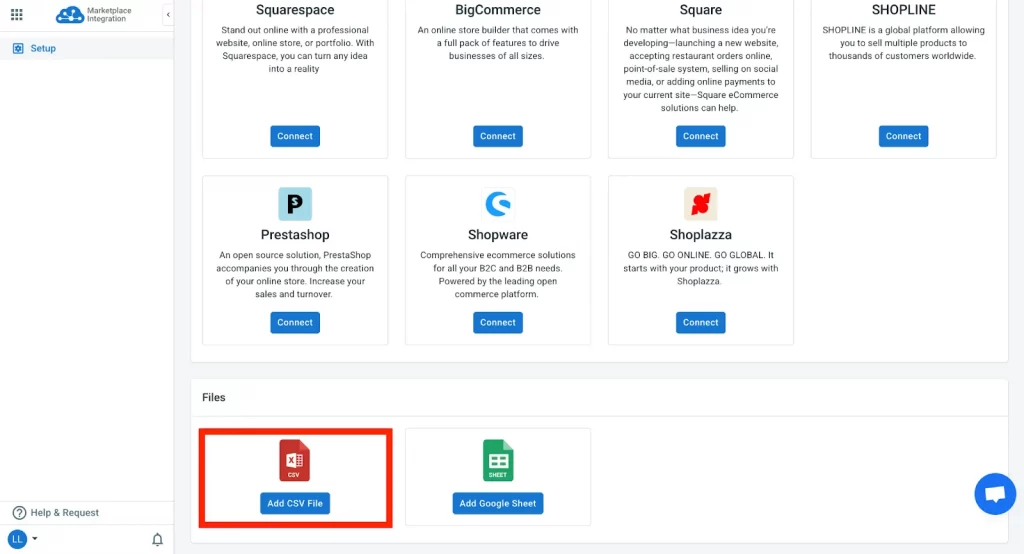
- On your LitCommerce dashboard, start by selecting Add CSV File from the list of supported Main Store platforms.
This option allows you to upload and sync your CSV file with LitCommerce as your data source.
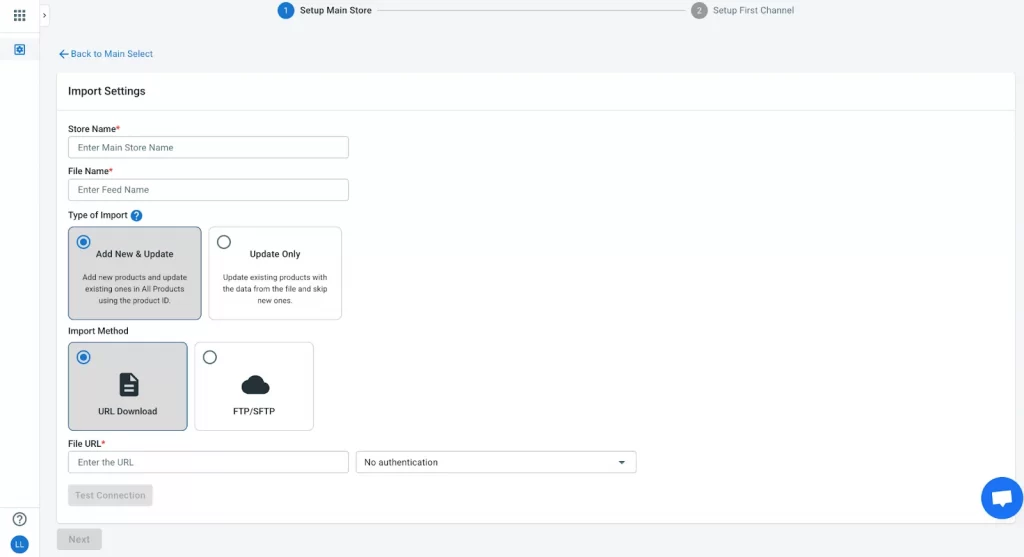
2. After selecting CSV as your main store, you’ll be redirected to the Import Settings page, where you’ll enter key details to complete the file import setup.
- Store name: Give your CSV store a name that’s easy to reference later.
- File name: Add a name for the file you are importing, so it’s easy to identify.
- Import type: Choose whether this is an Add New & Update (to import all new product data and update existing ones) or an Update Only (if you want to update your existing listings on the All product tab at LitCommerce).
- Import method: You can choose between URL download or FTP/SFTP to import your CSV. If you have your CSV hosted on a server or cloud service, you can use the URL method to link to your file in the LitCommerce app.
However, if you don’t have a server or cloud service storage with URL access? We recommend using the Google Sheet option instead. Simply follow these steps
- Upload your CSV file to Google Drive

- Once uploaded, copy a shareable link that anyone with the link can access. This link allows LitCommerce to read the file and import the data.
- Go back to the Import Settings page in LitCommerce and paste the shareable link from your Google Drive into the File URL field.
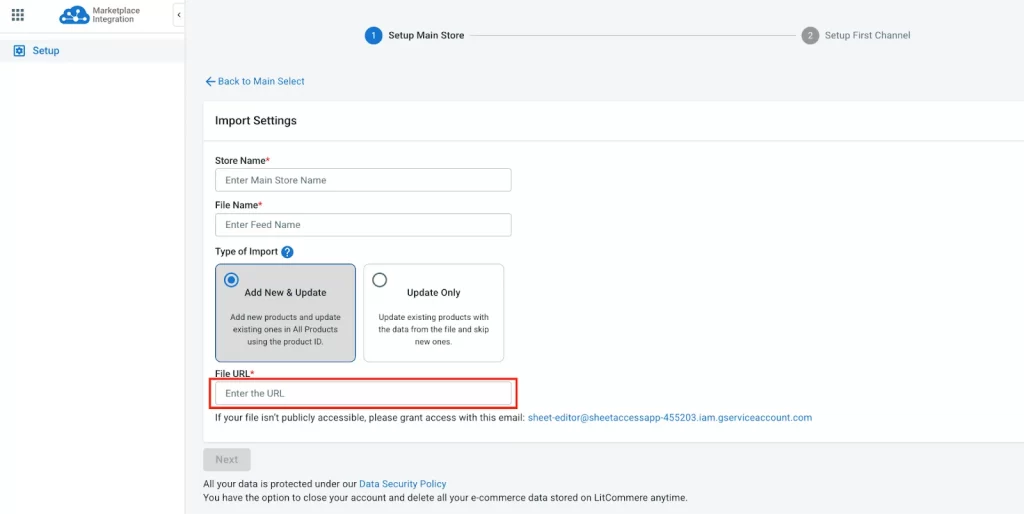
- Set authentication to No authentication: For most files, simply choose No authentication to ensure there are no issues accessing your file.
3. Click Test Connection to test the connection to your CSV file to ensure it can successfully access and retrieve your product data. Then click Next to finish the Import settings.
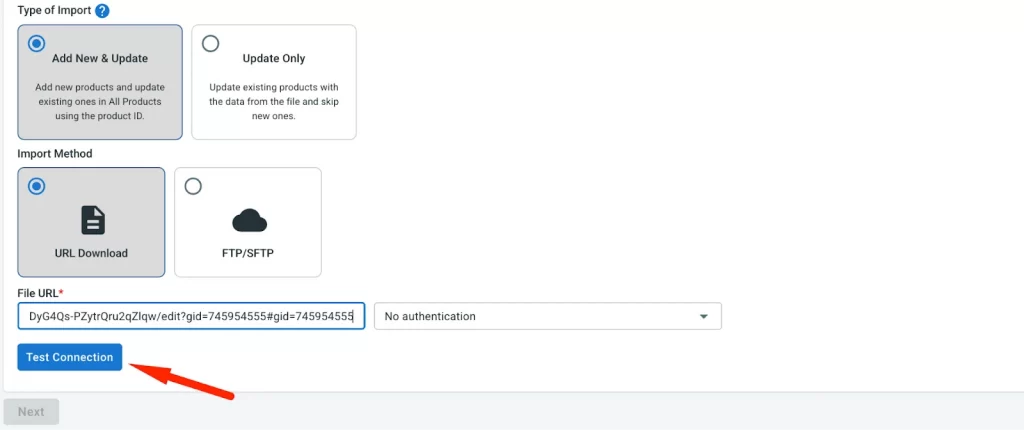
If the connection test is successful, you’re ready to move to the next WooCommerce CSV Import step: mapping your CSV fields to product attributes.
4. Map your CSV fields to product attributes
Now that LitCommerce is connected to your CSV file, you’ll be taken to the Attribute Mapping screen. This next step on the WooCommerce CSV Import process ensures that the data flows correctly into the system, allowing you to match the columns in your CSV file to product attributes in LitCommerce.
- Automatic mapping: LitCommerce will automatically detect and match the column names from your CSV file to its built-in product attributes (such as SKU, Product Name, Price, Quantity).
- Manual mapping: If some columns don’t auto-map (due to different naming conventions), you can manually match them by selecting the correct attribute from the dropdown list. You can also uncheck any fields you don’t want to import.
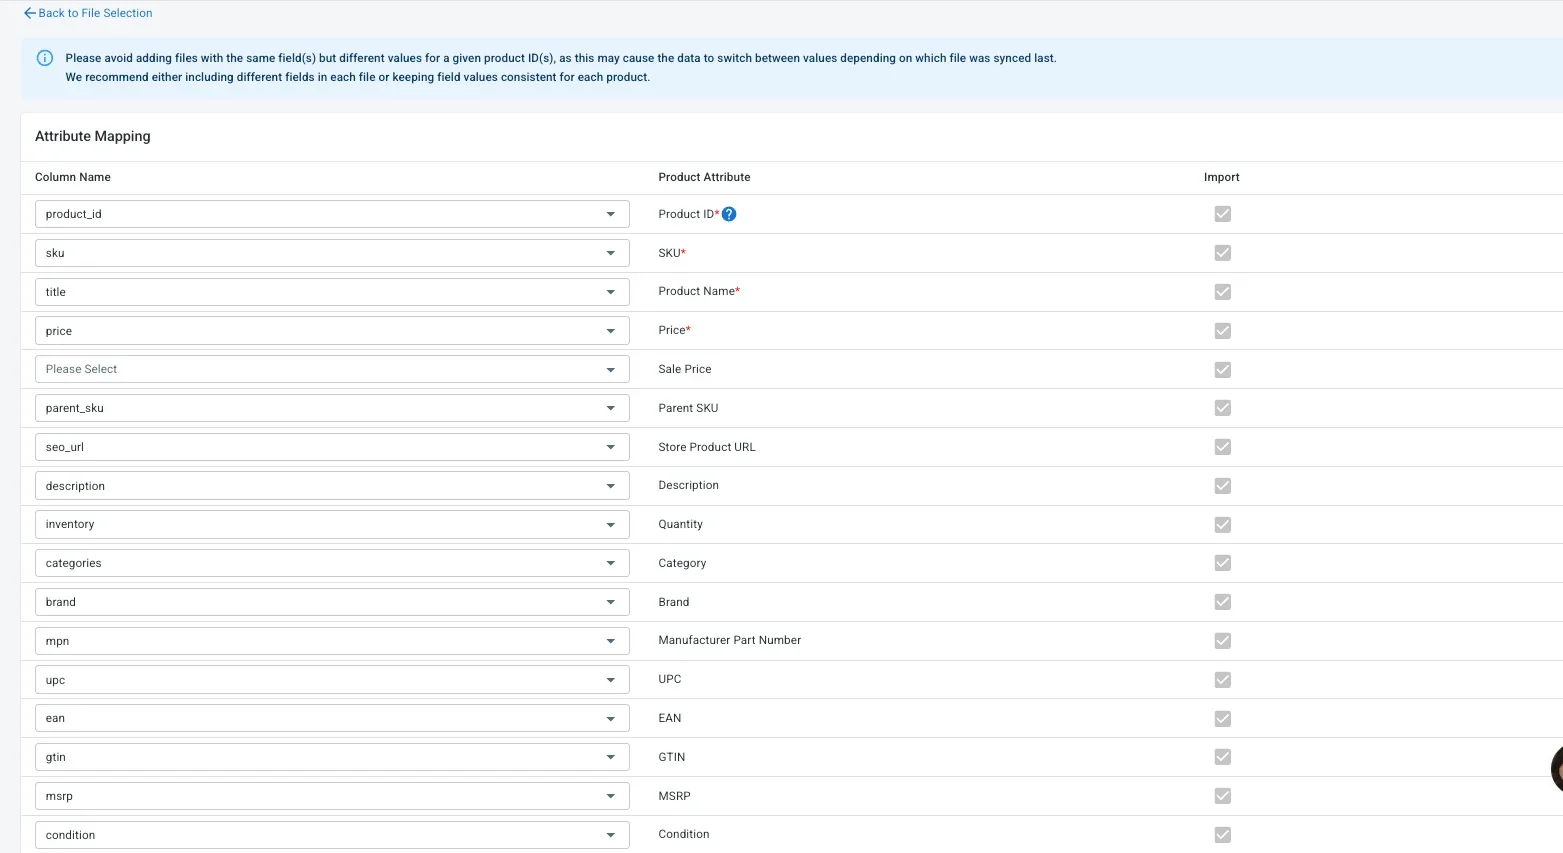
Once everything is mapped, click Save & Run to begin the import process.
5. Set up automatic updates for your CSV import
With your CSV file successfully mapped, the final step is to set up an automatic update schedule. This ensures that your product data is always up-to-date without needing to manually upload a new CSV every time you make a change.
- Toggle Automatic Update: Turn the Automatic Update option ON to keep your WooCommerce store synchronized with LitCommerce, automatically syncing changes made to your CSV file.
- Select your time zone: Choose your preferred time zone from the drop-down menu so that updates happen at the right time for your business.
- Set the first sync time: Pick a time when you want the first sync to occur. This will be when your products are first uploaded to WooCommerce from LitCommerce.
- Choose the update frequency: You can set how often you want the data to be updated. If you have frequent changes in pricing or inventory, selecting a higher frequency (like 4 or 12 times a day) will keep your listings current.
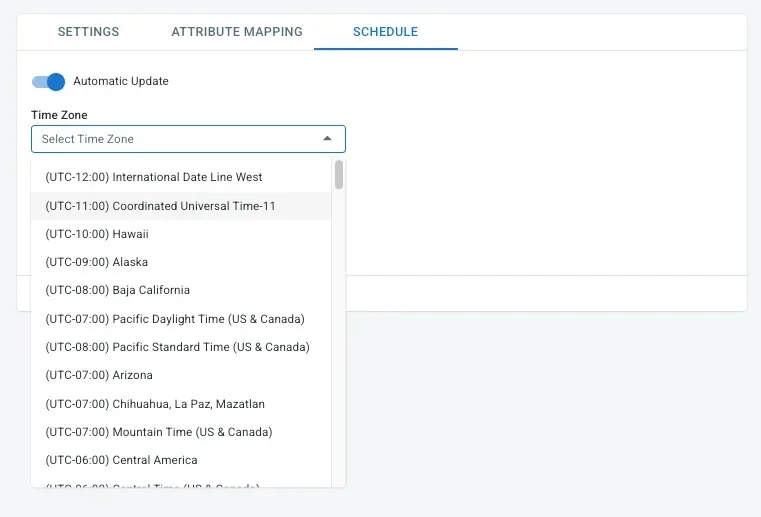
Once your automatic updates are configured, click Save, and you’re ready to let LitCommerce handle the syncing and updating of your product data on WooCommerce. This step eliminates the need for manual updates, streamlining your workflow and saving you time.
Step 4: Connect Your WooCommerce Store to LitCommerce
Now that your product data has been imported into LitCommerce, the next step is to connect your WooCommerce store to LitCommerce. This will allow you to sync your product data and begin listing directly from LitCommerce.
- In your LitCommerce dashboard, from the list of available channels, click Connect to choose WooCommerce as the platform where you’ll list your products.
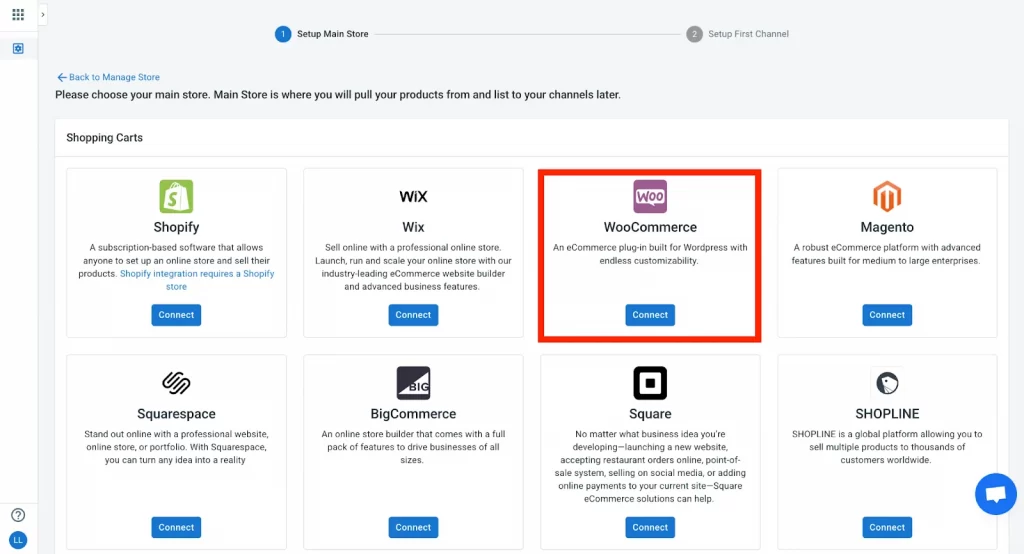
- LitCommerce will redirect you to the WooCommerce login page. Enter your login credentials and sign in.
- Once logged in, you will be asked to grant LitCommerce permission to access your WooCommerce store. Click Allow Access to complete the integration.
After the connection is established, LitCommerce will redirect you back to your dashboard. Your WooCommerce store will now be displayed as your sales channel. You can begin syncing your product data directly from LitCommerce to WooCommerce and start managing your listings more efficiently.
Step 5: List and import products from WooCommerce
Now that you’ve connected your WooCommerce store to LitCommerce, you can begin listing and importing products.
LitCommerce offers two flexible ways to import and list products: starting from a CSV file or syncing with an existing WooCommerce store.
Case 1: List products on WooCommerce using a CSV file
If you have a CSV file with your products but haven’t connected to an eCommerce platform like WooCommerce, you can still list your products directly. Here’s how:
- In your LitCommerce dashboard, go to All Products from the left-hand menu.
- Tick the checkbox next to the products you want to list on WooCommerce and click List products on a channel.
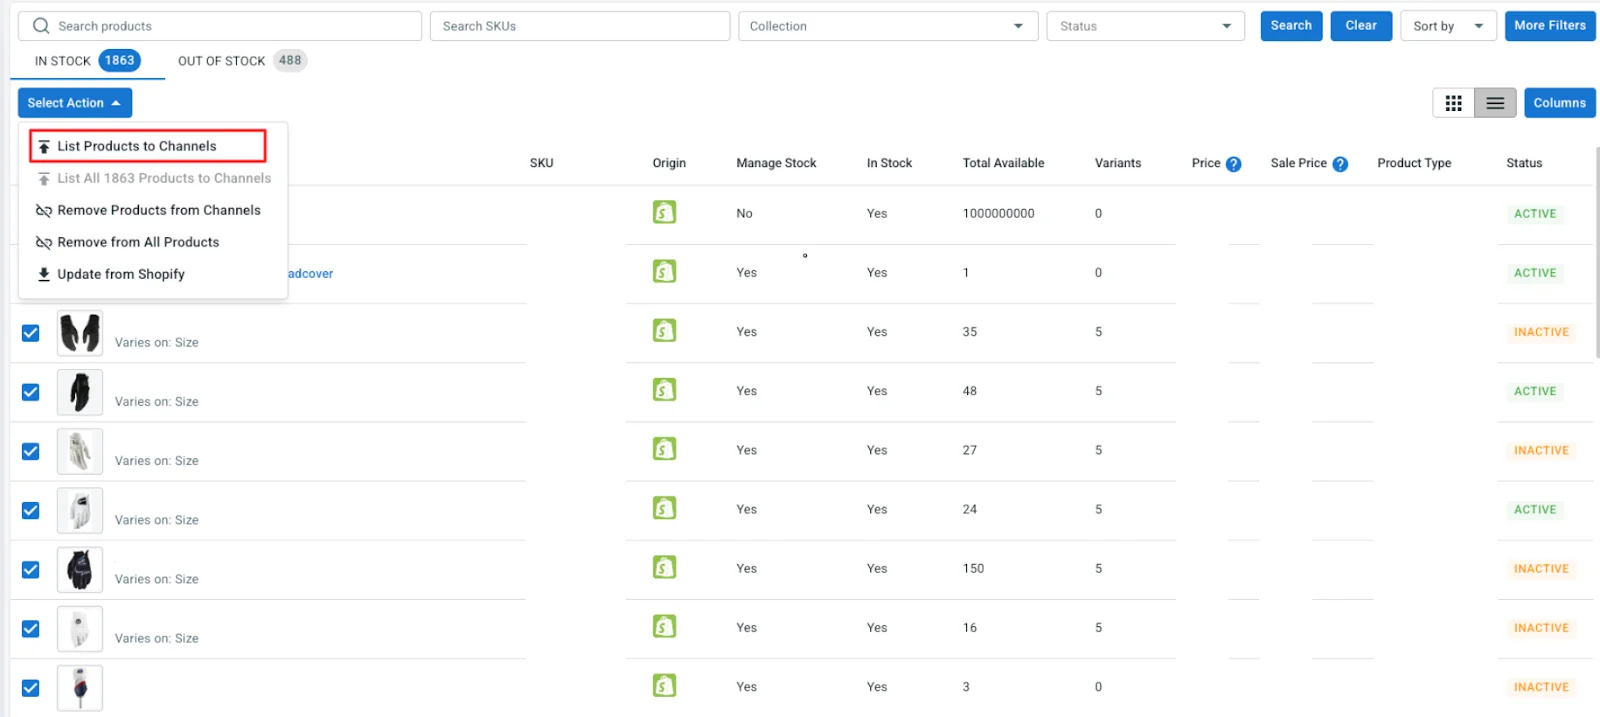
- Choose WooCommerce from the drop-down list.
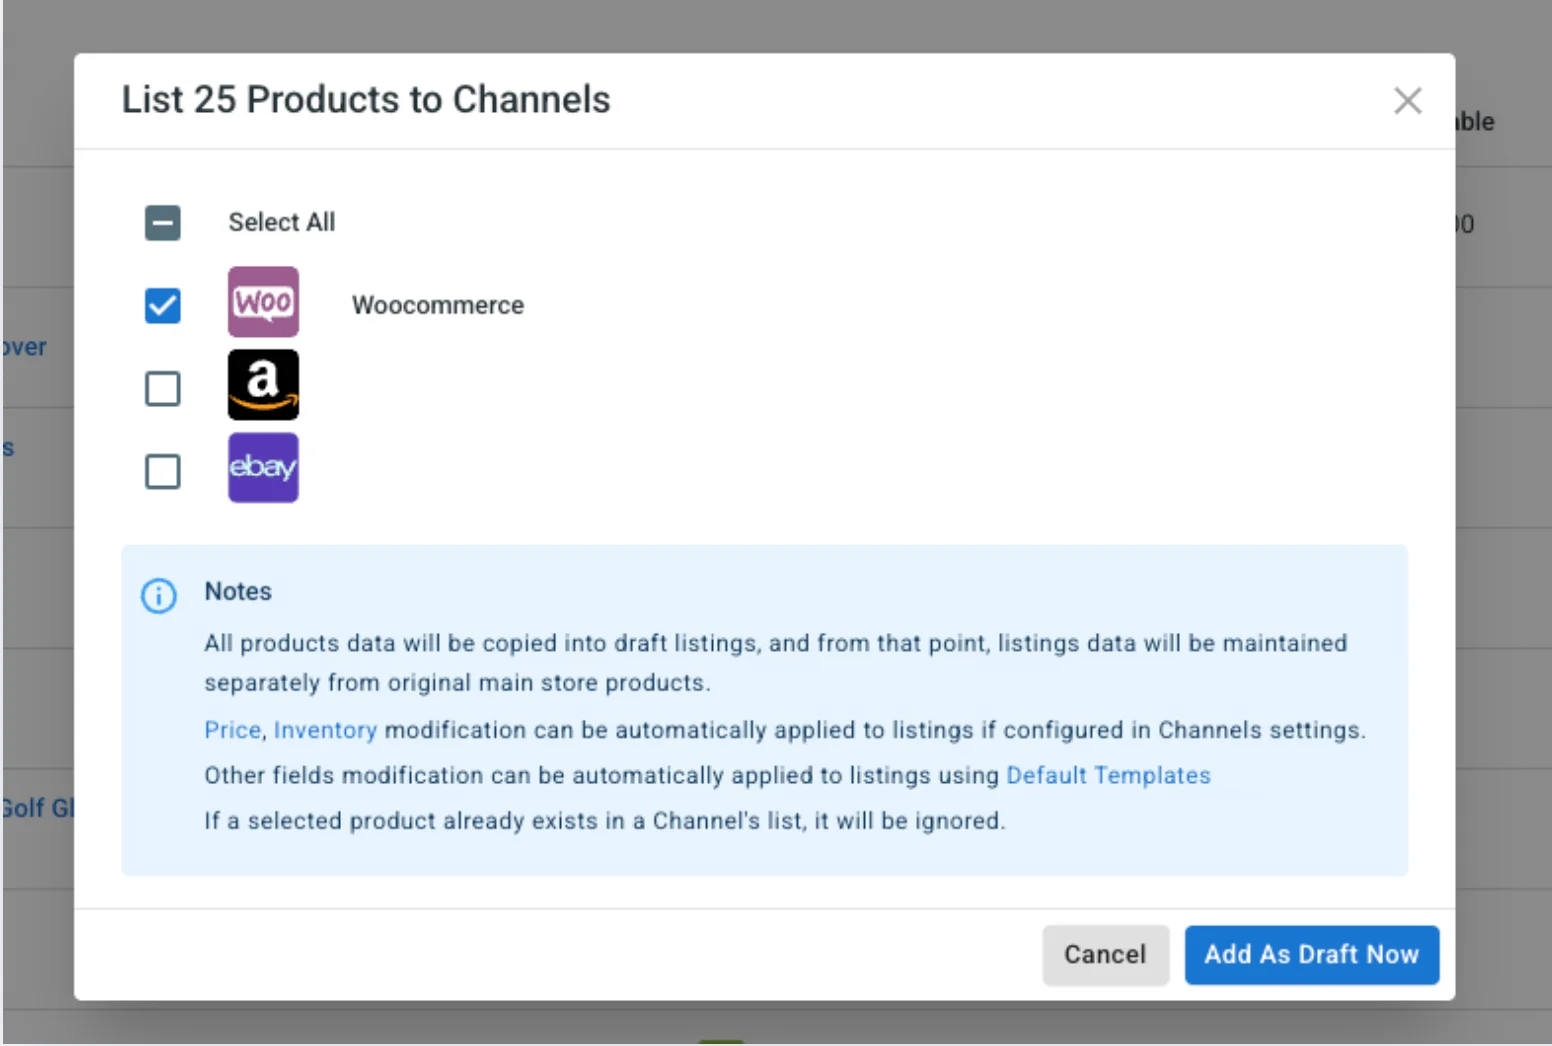
LitCommerce will redirect you to the draft listings for your WooCommerce store and notify you that the draft listings have been successfully created.
- Before making the listings live, you can edit the product details to meet WooCommerce’s requirements.
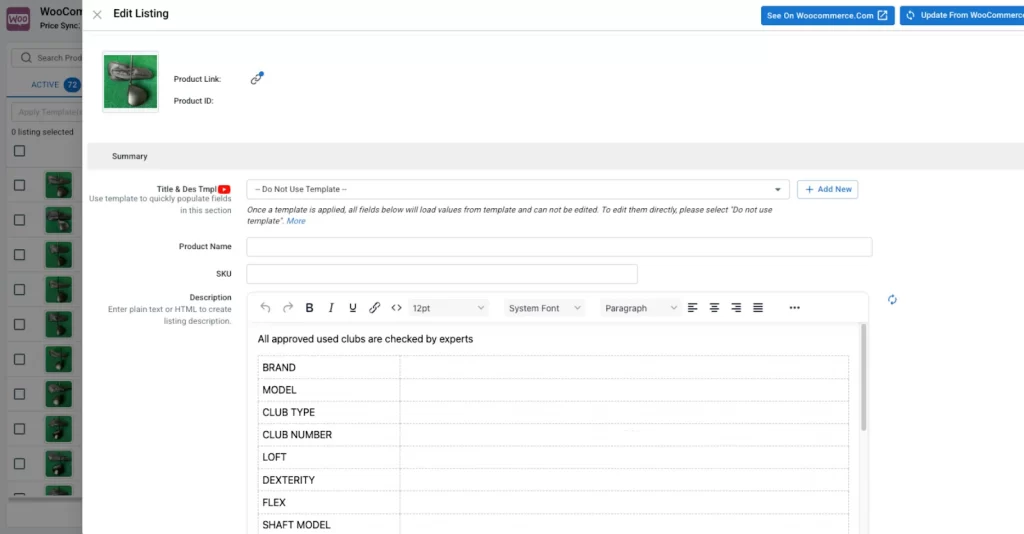
Practical Tip: To make bulk listing more efficient, Templates & Recipes can be used. Templates let you preset common settings like shipping methods or return policies, so you don’t need to enter them repeatedly. Recipes go a step further by allowing you to apply templates to specific products automatically based on rules you define (e.g., items below $50 use a free shipping template).
- Once everything looks good, click Save & Publish to Woo to push the products live to your WooCommerce store.
Case 2: Import products from WooCommerce & edit in bulk
If you’re already selling on WooCommerce and want to bulk edit your WooCommerce products, here’s how to do it using LitCommerce:
- Click on the WooCommerce channel on the left sidebar, choose Import from Woo in the top right corner.
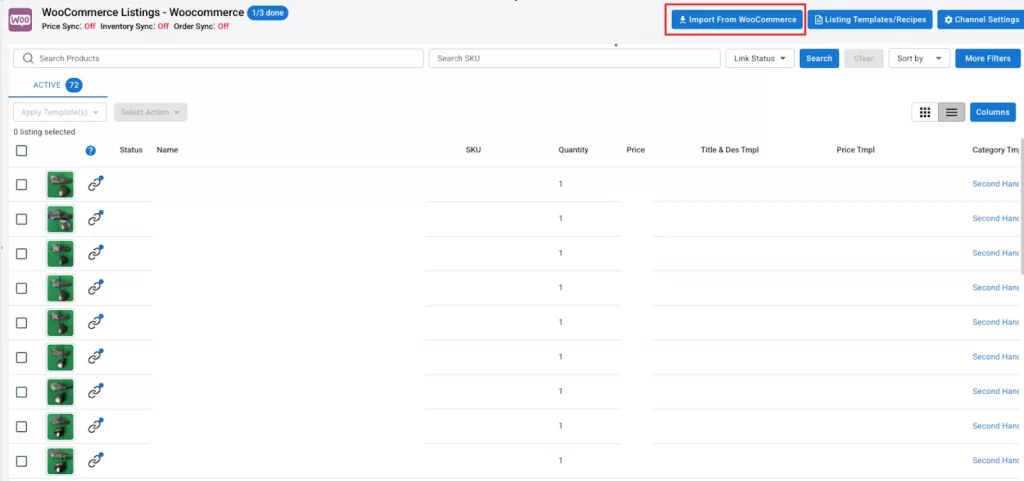
- You will be asked a few questions about whether you want to auto-link listings, re-import all deleted products, or apply a specific filter.
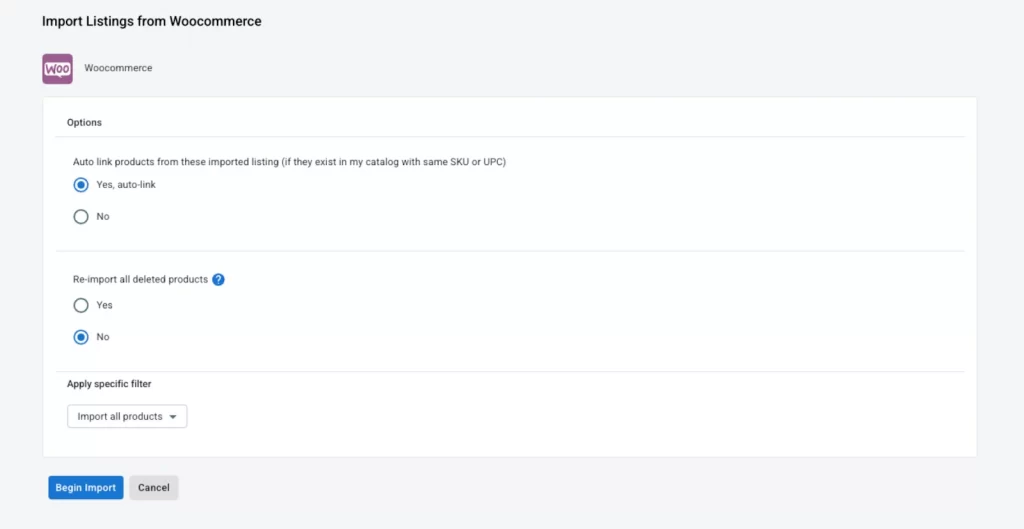
After setting, click Begin Import to start the importing process. Then, you will see all the imported products on the All Products tab.
Once you import the current listings from your WooCommerce store, LitCommerce will automatically link them to the CSV products by matching SKU. You will see the blue chain icons when the linking is complete.
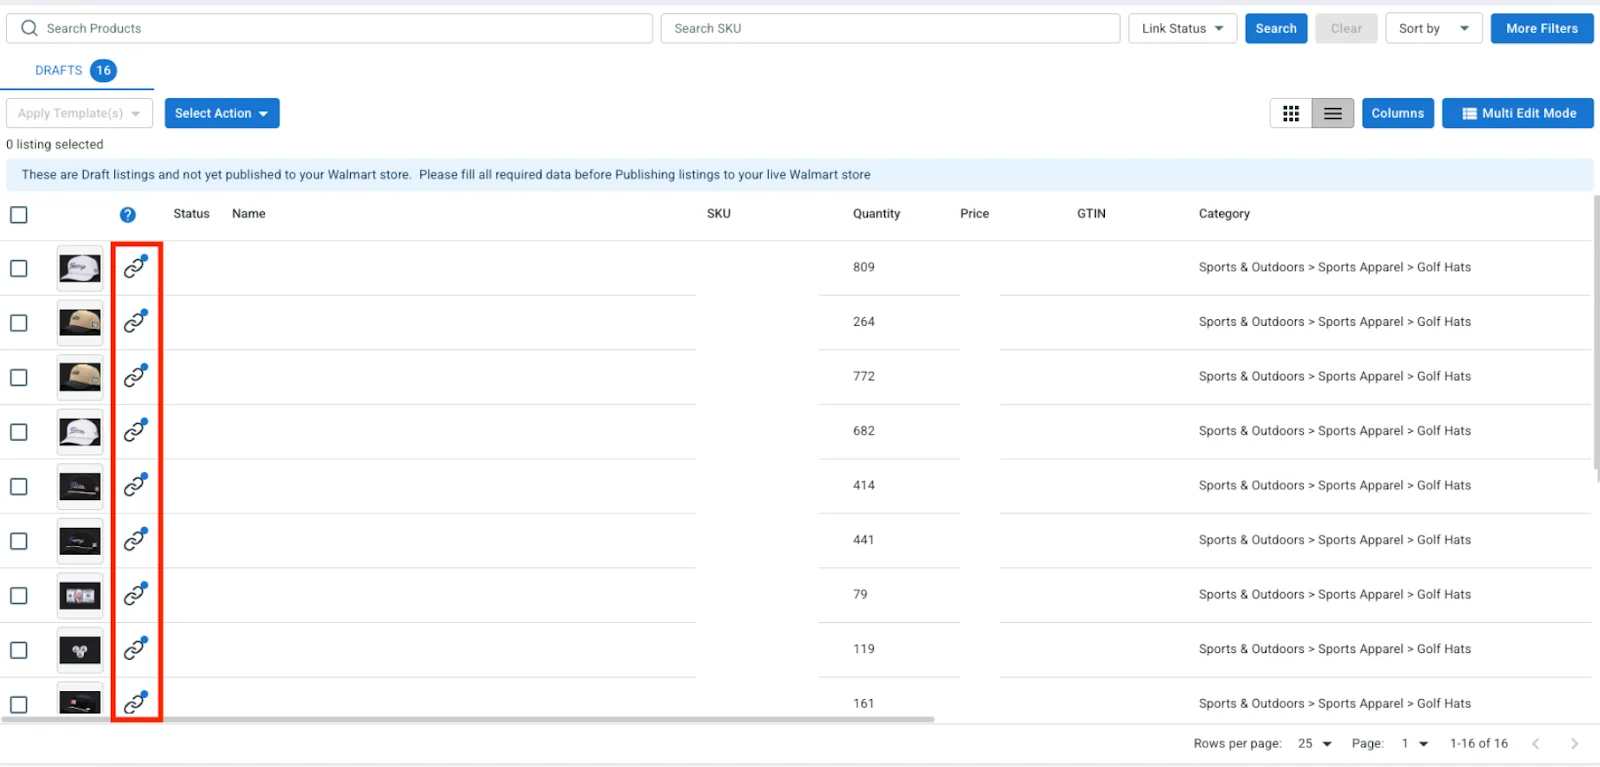
However, if your SKU numbers do not match across channels, or an SKU is missing, you will have to create the links manually by following the instructions below:
- Simply hover over the unlinked red icon and select Link to a Product.
- In the field, enter the missing SKU of the product you want to link to.
- Select the product that appears on the screen. A notification will pop up when the linking process is complete.
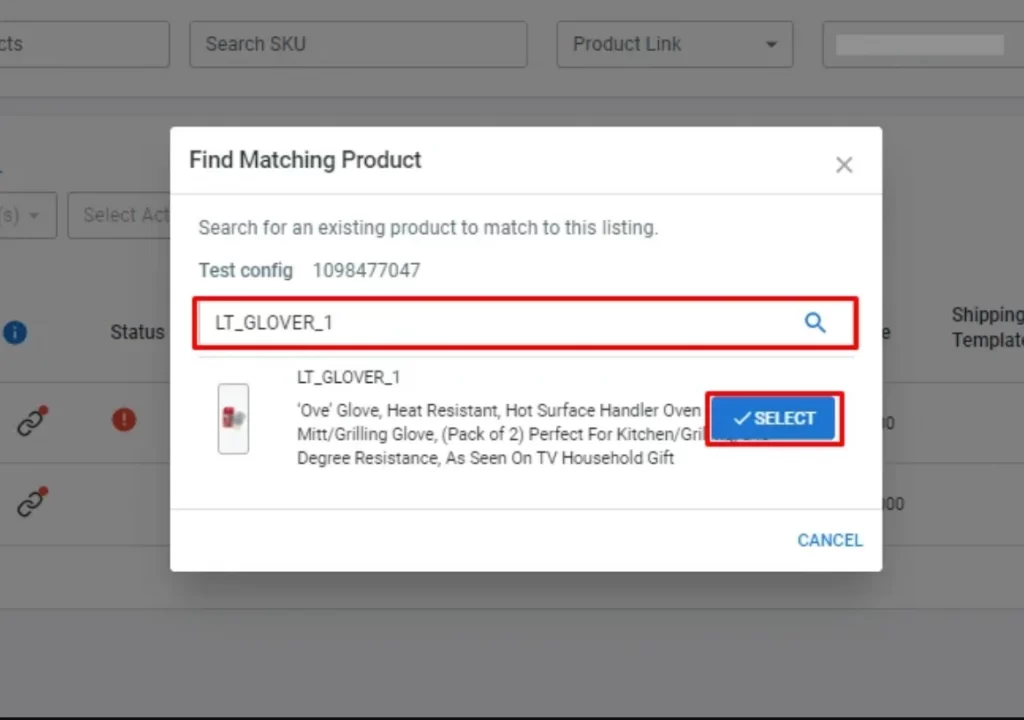
- Next, open your CSV file, make edits to product details such as Prices, titles, descriptions, and more.
Just make sure that the products in your editing file match the ones in your WooCommerce store by using the same Product IDs or SKUs.
- At the scheduled sync time, all updates from the file will be automatically updated to the All Products tab and your WooCommerce store, as long as the Product IDs or SKUs match.
You can check your WooCommerce store and the All products tab to confirm that all changes (e.g., updated prices or stock levels) are reflected correctly.
Now your products are ready to be listed, and you can edit them in bulk or make new listings with ease. LitCommerce simplifies product management for WooCommerce stores, whether you’re starting fresh or managing existing listings.
If you’re selling on Etsy and want to import products to WooCommerce, check out these details guide to Integrate Etsy to WooCommerce (2 Methods)
Step 6: Set up inventory sync & price sync
You’re at the final step of the WooCommerce CSV import process. To help prevent overselling and price differences, LitCommerce allows you to automatically sync inventory and pricing between your CSV file and WooCommerce listings.
Here’s how to enable inventory and price sync on LitCommerce:
First, navigate to the WooCommerce channel on the left sidebar, then follow these 4 steps:
- Click Channel Settings in the top right corner
- Scroll down, and you will arrive at 2 sections: Inventory and Price
- Next, toggle the switch next to these sync options
- Then, hit the Save Settings button to save the changes you’ve just made.
Inventory sync
After this sync option is turned on, the LitCommerce tool will help you sync inventory from your CSV file to your WooCommerce store automatically.
If you want more control over how inventory shows up on WooCommerce, you can apply rules directly in the settings:
- Quantity: Choose what portion of your total stock is listed on WooCommerce (e.g., 100% or 50%).
- Maximum/minimum quantity: You can specify the maximum or minimum quantity displayed on your WooCommerce store. This setting is helpful if you want to create scarcity or control the number of products displayed in your store.

Price sync
By enabling the price sync option, any pricing updates in your CSV file will automatically reflect in your WooCommerce store based on the schedule you’ve set, no manual work is needed.
Besides, this option allows you to control how the price is shown on your WooCommerce store using
- Use Sale Price: Use the compared-at price for higher conversion.
- Currency Conversion: Convert prices when your CSV file and WooCommerce use different currencies.
- Price Rules: Set product prices on WooCommerce by a fixed amount ($) or percentage (%), or round prices to more attractive values.

Method 2: Manually Import Products to WooCommerce with CSV files
In addition to using automated WooCommerce import tools, you can also upload products manually with WooCommerce’s built-in CSV import feature. Here’s how to do it step-by-step:
- From your WooCommerce dashboard, go to All Products > Products in your WooCommerce dashboard.
- Then, click Import at the top to open the Upload CSV File screen.
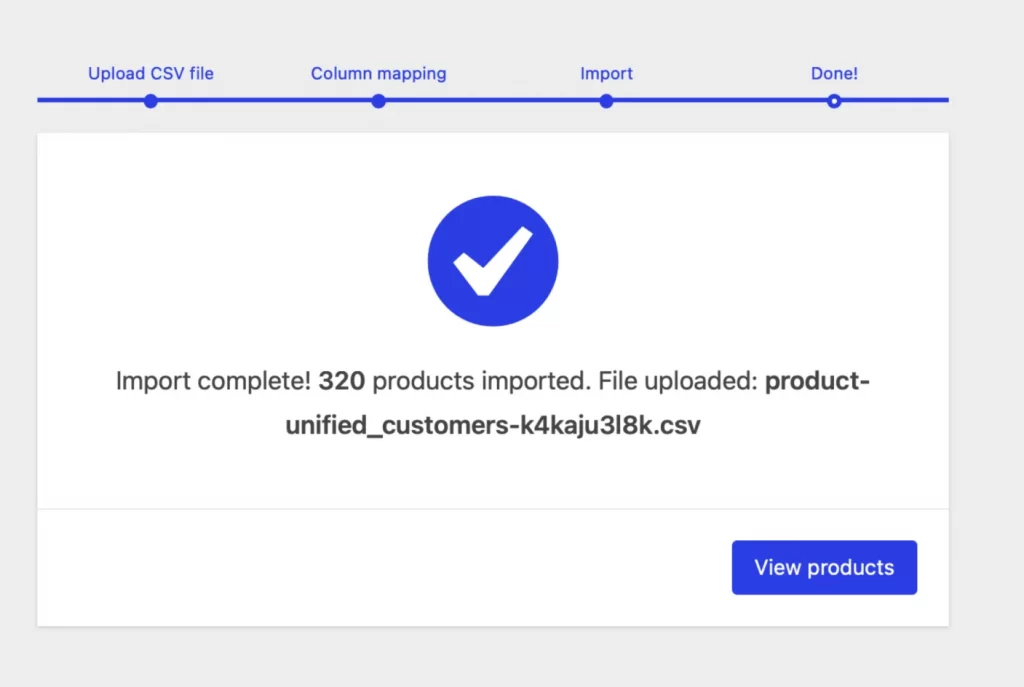
- Select Choose File and upload your desired CSV file. Next, click Continue to proceed to the Column Mapping screen.
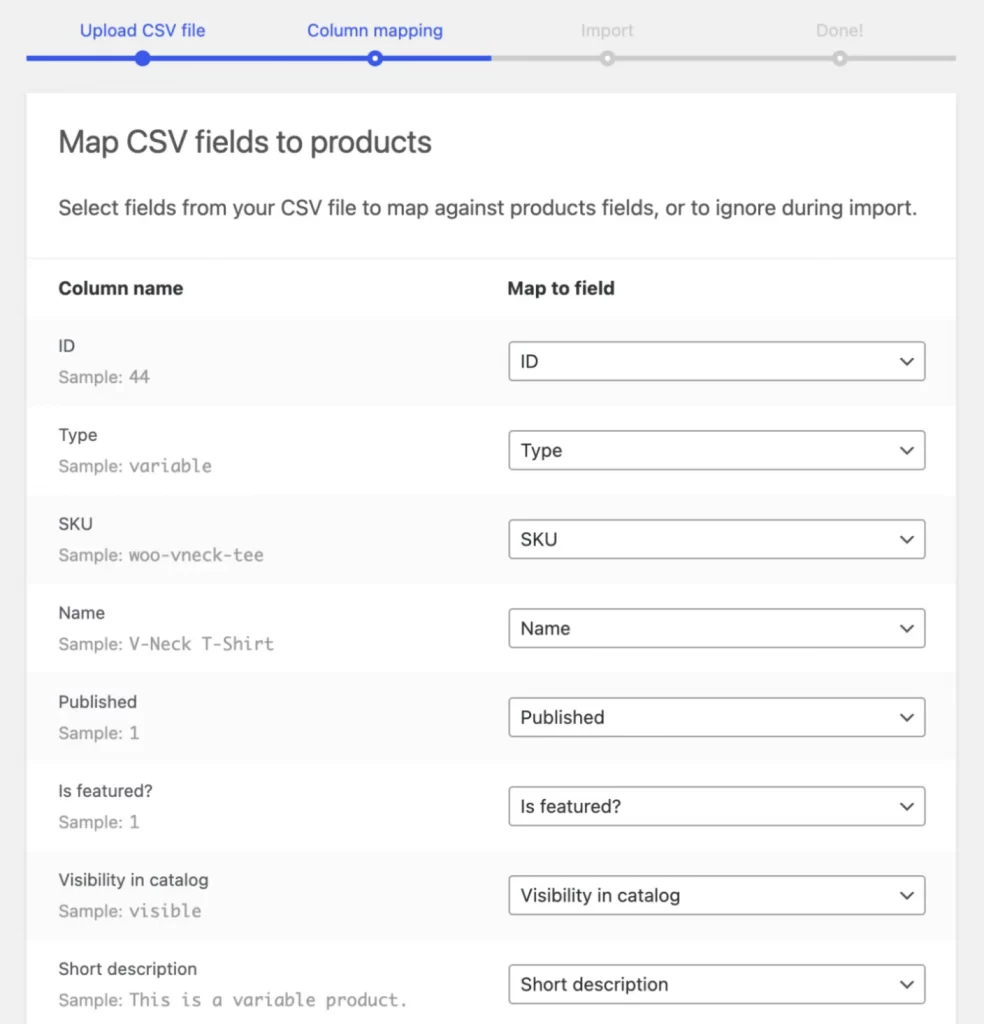
- Use the dropdown menus to adjust mappings or select Do not import for any unnecessary columns. Once everything is set, click Run the Importer.
Update existing products
Additionally, you can also use this built-in WooCommerce CSV import tool to update existing products with new information, change a tax class, and more manually. Here are 4 steps to update existing products:
- Prepare a CSV file using the format in the “Create Your CSV” section. Make sure to include product IDs or SKUs so WooCommerce can match them.
- Go to All Products, choose Products. Click Import.
- Upload your CSV file via Choose File. Check the box for Update Existing Products.
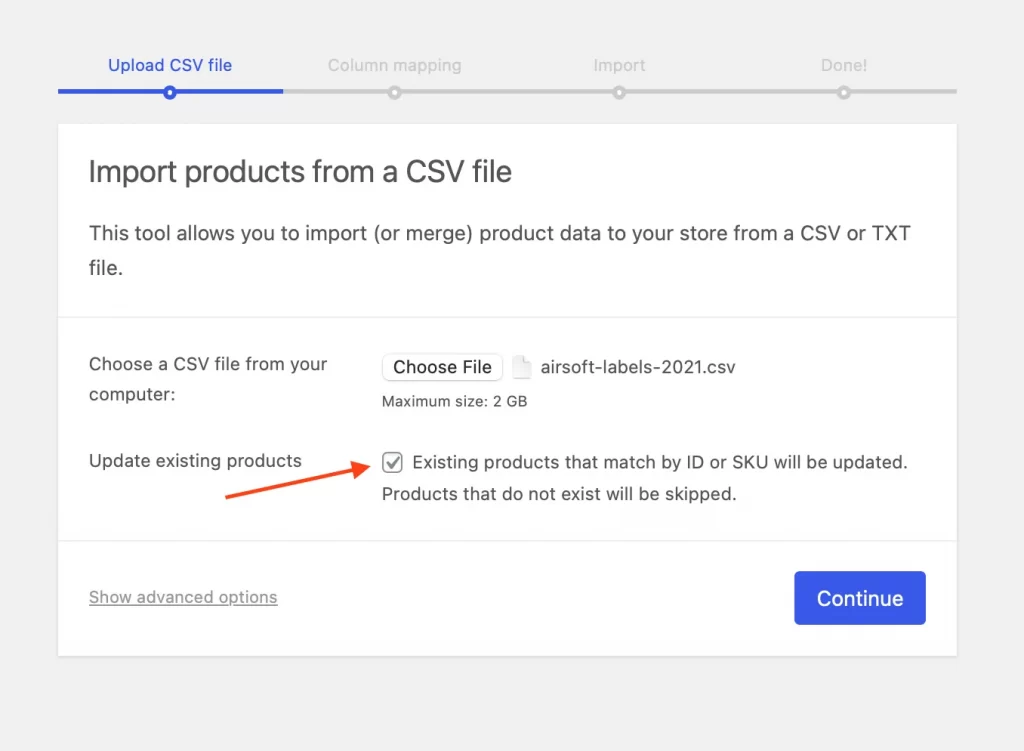
- Click Continue and follow the same steps for column mapping and running the importer.
Notes:
That’s it! With just a few steps, you can complete the WooCommerce CSV Import process.
WooCommerce CSV Import: FAQs
How to upload CSV to WooCommerce?
To upload a CSV file to WooCommerce, follow these steps:
Step 1: Prepare your CSV files
Step 2: Create your LitCommerce account
Step 3: Set up a CSV file on LitCommerce
Step 4: Connect Your WooCommerce Store to LitCommerce
Step 5: List and import products from WooCommerce
Step 6: Set up inventory sync & price sync
Or you can use the built-in WooCommerce product importer. First, navigate to Products > Import within your WordPress dashboard. Then, upload your CSV file and map the columns from your CSV to the corresponding WooCommerce fields. Finally, run the import and verify that the products have been added correctly.
How to bulk upload to WooCommerce?
To bulk upload products to WooCommerce, you can utilize WooCommerce’s built-in product importer or a third-party tool, including LitCommerce.
Can I bulk list products on multiple platforms using one file?
Yes, you can. LitCommerce enables bulk listing across multiple platforms using a single file. You can import product files (e.g., CSV) and distribute listings to supported marketplaces. Besides, you can bulk upload and edit products before publishing them on different channels using the LitCommerce multichannel selling tool.
What file types does LitCommerce support for product uploads?
LitCommerce supports CSV, Google Sheets, and FTP files for product uploads. If your Google Sheets file isn’t publicly accessible, please grant access with this email: [email protected]
Don’t Miss a Channel with WooCommerce Integration
WooCommerce CSV Import is one of the easiest ways to bulk upload or update products in your store, especially when you’re managing a growing catalog. By following this 6-step guide, you can simplify product management, reduce manual work, and ensure your product data stays accurate and organized.
Whether you’re launching a new store or updating an existing one, mastering the WooCommerce import products CSV process saves valuable time and sets you up for smoother operations in the long run.
Finally, if you are interested in expanding your business, don’t hesitate to reach out to us or read more useful tips on our Blog. We will accompany you to a successful eCommerce business.

