Adding social media to Shopify stores brings many benefits for sellers, from increasing brand awareness to strengthening trust and ultimately boosting sales. However, some methods may require coding, which can be challenging for sellers without technical experience.
In this guide, we’ll walk you through both no-code and code-based methods on how to add social media links to Shopify. Whether you’re a beginner or an experienced Shopify seller, you’ll find the best approach to enhancing your store’s social presence.
- Step 1: Navigate to Sales Channels
- Step 2: Select Online Store, choose Themes, and click Customize
- Step 3: Click the Theme Settings, then scroll down to Social Media.
- Step 4: Add your social media links.
- Step 5: Choose Save.
Let’s dive in!
Why Should You Add Social Media to Shopify?
Adding Shopify social media links can be a transformative strategy for enhancing brand visibility, customer engagement, and sales. Here are several compelling reasons to consider adding social media to your Shopify platform:
- Expand your customer reach: Connecting your Shopify store with social media allows visitors to follow your accounts. As a result, they can stay connected with your brand even after they leave your website.
- Increase trust and credibility: A consistent, active social media presence reassures potential buyers that your brand is legitimate. Moreover, it builds trust and encourages them to make a purchase. 99% of customers often check social media for reviews, product updates, and real interactions before buying.
- Improved customer satisfaction: Social media provides a convenient way for customers to ask questions or provide feedback directly. This improves their overall satisfaction with your brand.
- Keep customers engaged: Social media links make it easy for visitors to follow your brand. Social media links make it easy for visitors to follow your brand. As a result, they stay connected even after leaving your store. In turn, this helps you stay top of mind and brings them back for future purchases.
- Boost sales: Social media platforms like Instagram, Facebook, and TikTok allow direct shopping. Social media platforms like Instagram, Facebook, and TikTok allow direct shopping. By doing so, you create a smoother path from product discovery to checkout. Ultimately, this leads to more conversions and increased sales.
Adding social media links to your Shopify store is a simple yet effective way to boost engagement, build trust, and increase sales. So, it’s worth your time to continue finding how to add social media to Shopify.
Boost Your Brand Visibility and Drive More Sales!
Just like adding social media on Shopify, selling across multiple platforms with LitCommerce helps increase your brand presence and point of sales across all channels.
How to Add Social Media to Shopify Store Without Code
Above, we’ve mentioned many benefits of adding Shopify social media links. Now, let’s discover step-by-step to add social media on Shopify
To add social media to Shopify guide without code, follow these steps:
Now, let’s dive into step-by-step how to link social media to Shopify without using complicated code in detail:
Step 1: In your Shopify Admin, go to the Sales Channels section on the left sidebar. Click on Online Store, then select Themes.
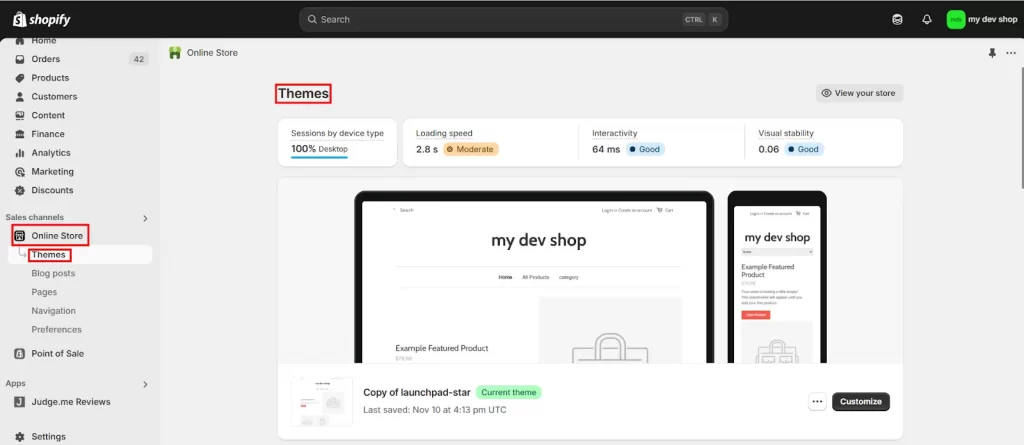
Step 2: On the right side, click the Customize button to open your theme editor.
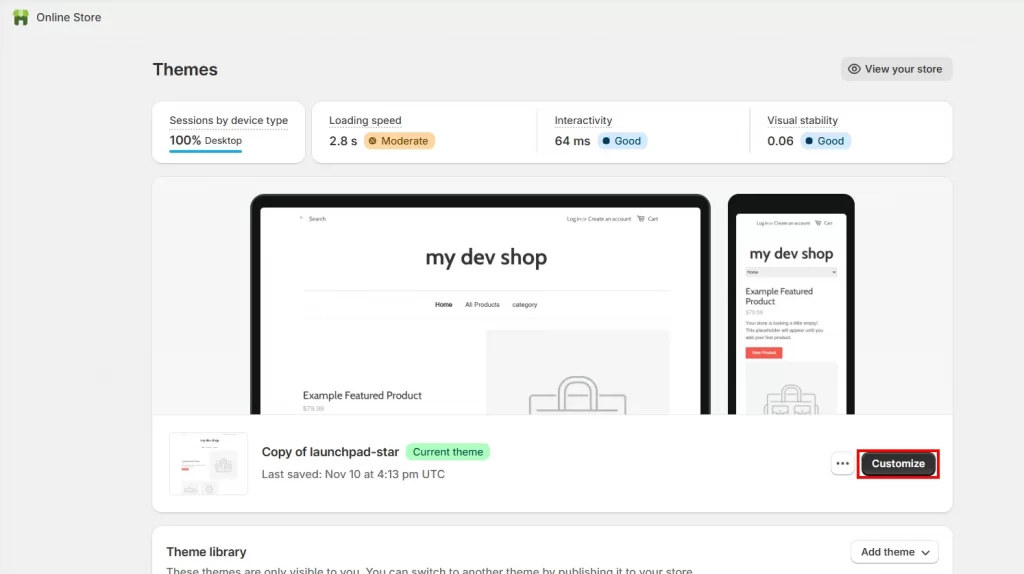
Step 3: In the theme editor, click on the Theme Settings icon on the left, then scroll down until you find the Social Media section and select it.
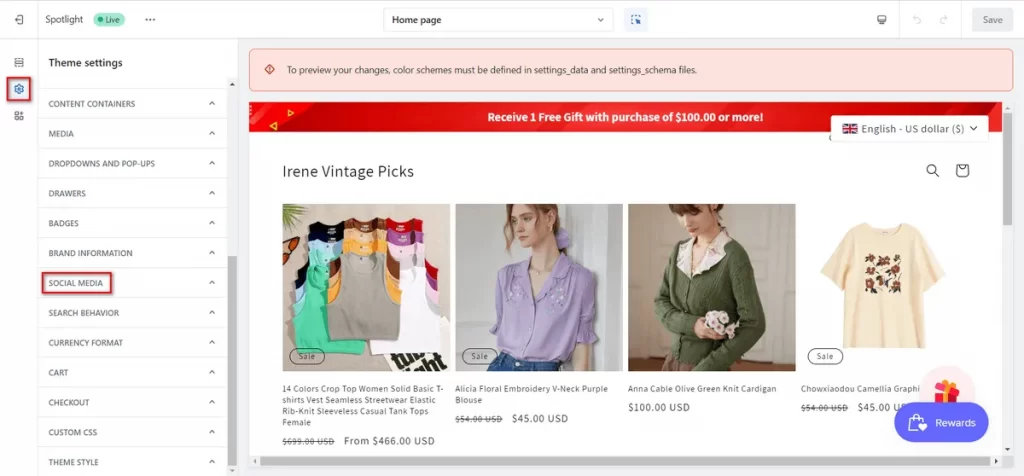
Step 4: Enter the links to your business’s social media accounts.
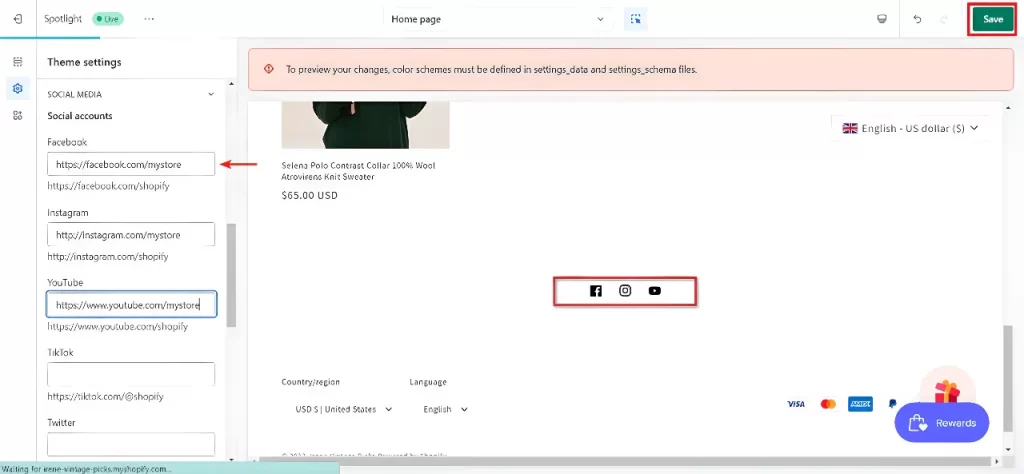
Step 5: Finally, click Save to finish.
Your social media links will now appear on your store, making it easy for visitors to connect with your brand. Scroll down to discover how to link social media to Shopify with Code.
How to Add Social Media to Shopify Store with Code
If your theme doesn’t support automatic icon integration or if you want more customization on your Shopify store. Below are step-by-step on how to add social media to Shopify using code.
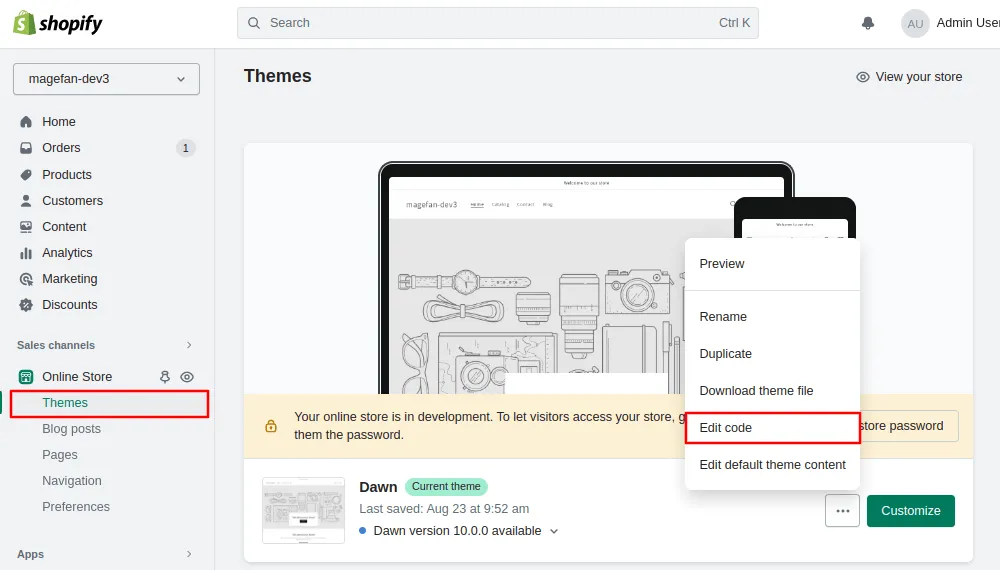
Step 1: In Shopify, go to Sales Channels > Online Store > Themes. Then, click the three dots and select Edit code.
Step 2: Next, find and click on the Assets folder and click on Add a new asset.
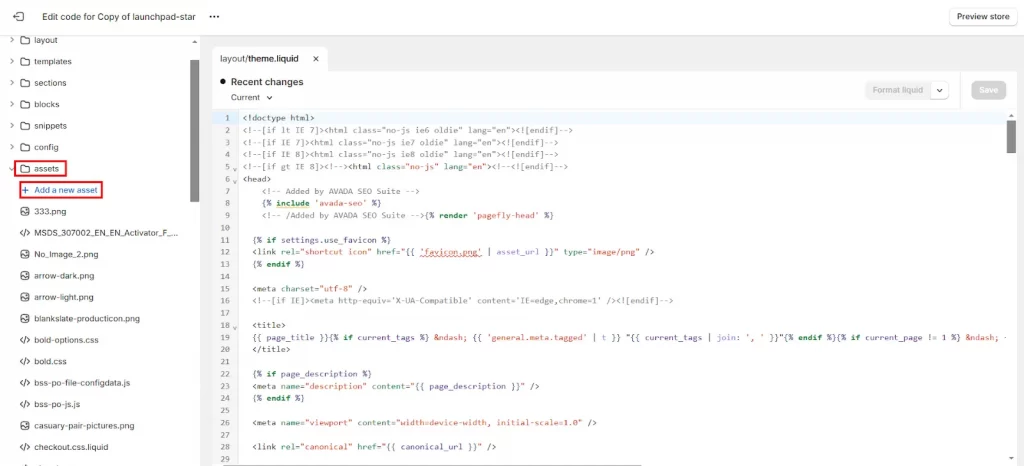
Step 3: Next, click the Add file button and select the social media icons that you want to upload.

Step 4: The icon will be saved as a .png file, which you can rename to fit with the social media you are adding, for example, Facebook-button.png.
Step 5: In the Sections folder, find the footer.liquid file (or the relevant file for the header or other location).
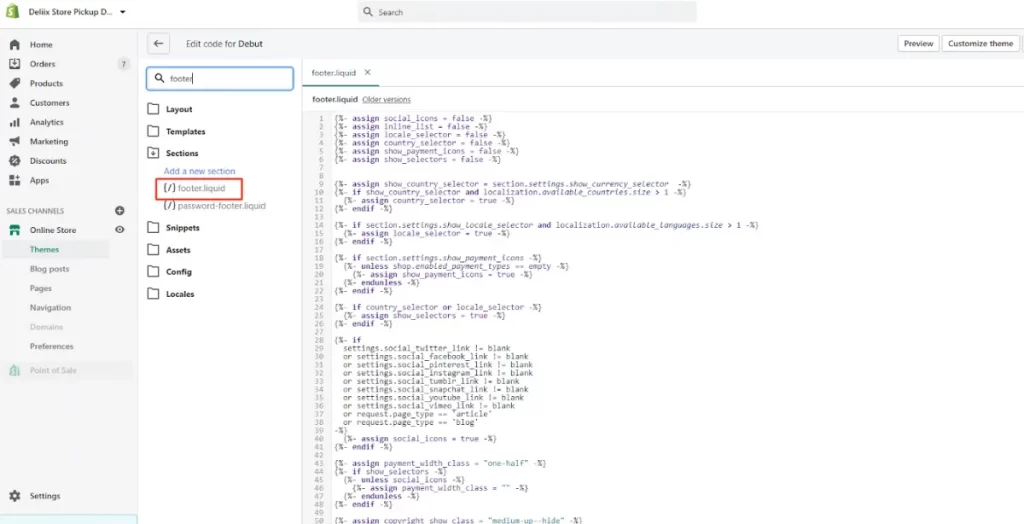
Step 6: Now, insert a couple of lines of code to display the icons, linking them to your social media pages. For example:
{{ ‘facebook-button.png’ | asset_url | link_to:
‘https://facebook.com/shopifystorepage’, ‘Follow our journey on Facebook’ }}
Please note that: Remember to replace ‘facebook-button.png’ with the actual filename of your icon and ‘https://facebook.com/shopifystorepage’ with the URL of your Facebook page.
Step 7: Finally, click Save to update your changes.
That’s how to add social media to Shopify guide, from no-code solutions to custom coding. We all know that integrating social media not only enhances user experience but also drives engagement and increases sales, helping your brand thrive.
Where is the Right Place to Add Social Media to Shopify?
Adding social media to your Shopify store offers numerous benefits, but where should you place the icons for maximum impact? Here are the best spots to add social media icons and how each placement can help grow your business:
- Footer: Most Shopify themes have a built-in section for social media icons in the footer. Additionally, this is a great spot for your links because it keeps them visible across all pages without being intrusive, making it easy for visitors to follow and connect with your brand.
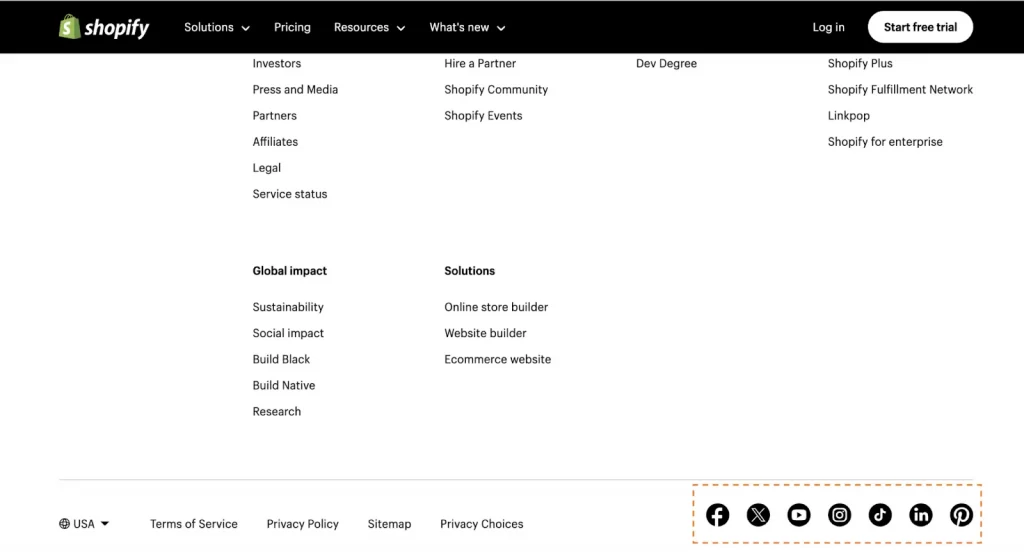
- Header: Placing social media icons in the header ensures they are front and center, increasing visibility. This is ideal if social engagement is a key part of your marketing strategy, encouraging visitors to follow you as soon as they land on your site.

- Other locations (using apps): If you want more flexibility in icon placement, third-party apps let you add social media links anywhere on your site—without coding. This is perfect for customizing your store’s layout and optimizing engagement.
How to Add Social Media to Shopify Store: FAQs
You can add a maximum of 250 images, 3D models, or videos to a product. 3D models and videos have specific hosting limits based on your Shopify plan. In your Shopify admin, navigate to Online Store > Themes. Locate the theme you want to modify and click Customize. You can edit a section or block on your home page directly or use the Home page drop-down menu to select a template containing the section or block you wish to update. If you can’t upload pictures to Shopify, check if the image size and file format are correct. They shouldn’t exceed 20 Mb or 20 megapixels. There are five steps to add social media to Shopify website easily: Step 1: Navigate to Sales Channels Step 2: Select Online Store, choose Themes, and click Customize Step 3: Click the Theme Settings, then scroll down to Social Media. Step 4: Add your social media links. Step 5: Choose Save. There are five steps to add an Instagram link to Shopify: Step 1: Navigate to Sales Channels Step 2: Select Online Store, choose Themes, and click Customize Step 3: Click the Theme Settings, then scroll down to Social Media. Step 4: Add your Instagram link. Step 5: Choose Save.
Wrap Up!
Integrating social media into your Shopify store is essential for building brand awareness, driving traffic, and increasing customer engagement. Whether you’re linking to the footer or any place, optimizing your store for social media ensures a seamless shopping experience and helps grow your online presence. In this blog post, we’ve guided you on how to add social media to Shopify in 2 ways no-code and using code.
You can also check out our Retail Blog for the latest eCommerce insights and more expert tips, or reach out to us for personalized support. At LitCommerce, we’re here to help you succeed every step of the way!


