You’re ready to make your mark in the billion-dollar print-on-demand industry, and you’re looking for how to connect Printify to Shopify to kickstart your business?
Don’t worry! Our guide will walk you through the first steps of this profitable setup, offering easy-to-follow instructions on how to link Shopify with Printify so you can easily get started with print-on-demand (POD).
Now, let’s dive right in!
How to connect Printify to Shopify:
1. To connect from Printify: Log in to Printify account -> Add a new store (Shopify) -> Enter Shopify store URL.
2. To connect from Shopify: Install Printify on Shopify app store -> Log in to Printify account -> Authorize the connection.
Why Connect Printify to Shopify?
The real question is, why don’t you connect Printify to Shopify?
There are countless reasons to kick off your POD business with this powerful connection. Here are a few of the top ones:
- Large product variety: Printify has a huge catalog of over 900 items with many different print providers. Hence, you can offer your customers more unique products, including those made with special printing techniques.
- Simple to use: Printify has a user-friendly interface that’s easy to navigate, and you can effortlessly handle key tasks like designing products, managing orders, and adjusting store settings.
- Cost-effective: Print-on-demand means you only pay when you make a sale, so there’s no need to spend money upfront on inventory. This reduces the risk of losing money on unsold products. Plus, many popular items on Printify are cheaper than on other platforms, making it a budget-friendly choice for selling on Shopify.
- Automated fulfillment: Printify takes care of order fulfillment automatically. This means less manual work for you and faster deliveries for your customers, freeing you up to focus on growing your business.
- Smooth operations: Product updates, inventory changes, and order management can all be synced between Printify and Shopify. So that you can save time and keep everything running smoothly without the need for extra data entry.
Want to know about other POD apps to start selling on Shopify? Read in our dedicated blog here.
How to Connect Printify to Shopify: Start from Printify Dashboard
Ready to get started? Here’s a step-by-step guide on how to connect Printify to Shopify, beginning from the Printify Dashboard:
1. Open the Printify website and log in to your account. If you don’t have an account yet, sign up for free.

2. Find the ‘My new stores’ option in the dashboard. Then, click on ‘Add a new store’.
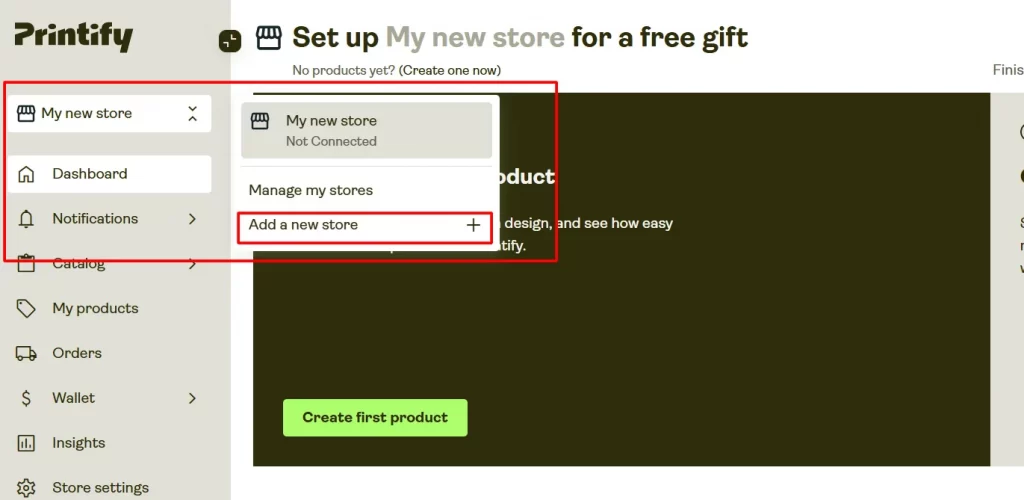
3. You’ll see a list of platforms that Printify supports. Choose Shopify from the list.

5. Enter your Shopify store URL and follow the instructions to grant necessary permissions.
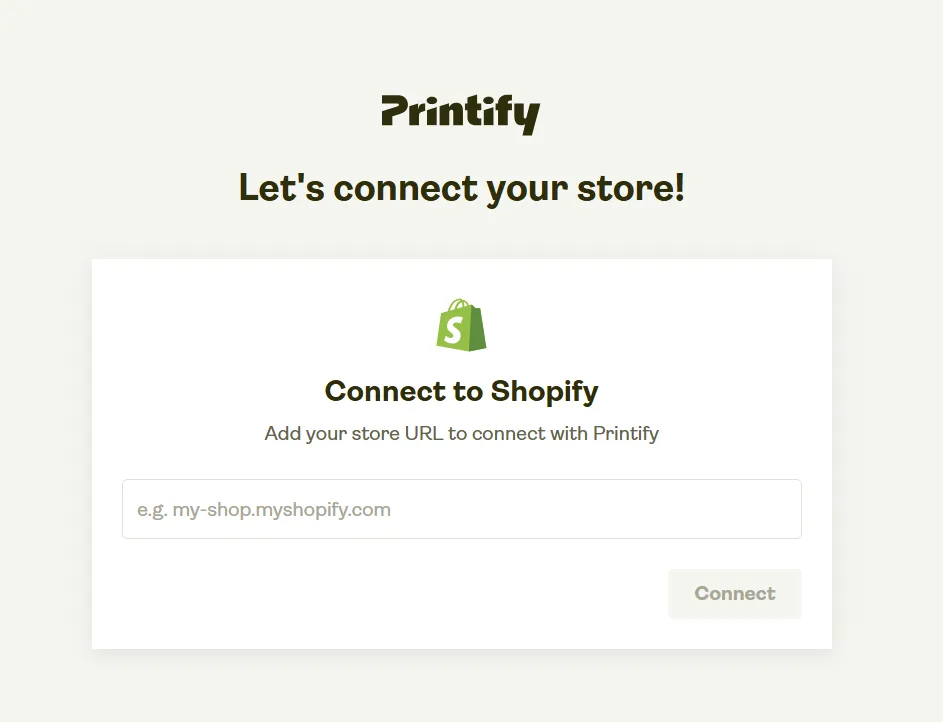
Now, you’ll now be able to manage Printify products directly from your Shopify store.
If you’re considering choosing a platform to sell POD products, read more about Shopify Review
How to Connect Printify to Shopify: Start from Shopify App Store
In case you already have a Shopify account, you can choose to start from Shopify. Here’s how to connect Printify to Shopify through the Shopify app store:
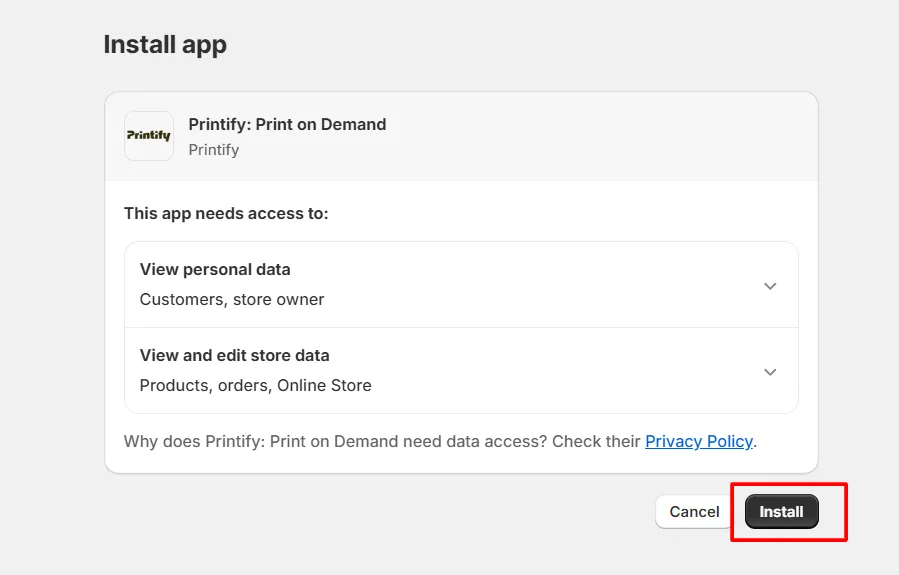
1. Click on Printify on Shopify app store and add Printify to Shopify.
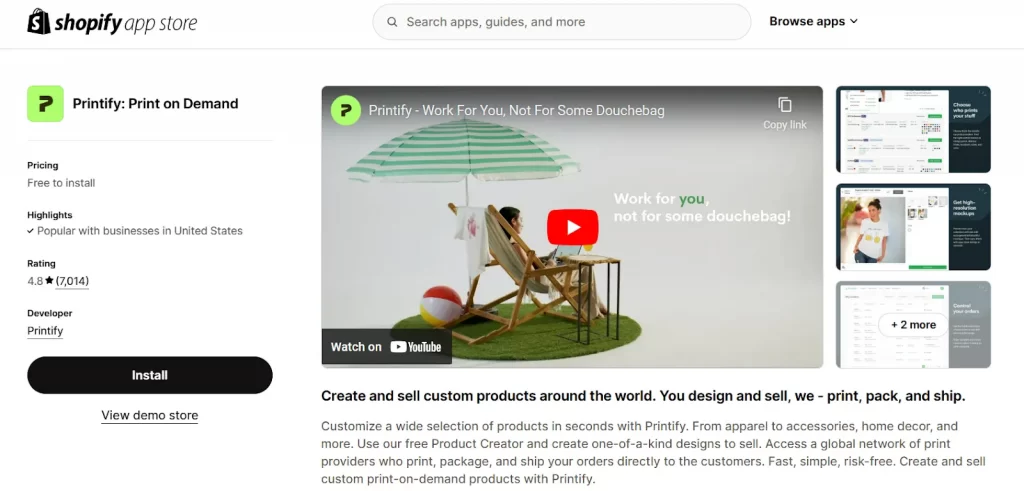
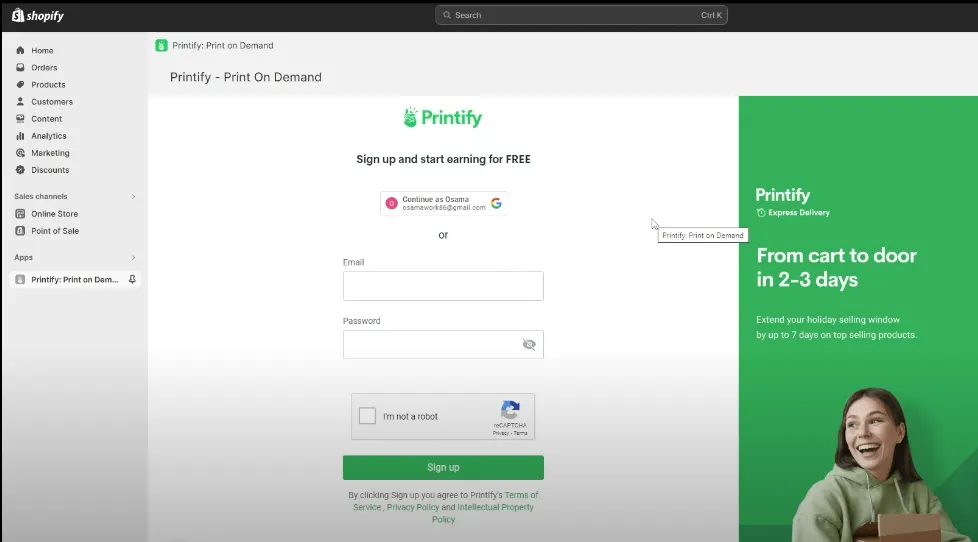
2. If you already have a Printify account, simply log in when prompted. If not, just create a new account.
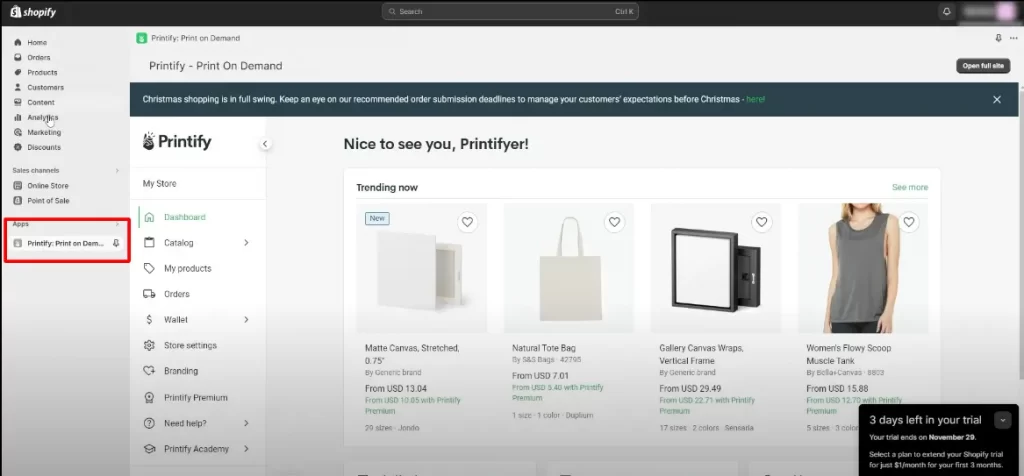
4. To complete the connection, Shopify will ask you to authorize the app. Once you approve, the integration is complete.
How Does Printify Work with Shopify?
In short, Printify acts as a POD service that functions like dropshipping – no inventory needed! You create your products in Printify, then use Shopify, a powerful eCommerce platform with all the tools you need, to run your online store.
Here’s a breakdown of the key processes:
- Automated product syncing: Once connected, any product you create in Printify can be easily synced to your Shopify store. This means that product descriptions, images, and prices are automatically imported, saving you time and ensuring consistency.
- Order processing: When a customer places an order on your Shopify store, the details are sent directly to Printify. Printify handles the entire fulfillment process, from printing to shipping, without requiring manual intervention. Once the order status updates to “Ready to Ship” in Printify, the tracking information is automatically synced to your sales channel, and a shipping notification with the tracking number is sent to your customer.
- Inventory management: Printify keeps track of your product inventory and automatically updates your Shopify store if any changes occur, such as stock availability or product variations.

What to Do After Connecting Printify to Shopify?
Now you know how to connect Printify to Shopify as well as how they work together. Here are some essential next steps to get started with selling:
1. Publish products
The first step in making your Printify products available for purchase on your Shopify store is to publish them. If you haven’t created any products on Printify yet, here’s how to add Printify products to Shopify:
1.1 Create your products in Printify:
Open your Printify dashboard and browse the product catalog to find items you want to sell. Printify offers a wide selection, so take your time to explore.
If you’re not sure which products to start with, consider some of the top 10 best-selling items from the Printify catalog:
- Unisex Heavy Blend™ crewneck sweatshirt
- Unisex jersey short-sleeve tee
- Unisex heavy cotton tee
- Unisex Heavy Blend hooded sweatshirt
- Unisex softstyle t-shirt
- Unisex garment-dyed t-shirt
- Unisex ultra cotton tee
- Canvas gallery wraps
- Premium matte vertical posters
- Velveteen plush blanket
You may also like: What to Sell on Shopify?
1.2. Choose a print supplier:
Once you’ve selected a product, choose a print supplier directly from the product page.
With Printify Choice, Printify helps you get the best prices and options for every order by automatically choosing a top-rated print provider from their network.
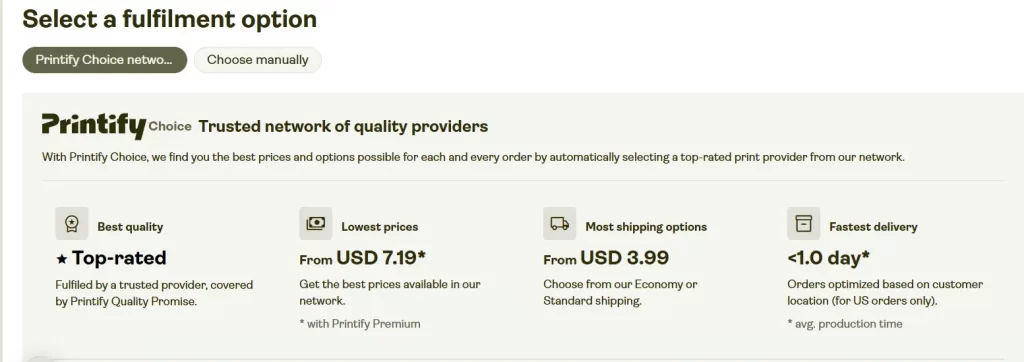
Or you can select ‘Choose manually’ option.
Click ‘Provider info’ to review important information about each supplier like product variants, print quality, and shipping options.
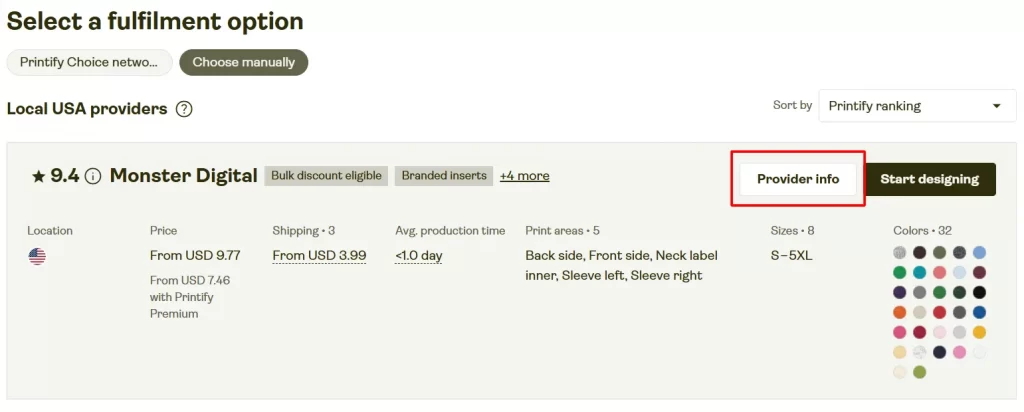
Tip: Pick a supplier based on factors like reliability (based on reviews and rating scores), location (to reduce shipping times), and product quality.
1.3. Design and customize your product:
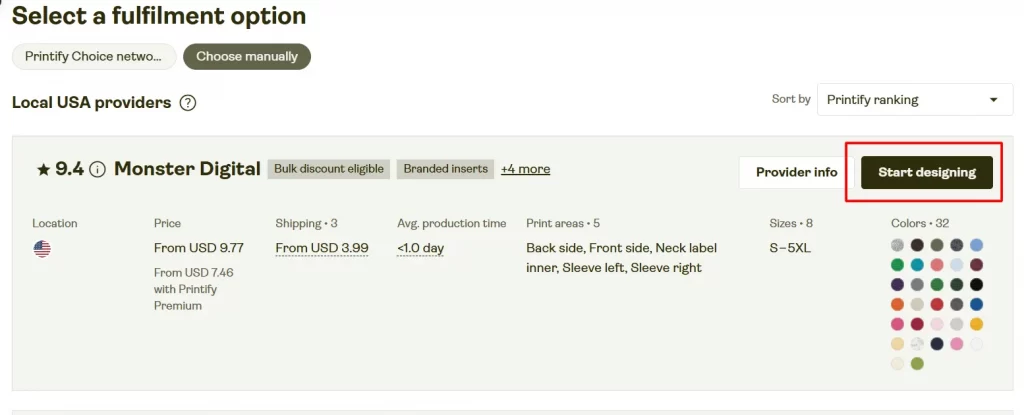
Now, click ‘Start designing’ to begin customizing your product.
Add your design, custom text, or logos, and experiment with various product variants, like size and color. Also, make sure your design fits well on all selected variants.
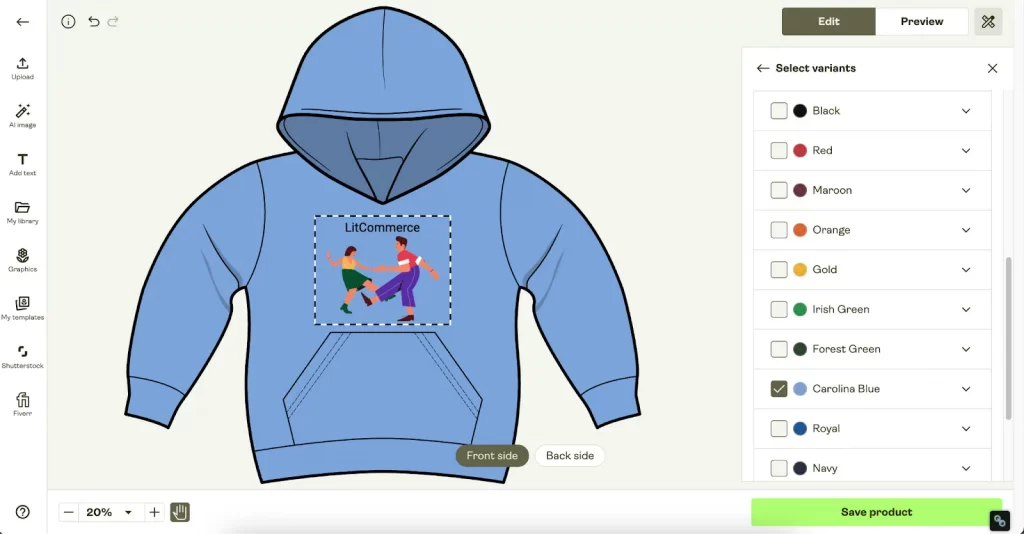
1.4. Add product information:
Next, click on ‘Save product’ and start to create detailed product information. Some attributes you should care about include:
- Title: Make it descriptive and engaging.
- Description: Highlight key features, materials, and unique selling points.
- Tags: Use relevant keywords to help customers find your products.
- Prices: Set competitive pricing that considers both your profit margins and market trends.
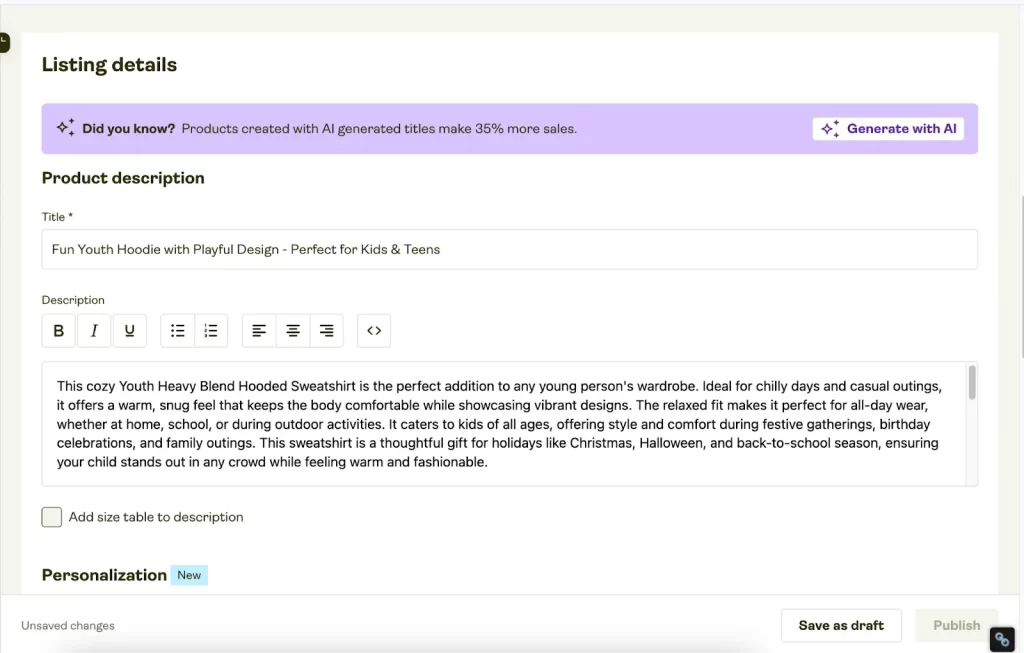
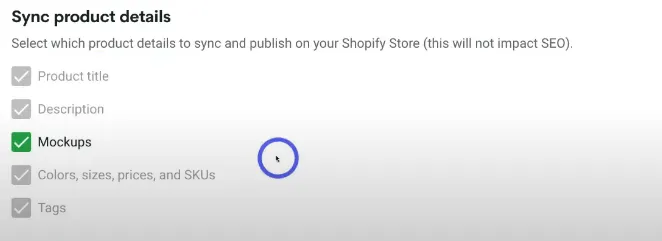
1.5. Sync product details with Shopify
Decide which product details to sync with your Shopify store. This feature ensures that any updates you make to product details in Printify will automatically reflect in your Shopify store.
1.6. Select Shopify categories
Organize your products by selecting appropriate Shopify categories so that shoppers easily find what they’re looking for and create a better browsing experience on your store.

1.7. Review and publish
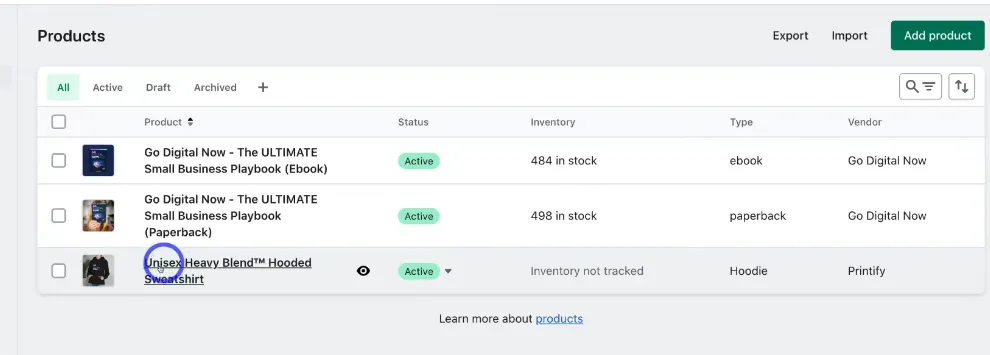
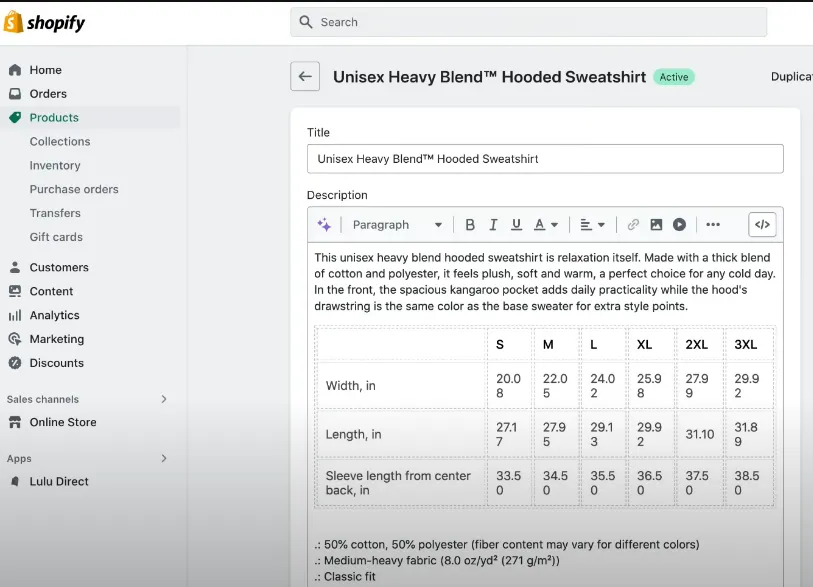
Now, head to your Shopify store and review the products you’ve synced from Printify. Double-check all details, images, and prices to ensure everything is accurate and well-presented.
2. Set up shipping rates
Next, after understanding how to connect Printify to Shopify, you need to make sure your shipping rates are configured correctly in both Shopify and Printify.
Here are 3 methods for you to set up shipping rates:
- Publish the Printify flat rates directly to Shopify.
- Enable Printify shipping calculator for Shopify.
- Set custom shipping rates.
2.1. Publish Printify flat rates directly to Shopify
The easiest option is to publish Printify flat shipping rates directly to Shopify. This method aligns the rates charged to customers with what you pay for fulfillment, requiring no additional setup.
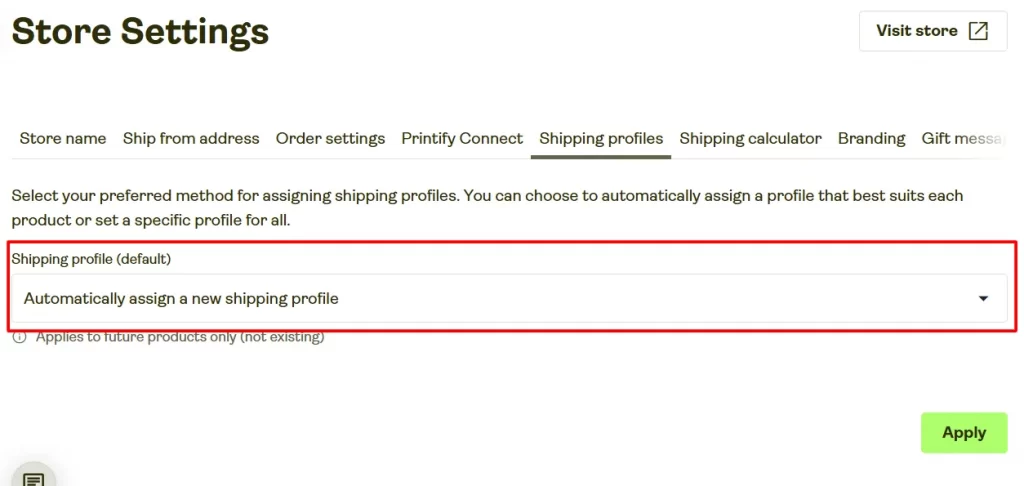
With ‘Automatically assign a new shipping profile’ option, Printify will either create a new profile or use an existing one if the settings match. For instance, if you’ve set up a shipping profile for your store, any future items of your store will use this profile.
1. Go to the ‘My Products’ section in Printify.
2. Click on the product, then ‘Edit’ under the Shipping section.
3. Choose ‘Automatically assign a new shipping profile’.
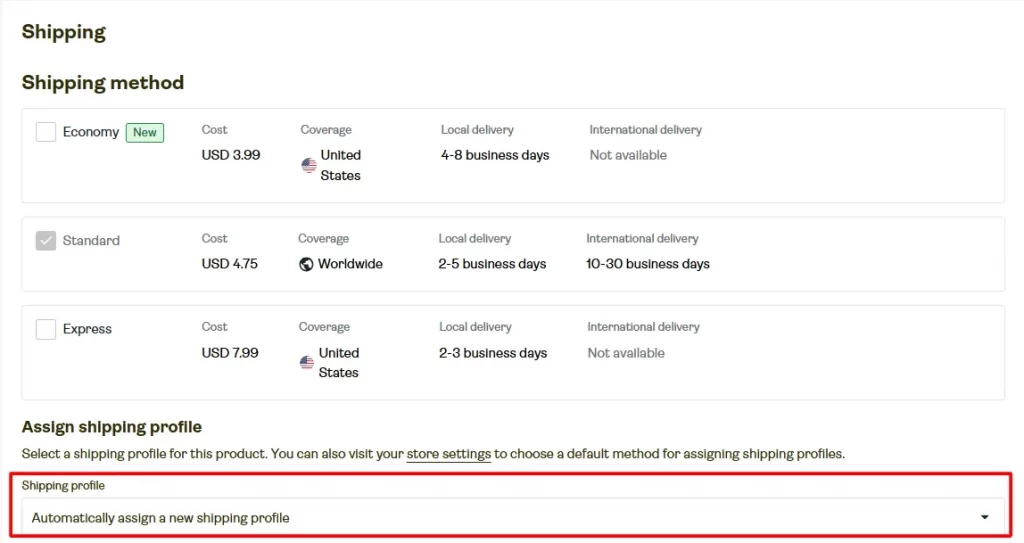
4. Go to ‘Store settings” and ensure the Shipping profile checkbox is marked.
5. Click ‘Publish’ to sync the changes with your Shopify store.
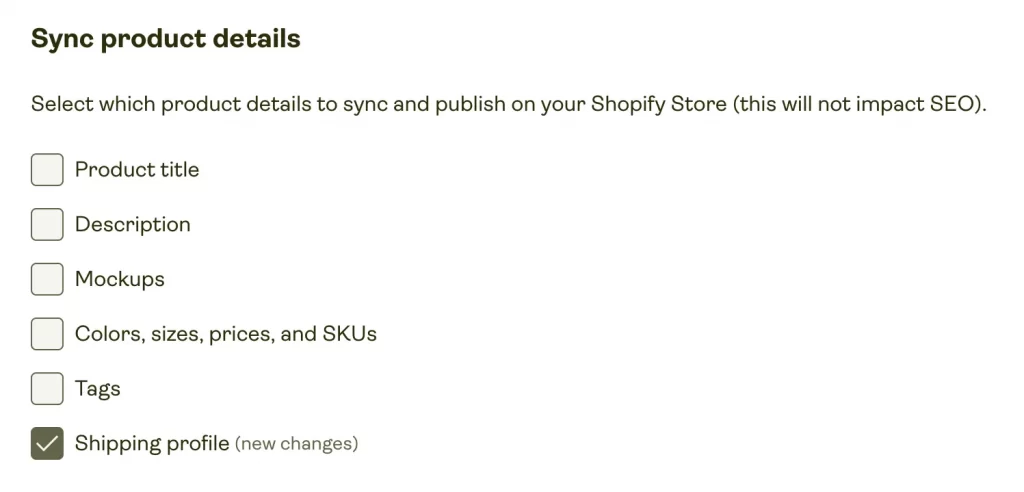
Note: Shopify allows up to 100 shipping profiles per account. If you’ve reached this limit, you’ll need to either select an existing profile to publish or delete an existing profile before creating a new one.
2.2. Enable Printify shipping calculator for Shopify
If you have an advanced or annual Shopify plan, you can activate the Printify Shipping Calculator to streamline your Shopify checkout experience.
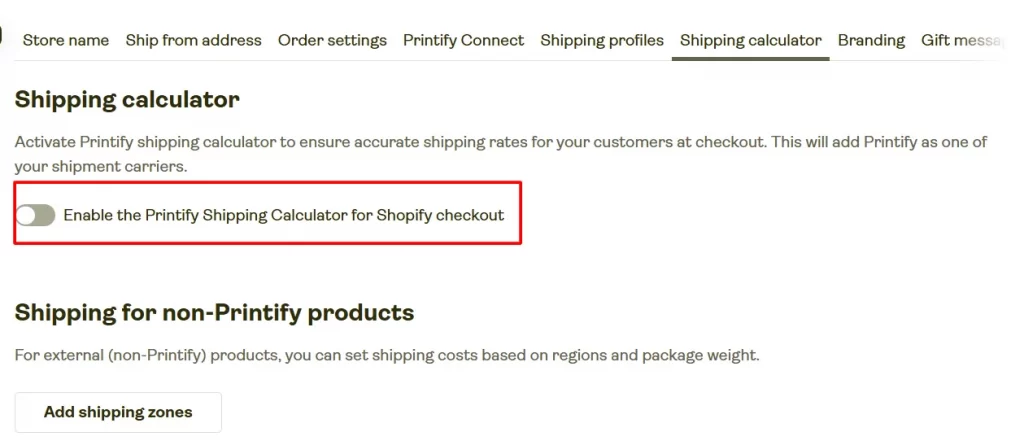
1. Go to your Store settings, then select Shipping calculator.
2. Turn on the box labeled ‘Enable the Printify Shipping Calculator for Shopify checkout.’
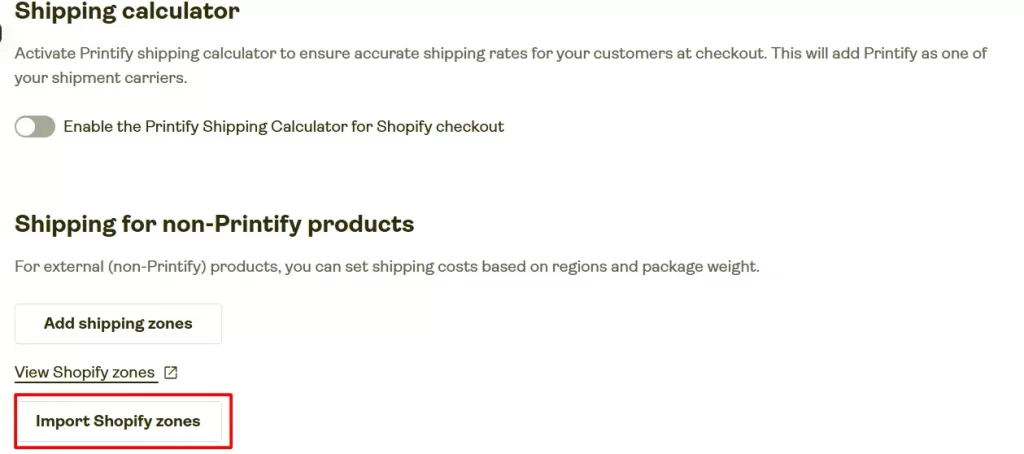
3. Click on ‘Import Shopify zones’ right below the checkbox. This will allow you to bring in any non-Printify product flat rates you may have set up.
4. Adjust your Shopify shipping settings:
– In your Shopify account, go to Settings → Shipping and Delivery and select General shipping rates.
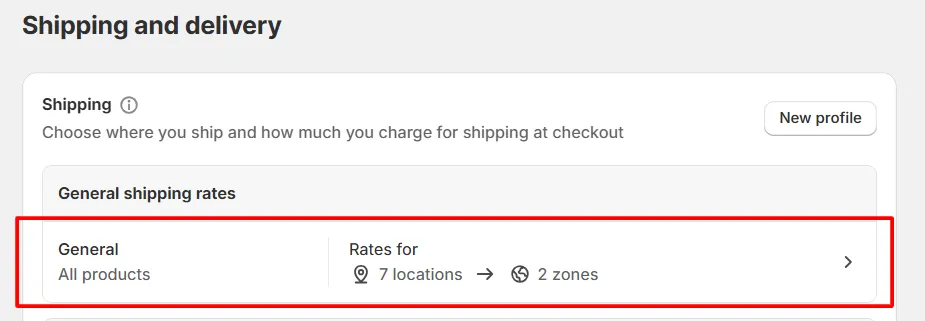
– Delete all zones currently listed.
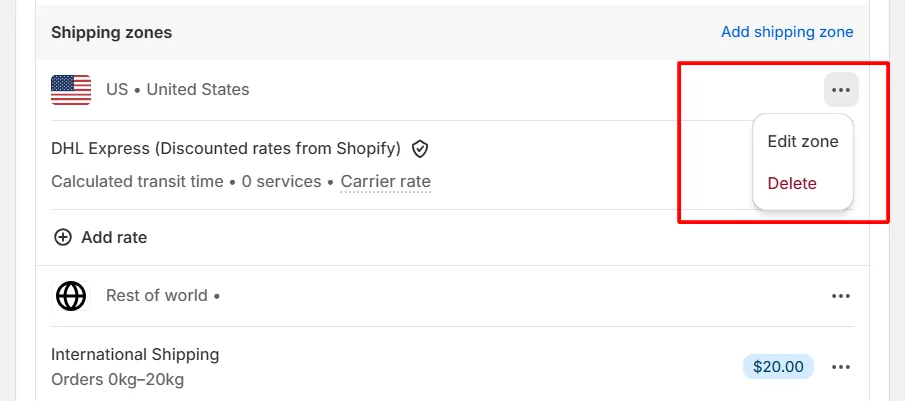
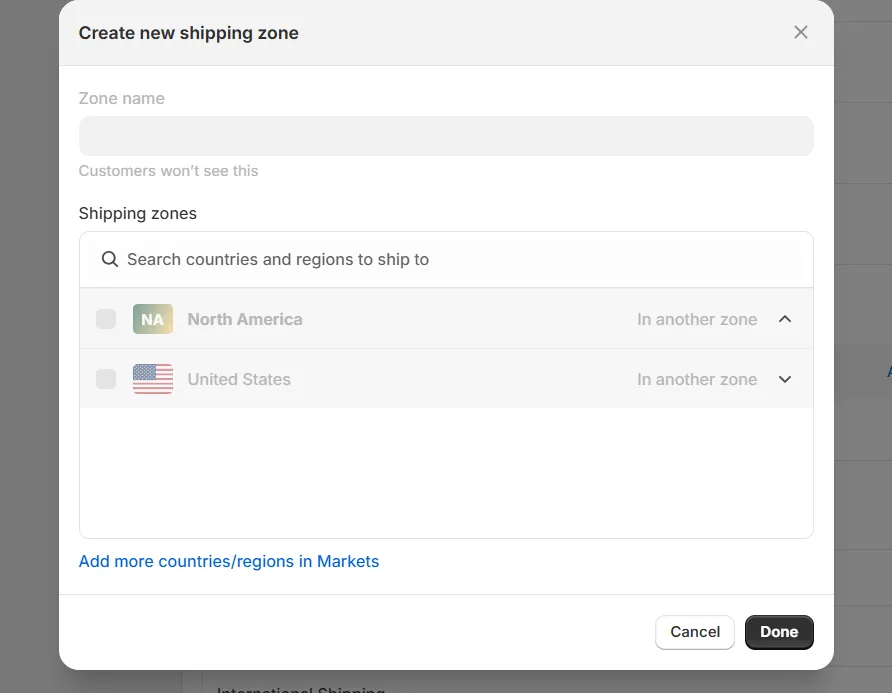
– Add a new shipping zone by selecting ‘Add shipping zone’ in the same profile.
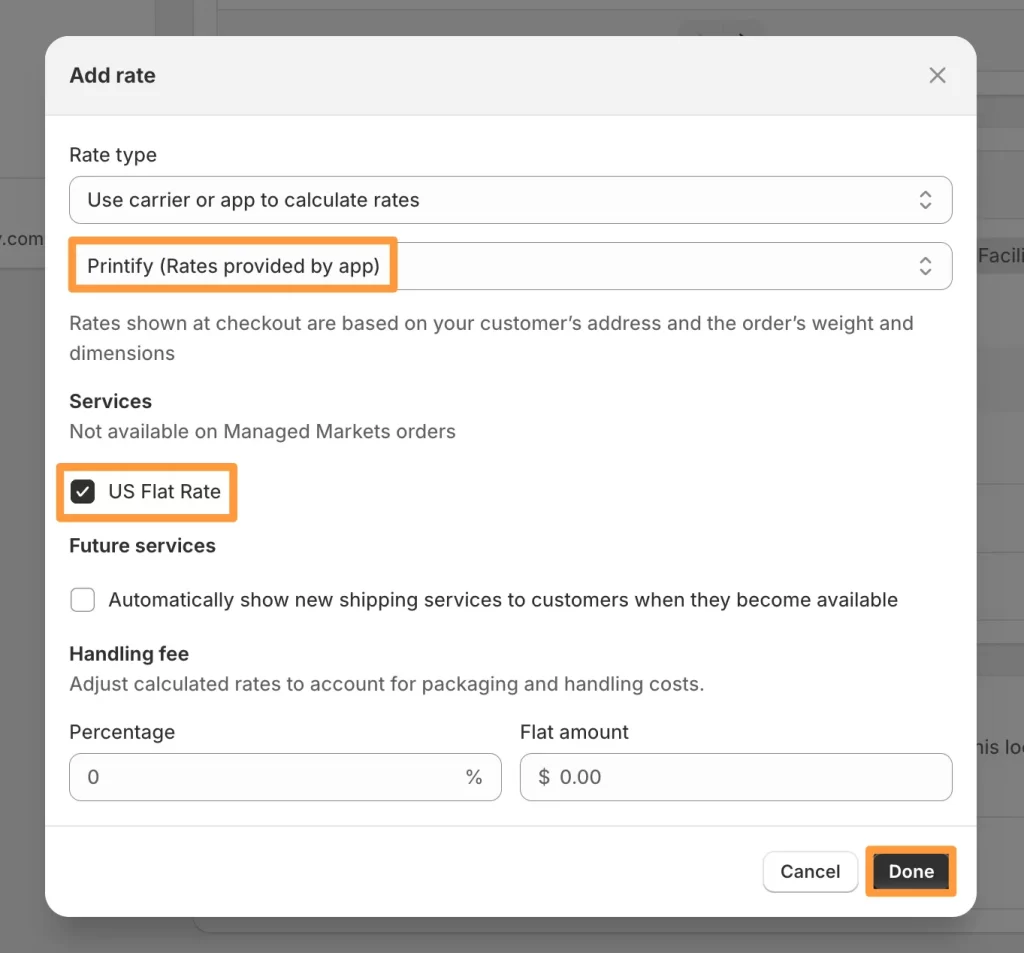
– Click on ‘Add rate’ and choose ‘Use carrier or app to calculate rates’. From the drop-down, select Printify, and check the Standard option.

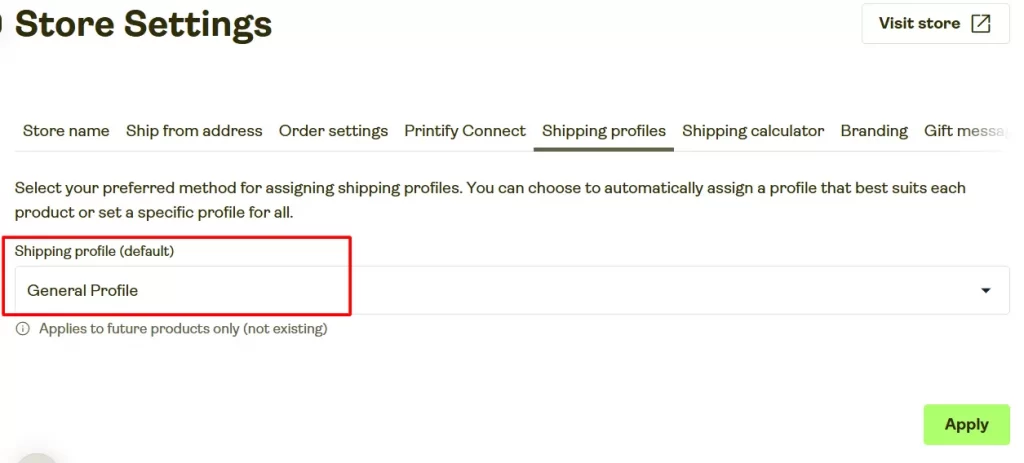
5. In your Printify account, go to Shipping Profiles and set ‘General Profile’ as the default profile. This will ensure the option is automatically applied when publishing new Printify products to Shopify.
2.3. Set custom shipping rates (e.g., free shipping)
You can customize shipping rates for specific products or offer free shipping by including shipping in the product price. Here’s how:
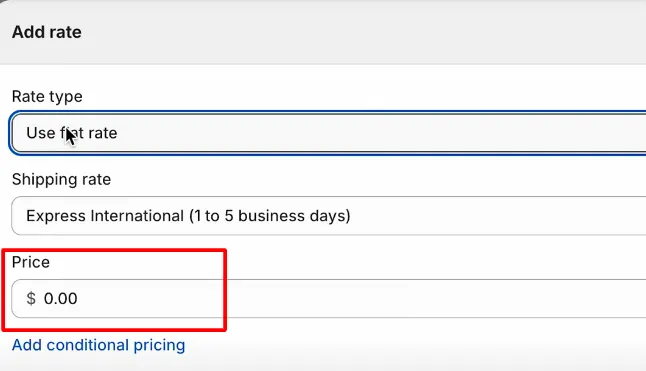
1. In Shopify, go to the General Profile and set the shipping price to 0.00 for the desired country.
2. In Printify, update product settings in Printify
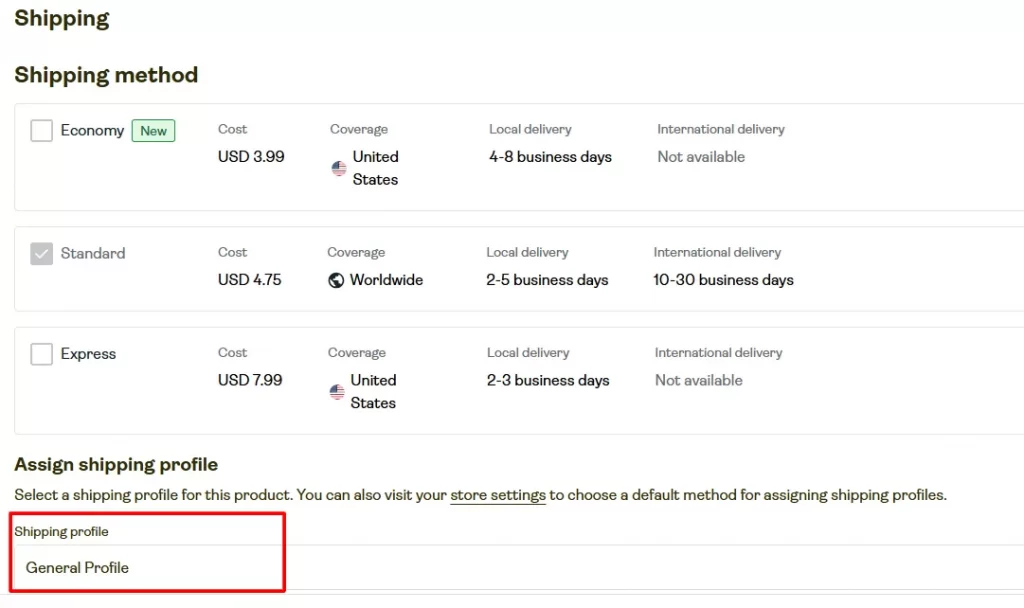
– Go to My Products and select a product.
– Under the Shipping section, click ‘Edit’ and select ‘General Profile’.
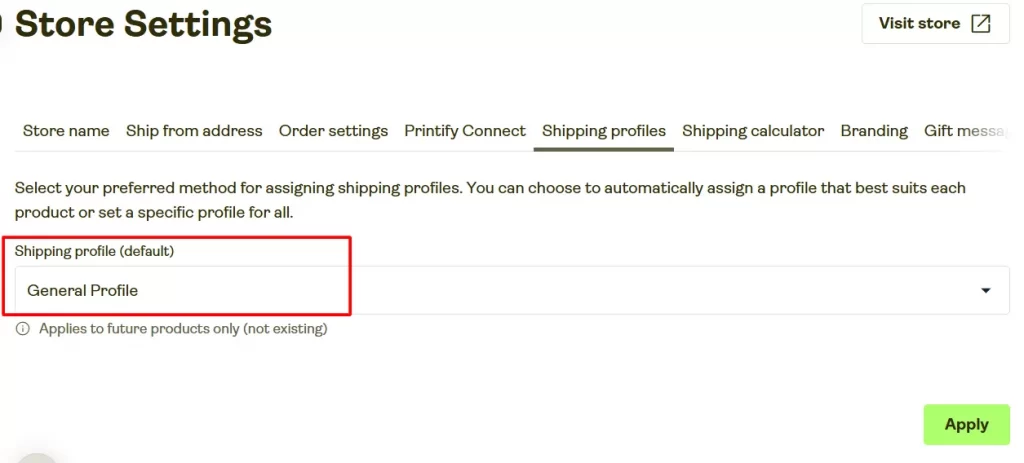
– Go to Store Settings and make sure the Shipping profile checkbox is marked.
Note: If you use multiple profiles, you can still offer free shipping by applying an alternate profile to some products.
How to Link Printify to Shopify: Best Practices
With your brand new sales channel in place, it’s time to maximize your conversion rate and boost sales. Here are some best practices for how to integrate Printify with Shopify to get you from good to great:
- Carefully set up your Shopify store: After connecting Shopify to Printify, make sure to complete essential setup steps in Shopify – choose a theme that highlights your POD products, connect a custom domain, and set up payment methods.
- Design attractively for print-on-demand: As you’re using a POD service, it’s essential to design products that stand out. Focus on creating eye-catching designs that resonate with your target audience. Also, you should use high-quality images and make sure your product listings are visually appealing and professionally presented to increase customer interest and boost sales.
- Optimize product listings: For higher conversion rates, make sure your product listings are optimized. To do so, you should use relevant keywords in your titles and descriptions, provide clear product information, and make use of engaging visuals.
- Regularly update product information: Remember to keep your product details, prices, and inventory up to date. Hence, your customers can have accurate information, and you can avoid issues like selling out-of-stock items.
- Test the order process regularly: A test order helps you ensure everything works as expected. You should regularly check the product selection, payment process, and order fulfillment.
FAQs – How to Connect Printify to Shopify
Yes, Printify can seamlessly connect to Shopify, enabling you to create and sell custom products through your Shopify store. This integration allows for automated order fulfillment, where Printify handles printing and shipping directly to your customers. Printify offers a free plan, but you only pay for products and fulfillment. Additional features are available with premium plans. Yes, Printify automatically receives and fulfills orders placed on Shopify, streamlining the process for you. Printify cannot withdraw funds directly from your sales channel. Instead, when an order is sent to Printify from your sales platform, the production and shipping costs are charged to your linked credit card or Printify balance. Once payment is received, the order is processed and sent to production. You’ll need to configure your shipping settings on both platforms. Printify offers guidance on setting up rates that align with their fulfillment centers.
Start Selling on Shopify with Printify Today!
We’ve just gone through a step-by-step guide on how to connect Printify to Shopify. By following this guide and implementing the best practices, you’ll be well on your way to running a successful POD store.
Additionally, if you’re looking to scale your business and boost profits through Printify and Shopify, consider using LitCommerce. Our product feed management tool expands your reach by listing your products across hundreds of online channels, including top marketplaces, advertising platforms, and comparison sites.Reach out anytime to discover how LitCommerce can assist you with your eCommerce journey!

