Have you ever thought about how to enhance your brand recognition on Amazon? Amazon storefronts make a simple yet effective way to do that. It refers to a dedicated page or section on Amazon’s website where sellers can showcase and sell their products, and promotions to potential customers.
Learning how to create an Amazon storefront is easy. Let us show you. We’ll walk you through everything, from what you need to get started, to a step-by-step setup, and even some best practices to make the most of your storefront.
What is an Amazon Storefront?
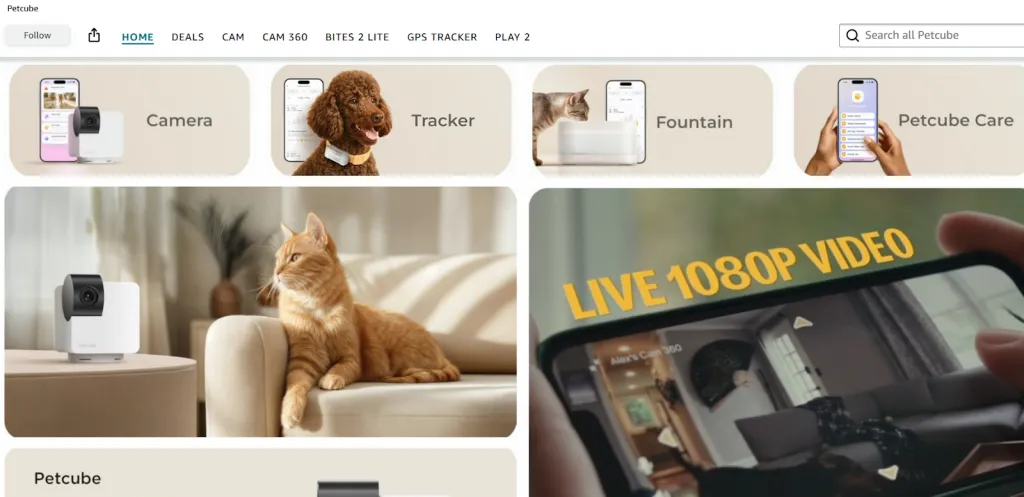
An Amazon storefront is your brand’s own mini-website within the Amazon marketplace. It’s a fully customizable space where you can showcase your products, tell your story, and create a cohesive shopping experience.
Unlike regular Amazon listings that compete with other sellers, an Amazon storefront gives you a branded environment that’s entirely yours. You can group products into collections, feature bestsellers or new arrivals, and use banners, lifestyle images, or videos to connect emotionally with shoppers.
What’s more, Amazon storefront is a powerful marketing tool that supports advertising campaigns, influencer collaborations, and external promotions by allowing you to drive traffic straight to your Amazon store URL. You can even track your results through Store Insights, monitoring visits, views, and sales to refine your strategy.
Amazon Storefront Requirements
So, can anyone open an Amazon storefront? In fact, not every Amazon seller can create one.
Before learning how to create an Amazon storefront, you need to meet the following requirements:
1. You must have a professional seller account, not a free individual account.
To create a professional seller account, simply go to Amazon Seller Central and create a new account. Then provide required information related to your business, seller, billing, store following the prompt and verify your identification.
2. You must have a trademark for the products you sell and apply for the Amazon Brand Registry program.
This program protects brands from counterfeit products and unauthorized use of their trademarks. To be eligible for the program, you must have a registered trademark in the country where you want to sell your products.
To register in the Amazon Brand Registry program, follow these steps:
1. Go to the Amazon Brand Registry website.
2. Select the country you want to enroll your brand.
3. Enter your brand information, account information, and manufacturing and distribution information.
4. Click on the “Submit” button.
After you have submitted the application, Amazon will review it and notify their decision. If your application is accepted, you can access the Brand Dashboard. Here, you can address how to start an Amazon storefront.
Also read: How to start Amazon FBA business
Go beyond Amazon and x2 your sales
Amazon is one of the top marketplaces and your start here is super great. But you can also sell your products across other profitable marketplaces like TikTok Shop, Etsy, eBay. Just in a few clicks, with LitCommerce and you can easily x2 x3 your sales!
How to Create an Amazon Storefront
Once your brand is approved for Brand Registry, let’s dig in the process of how to make an Amazon storefront.
Step 1: Create your store
First, log in to the Seller Central. Then, in the navigation menu, choose Stores > Manage Stores.
Click the Create Store button to start creating your store.
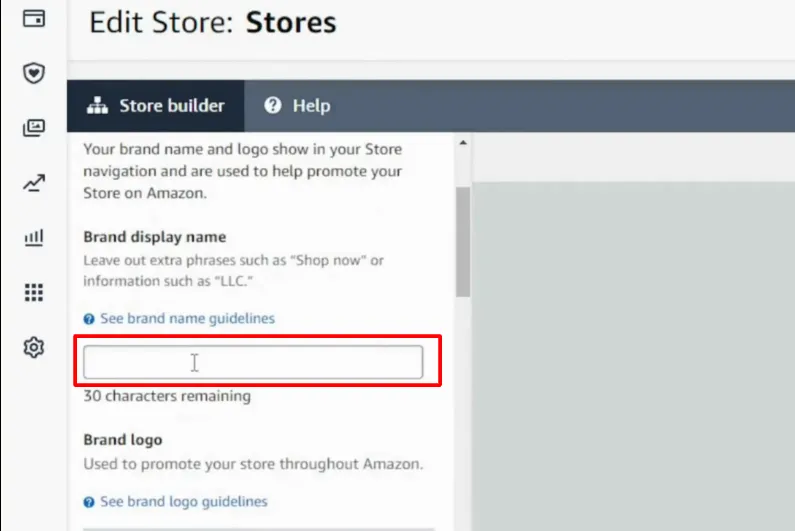
Now, you’re in the Store builder. Enter your brand’s name and logo
Step 2: Build your homepage
Your homepage is what customers will see first when they visit your Store. Hence, it’s important to make it attractive and informative.
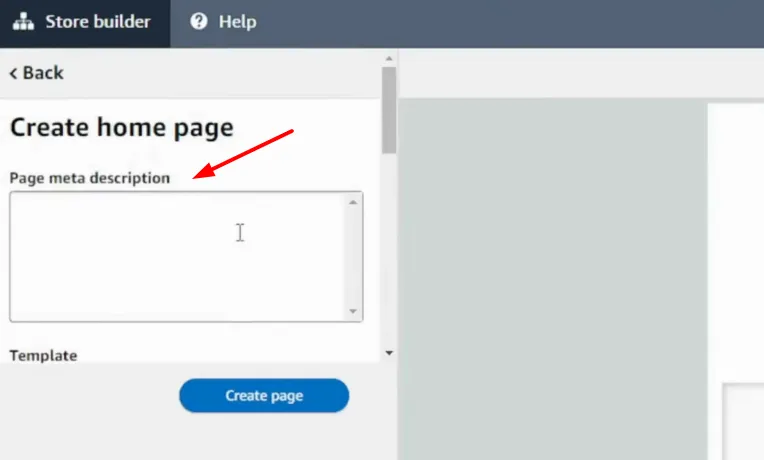
You will start to build your homepage by writing a meta description. If you want your store to be visible in Google search results, try to add key SEO terms.
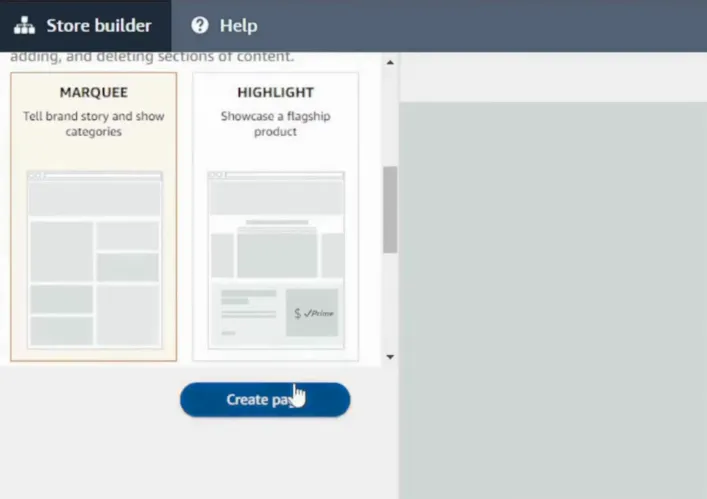
After that, you will need to select a template for your homepage. Amazon offers several choices, like:
- The “Marquee” template to showcase your brand story and top products,
- The “Product Highlight” to feature your top-selling product
- The “Product collections” to showcase related items
Or choose the “Blank” template to create a custom design from scratch.
Step 3: Design your Amazon storefront
This is the most important step on how to create an Amazon storefront, designing your storefront. You can start adding new sections to your pages.
1. Customize your header
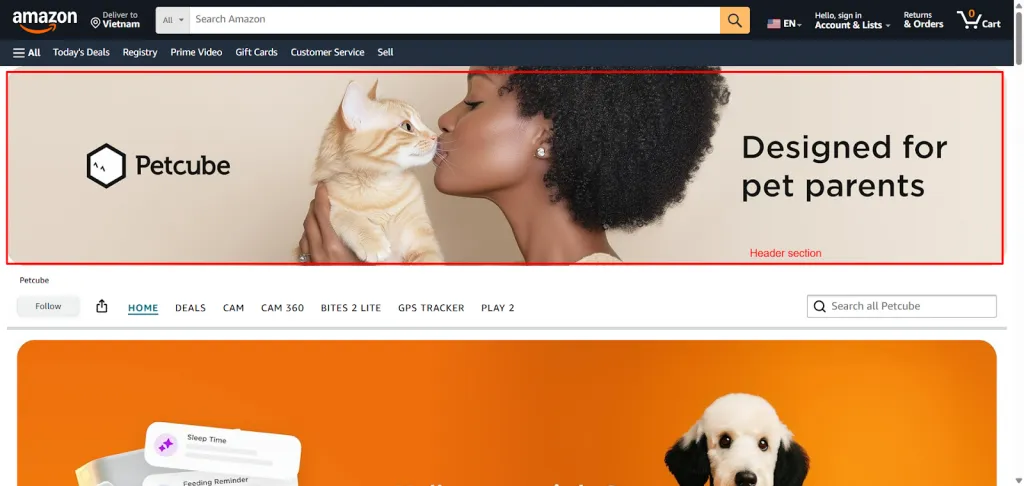
The header showcases your brand features, like your logo or a branded image, letting customers know they’re in your store. Hence, make sure to follow Amazon’s creative guidelines for the correct image size.
Suggested size for this image is 3,000 x 600 pixels.
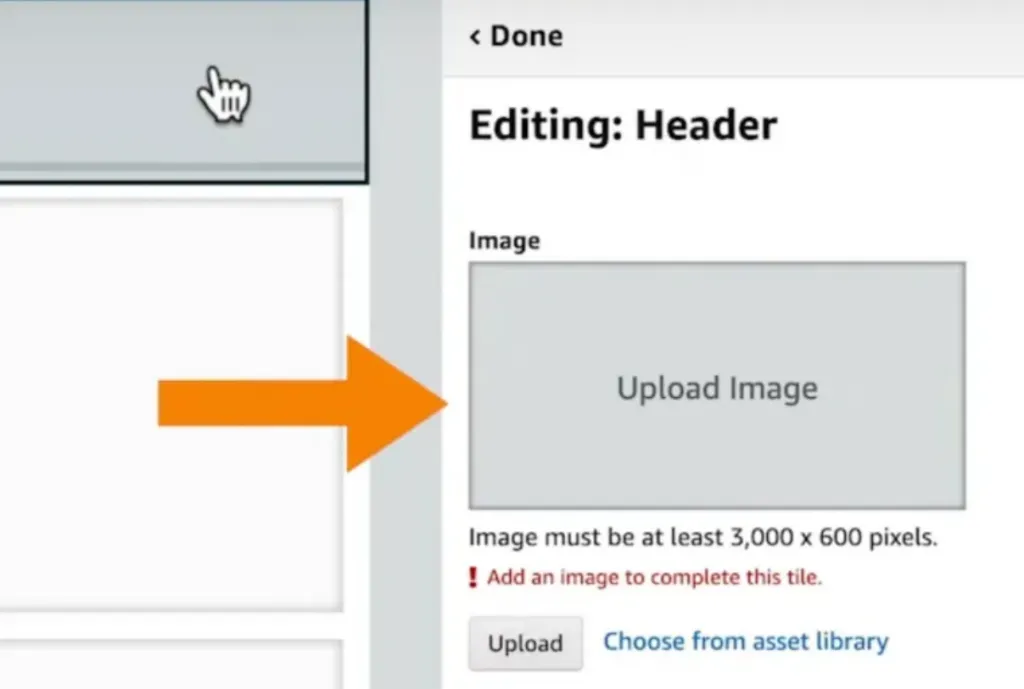
You can feature a high-quality image of your product, a lifestyle photo that represents your brand, or a custom graphic. Keep in mind that the image should fit your brand’s style and connect with your audience.
2. Add customized tiles & sections
Now, add content to tiles like product images, images with text, shoppable photos, text blocks, videos, or background videos to your storefront.
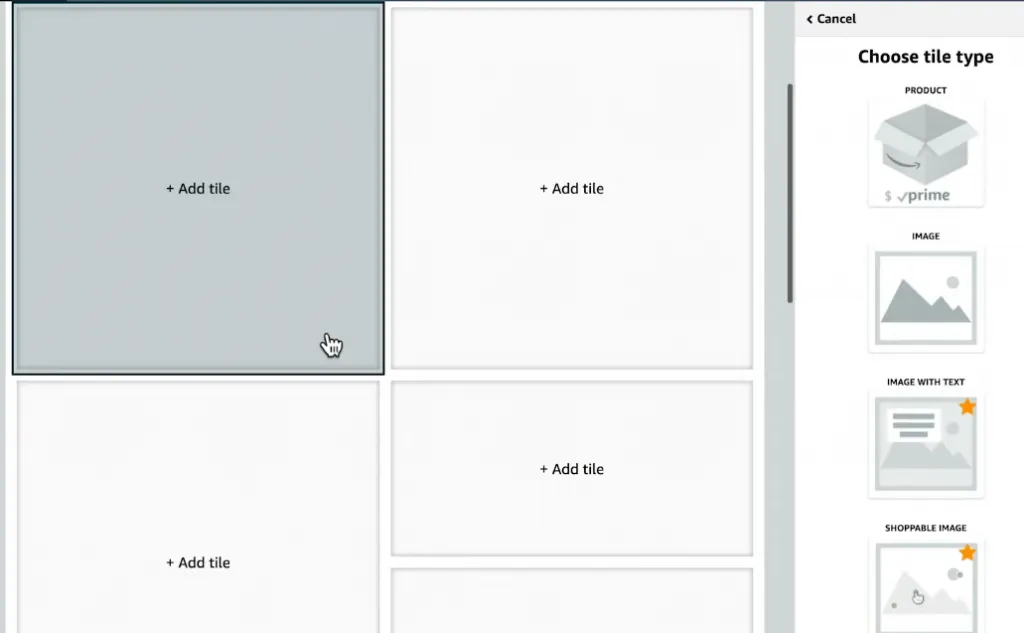
With the “shoppable photos” option, you can directly link image tiles to product listings. This means customers can click on a picture and go straight to that featured product’s page.
If you want to add new sections outside of the existing template, click “Add new section” on the left-hand side.
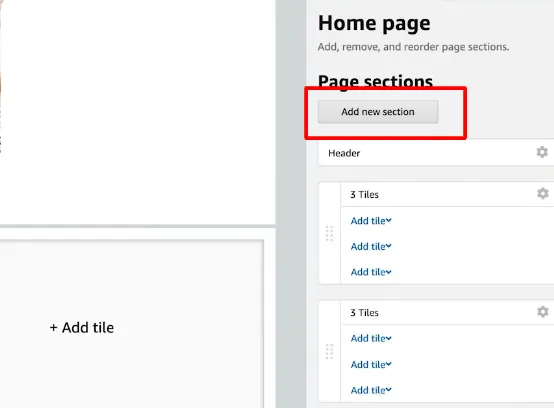
Then, select tile layout and populate the desired tiles.
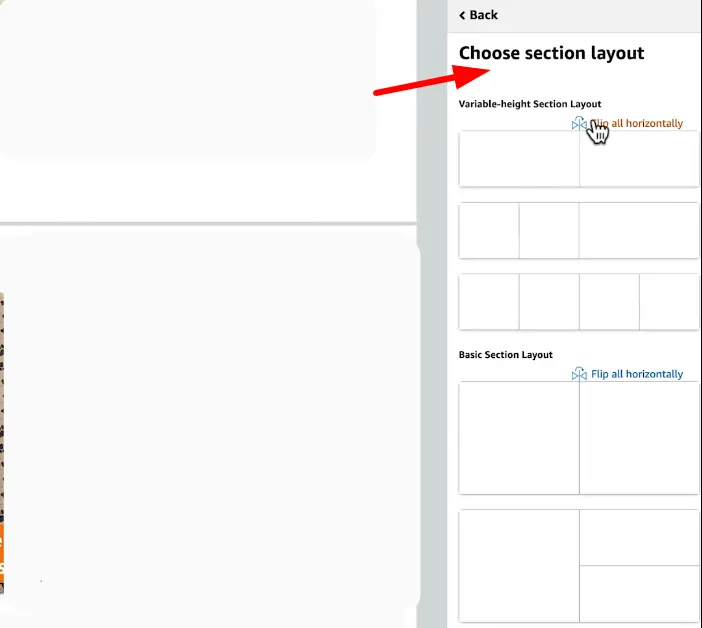
One tip for you is that you can preview your storefront anytime on both desktop and mobile to see how it looks.
Let’s try with the various tile options to find what works best for your brand. You can also look at your competitors’ Stores for ideas on how they showcase their products and tell their brand stories.
3. Add subcategory pages
Creating subcategories helps keep your products organized in your Amazon storefront. You can add each subcategory as a page.
For each page, you’ll choose a title, write a meta description, and select a template. Templates like “Product Highlight” or “Product Grid” are great for showcasing the products in these sections.
Here is how you can create a subcategory page:
1. On the left-hand side, click “Add page.”
2. Enter a title and a description for the page. Then, choose a template and customize it
3. Click “Create page,” and the new subpage will appear as a tab on your Store’s homepage.
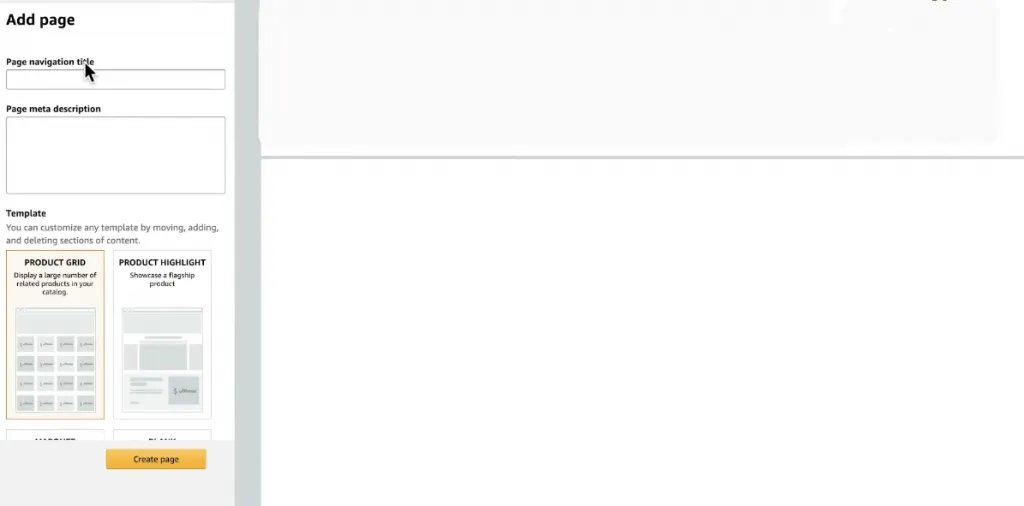
If you want to organize products within a subcategory, create a drop-down menu from the subpage’s tab. To add a drop-down option, click on the tab you want to edit, then “Add page,” and include the drop-down option.
Step 4: Preview and submit your store for review
Once your homepage is completed, let’s preview and submit your storefront for review as the next step in creating an Amazon storefront. Click “Submit for publishing.” Amazon will review your storefront in 24 hours, and once approved, it will go live for customers to see.
Overall, starting an Amazon storefront is quite easy. Just spend some time adjusting the layout until you’re happy with how it looks. Try out different sections and tile arrangements to make your Store stand out.
Why you should create an Amazon Storefront
Here are the main reasons you need to know about how to make an Amazon storefront
- Enhance brand awareness and visibility: An Amazon storefront allows you to create a centralized hub for your brand, showcasing your products, stories, and values. This can help you attract new customers and build a loyal following.
- Increase product discoverability and sales: Getting to know how to create an Amazon storefront can help your products get noticed by more shoppers. Amazon’s search algorithm considers storefront engagement, so the more people visit your storefront, the higher your products will rank in search results.
- Create a cohesive and branded shopping experience: Solving how to create your own Amazon storefront gives you complete control over the look and feel of your brand. You can use custom images, videos, and text to create a unique and engaging customer experience.
- Access valuable marketing tools and analytics: Amazon provides marketing tools to help you promote your storefront and products. You can also track key metrics such as traffic, sales, and customer engagement.
- Grow your business with Amazon’s massive reach: Amazon is the world’s largest online marketplace, with over 200 million active customers. By creating a Storefront, you can tap into this vast audience and reach potential customers worldwide.
Learning how to make an Amazon storefront is essential for building brand awareness and driving sales. However, to ensure profitability, understanding the associated costs is equally important. To get more value information, check out our comprehensive guide on Amazon Seller Fees.
Best Practices for Creating a High-Converting Amazon Storefront
If you want customers to truly stay on your Amazon storefront and click through to your products, you need more than just a pretty design. A high-converting storefront combines strong visuals, smart structure, and strategic content that guide shoppers naturally toward making a purchase.
Here are some proven best practices on how to create an Amazon storefront:
1. Upload high-quality images
Your visuals are the first thing shoppers notice, so make sure they reflect your brand quality. Use sharp, well-lit product images that highlight key features and real-life use. Also, you can include lifestyle photos to help customers visualize your products in action.
2. Utilize videos
Videos make your storefront more engaging and persuasive. They’re perfect for telling stories, getting information across, and really connecting with customers on an emotional level.
On your Amazon storefront, you can add a short clips to:
- Showcase your brand story
- Demonstrate how your products work
- Feature user-generated content like unboxing, review videos, etc.
A well-made video helps increase time spent on your page and improves conversion rates by connecting emotionally with shoppers.
3. Optimize for SEO
Treat your Amazon Storefront like it is – a mini website. So that, search engine optimization matters.
Add relevant, high-traffic keywords to your page titles, product descriptions, and image alt text. Optimizing for SEO improves your store’s visibility in both Amazon search and external search engines like Google.
4. Include clear CTA
Guide your visitors toward the next step using clear, action-oriented CTAs like “Shop Now,” “Explore Collection,” or “Discover More.”
Design plays a huge role here. Human eyes naturally gravitate toward contrast, so make sure your CTA button pops from the background. Use bold colors, larger size, and enough whitespace to draw attention.
Also, position your CTA above the fold for immediate visibility, then repeat it strategically throughout the page, after testimonials, benefit lists, or product demos, wherever a visitor might feel ready to act.

5. Ensure mobile optimization
The last practice on how to set up an Amazon storefront is optimizing for mobile.
Nearly 57% of Amazon traffic comes from mobile users, so your Storefront must look great on smaller screens.
Use clean layouts, short text blocks, and easy navigation to improve readability. Don’t forget to preview your Storefront on mobile to ensure a seamless, conversion-friendly experience.
How to Create an Amazon Storefront: FAQs
How do I make an Amazon storefront as an affiliate?
There are different ways on how to make an Amazon storefront as an affiliate. Here are a few options:
– Amazon Influencer Program: If you have a strong social media presence, you can join the Amazon Influencer Program. This program allows you to monetize your social media content by sharing your storefront URL or through affiliate links.
– Amazon associates aStore: You can create an aStore, which is a customizable storefront that allows you to showcase a selection of Amazon products. To set up an aStore, log in to your Amazon Associates account, go to the “Your aStore Settings” section, and click on the “Add Category” button to add a new page to your Store.
– WordPress with Amazon affiliate plugin: If you have a WordPress website, you can use plugins like WooCommerce or EasyAzon to create an Amazon affiliate store. These plugins provide features to import and display Amazon products on your website, along with your affiliate links
Can anyone create an Amazon storefront?
Not everyone can create an Amazon Storefront. To do so, you must meet these requirements for Amazon storefront:
– Have a professional seller account, not a free individual account.
– Be registered with Amazon’s Brand Registry.
Once you meet these conditions, you can create an Amazon Storefront.
How much is it to have an Amazon storefront?
Amazon storefront creation is free. There are no additional fees specifically for setting up and running your Storefront, but you do need a professional seller account, which has a monthly subscription fee of $39.99. However, the Storefront itself does not incur any extra costs.
How do I get to Amazon storefront?
To access an Amazon storefront, you can follow these steps:
– Go to the Amazon website.
– Search for the brand or seller whose storefront you want to visit.
– Click on the brand or seller’s name in the search results to go to their storefront.
– Alternatively, you can also find a storefront link on the seller’s profile page accessible from Seller Central if you are a registered seller.
Ready to build your Amazon Storefront?
Knowing how to create an Amazon storefront is an excellent opportunity to rock your online business. And our simple guide will be your best support in this process.
By the way, to streamline your cross-platform eCommerce business management, reach out to us for personalized guidance on LitCommerce. Additionally, subscribe to our blog to stay abreast of the latest eCommerce industry trends and insights.


