Are you ready to start selling your products and looking for how to list products on Amazon? You are at the right spot.
On Amazon, there is only one listing for a specific product. Thus, if a product already exists on Amazon, you will need to join this existing listing. Otherwise, you can create a new product listing for items not yet in Amazon’s catalog.
This guide will walk you through the simple steps on how to list products on Amazon Seller Central in both cases and cover:
- How to add an existing product on Amazon
- How to list products that are not sold on Amazon
- How to list items on Amazon via a listing app
Your items will be searchable and ready to order on Amazon by the end. So, let’s get started!
List Products on Amazon Like a Pro
Save time and effort by listing products on Amazon directly from your online store with LitCommerce. Enjoy bulk listing and real-time inventory sync.
How to Add an Existing Product on Amazon
Trying to stand out when selling items already on Amazon? We’ve got you covered. In this part, we’ll show you how to list products on Amazon when they already exist on the platform.
Step 1: Find the product you want to sell
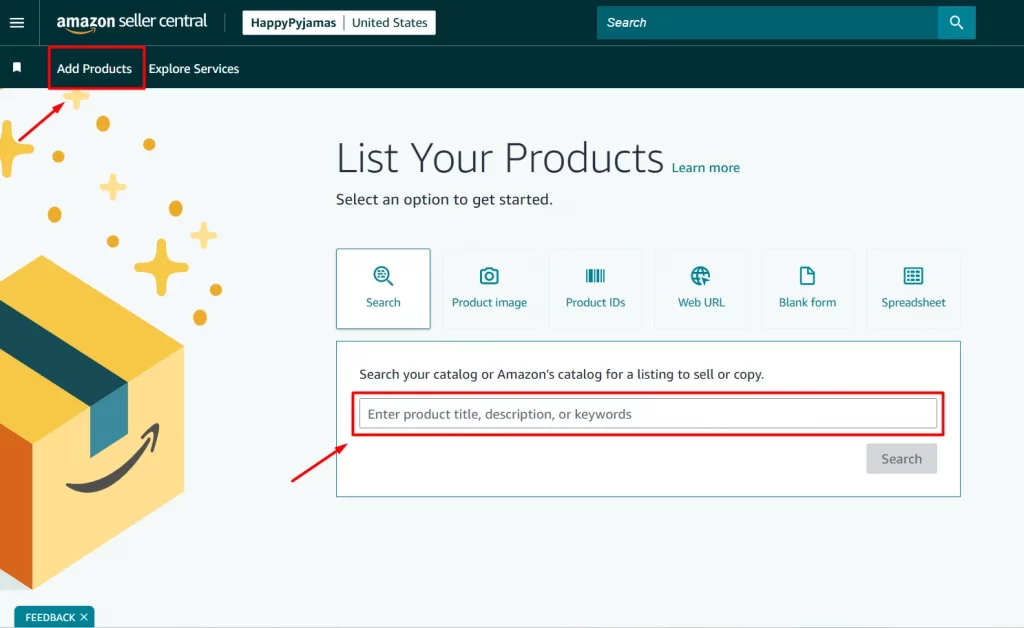
In your Amazon Seller Central, click on Add Products and find the product you want to sell to start listing a product on Amazon. You can look for it by entering its name or ASIN in the search bar and click Search.
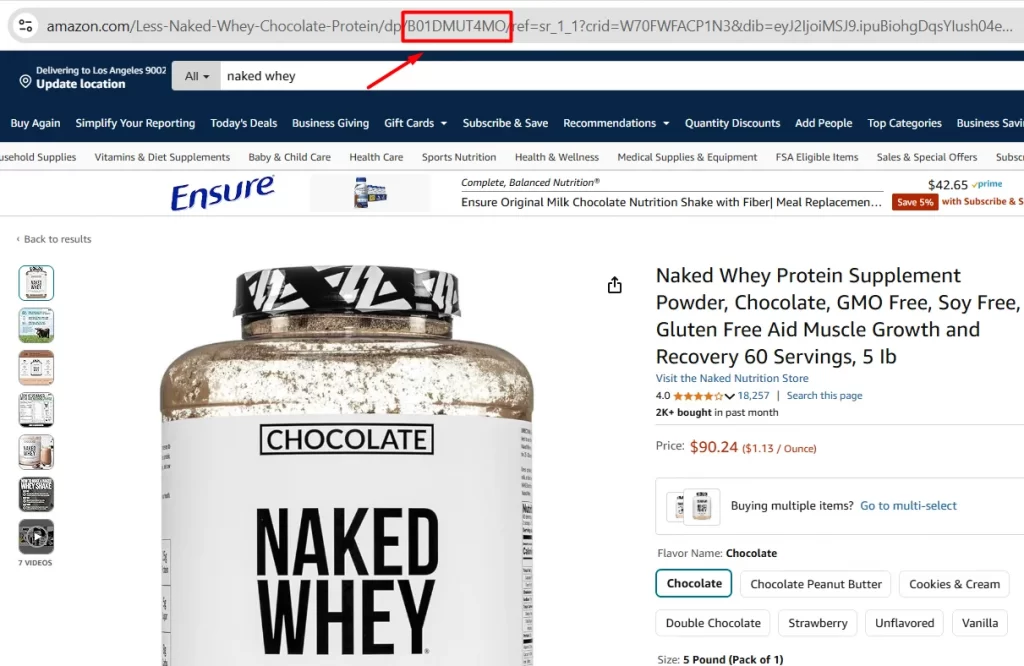
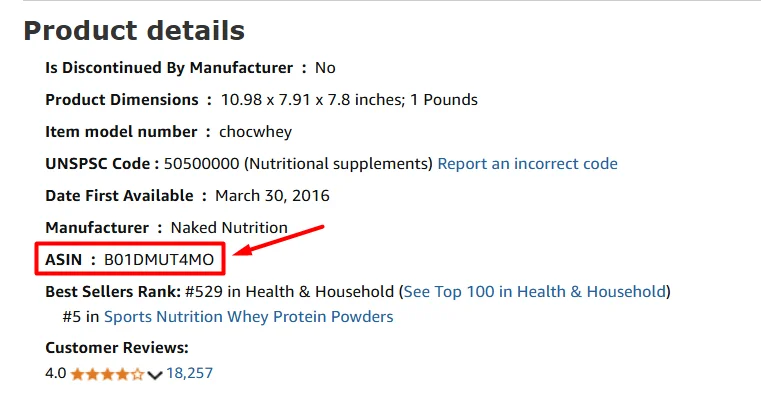
An ASIN is a unique number assigned for each product listed on Amazon. If you want to get an ASIN number, you can easily see it on the URL of the existing listing page or its Product details section.
You can also find Amazon products to sell in 3 other ways, including:
- Product image: You can upload your product to let Amazon find your items from its catalog.
- Product IDs: You can search for multiple UPC, EAN, ISBN, or ASIN IDs.
- Web URL: Generate an Amazon listing based on your existing product web page. However, please avoid other retailer URLs for the best results.
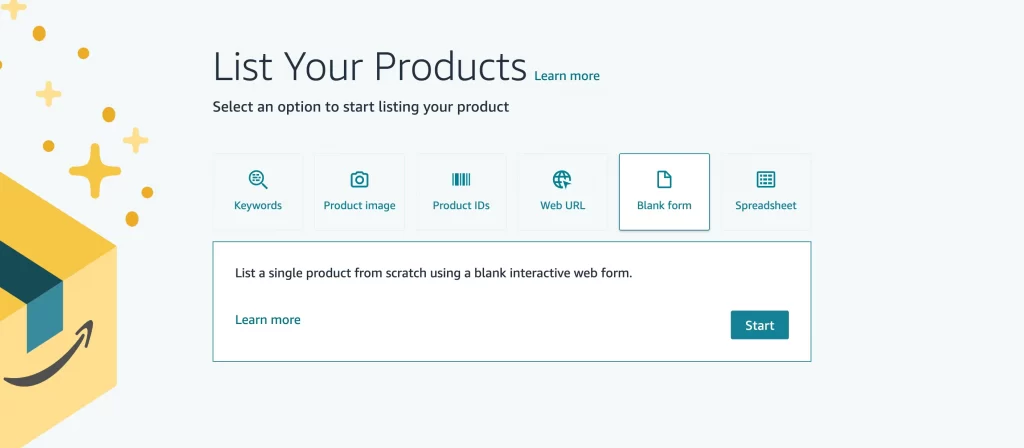
The blank form option is used to list a single product on Amazon from scratch, which we will discover afterward, and the spreadsheet is used to add multiple listings at once with bulk listing spreadsheet templates.
Step 2: Select your product
Once you submit your desired items, Amazon will direct you to the next page, where you can select your best-match product.
For example, I searched for “silicone baking mats,” and here are the Amazon product listings I got:
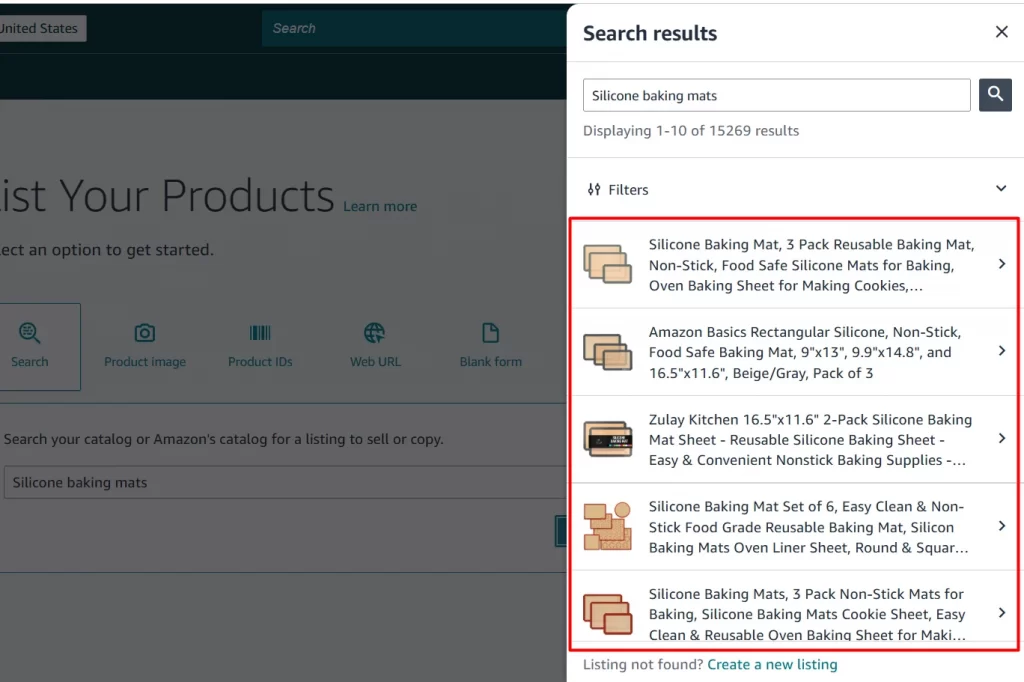
Select the product you want to sell in the list of search results; then, you will need to select product conditions like New or Used. For some kinds of products, Collectible, Refurbished, and Used conditions cannot be listed.
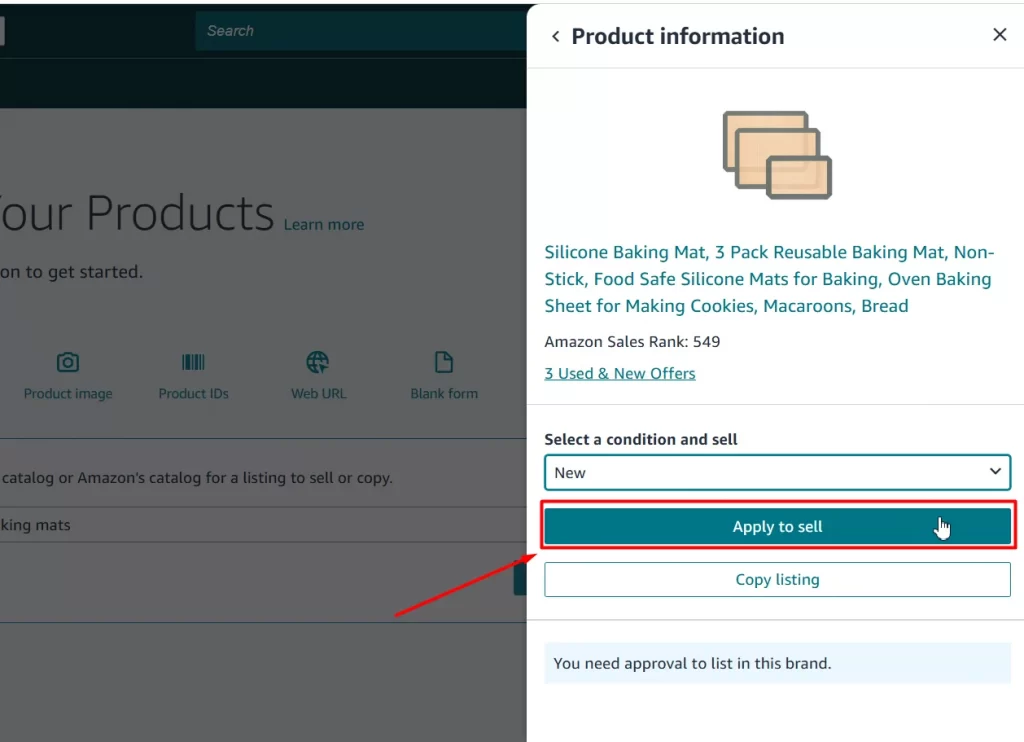
Then, you may encounter in 2 cases:
- Brand or category approval required: Depending on the product, you may need to submit documents for approval to list the brand or category you chose. In this case, click Apply to sell to request approval.
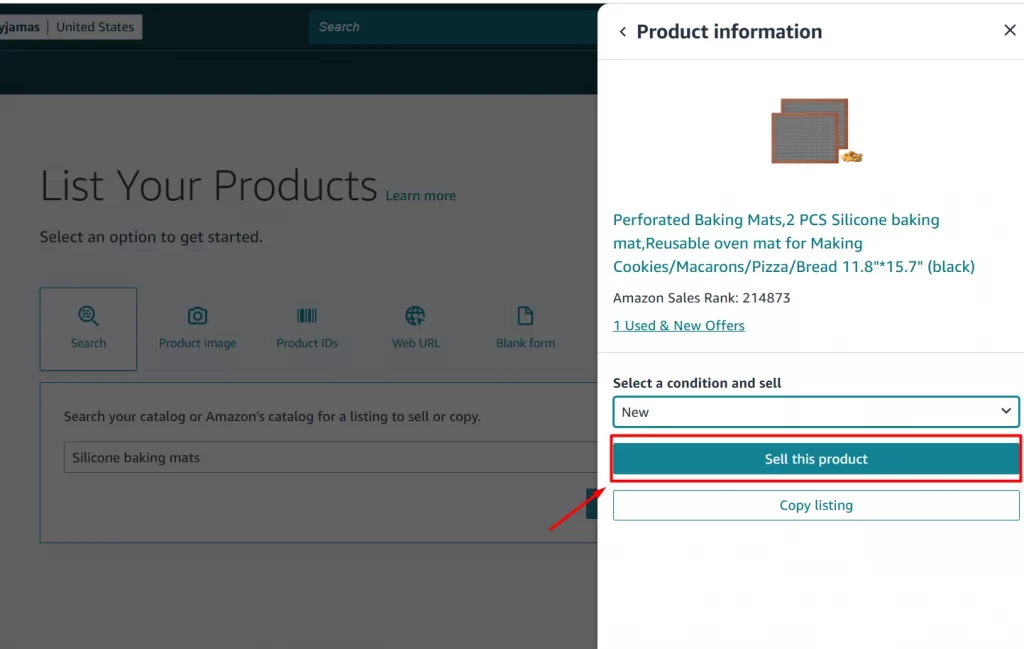
- No approval needed: If the product doesn’t require brand or category approval, click Sell this product to move to the next step on how to add a product on Amazon.
Step 3: Submit documents for approval
Next, if you’re learning how to list products on Amazon with an existing listing that requires brand approval, you’ll need to submit the necessary documents and apply for selling approval to meet Amazon’s requirements. Here’s how:
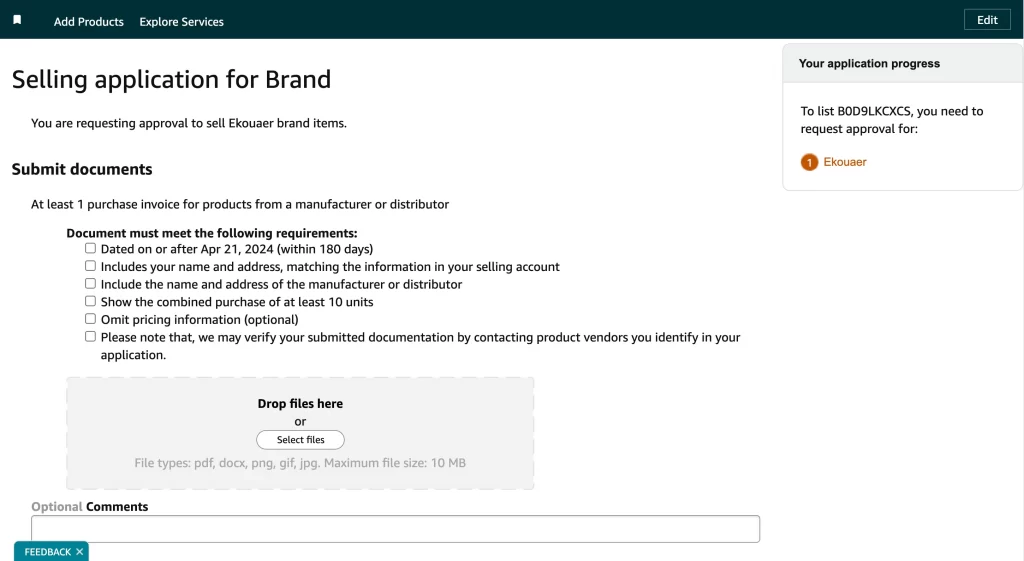
1. Gather the required documents
To apply for approval, you must submit at least one purchase invoice. This invoice should come from a manufacturer or distributor of the product. Make sure the invoice meets Amazon’s requirements:
- Date: The invoice must be dated on or after April 21, 2024 (within the last 180 days).
- Seller information: Your name and address must be clearly displayed and match the information in your Amazon selling account.
- Supplier information: The name and address of the manufacturer or distributor must also be visible on the invoice.
- Product quantity: The invoice must show a combined purchase of at least 10 units of the product.
- Pricing information: While including pricing details is optional, you can choose to omit this information if you prefer.
2. Submit your documents
Once you have the required documents:
- Upload your files: You can either drag and drop your files or select them manually. Make sure your files are in one of the following formats: PDF, docx, PNG, GIF, or JPG.
- File size limit: Keep in mind the maximum file size for each document is 10 MB.
3. Optional information
Amazon allows you to provide additional information:
- Comments: You can add any relevant comments regarding your submission.
- Contact information: You may provide an email address and/or phone number for Amazon to reach you if they have questions about your application. If providing multiple email addresses, use commas to separate them.
4. Verification process
Amazon may verify your documentation by contacting the product vendors listed in your application. Make sure the information you provide is accurate and up-to-date.
5. Additional steps for brand owners
If you don’t have a trademark, you can file one using Amazon’s IP Accelerator to gain access to the Amazon Brand Registry. More information is available on the Amazon IP Accelerator page.
If you are the brand owner or manufacturer with a registered trademark, you can also enroll in the Amazon Brand Registry. Visit Amazon Brand Registry for further details.
After entering your information, click “Agree and Submit” at the bottom.
Step 4: Add your offer details
Once you’ve found the existing product listing or received brand or category approval, it’s time to add your offer details.
Enter your offer details by filling in the SKU (optional), quantity, selling price, and fulfillment channel.
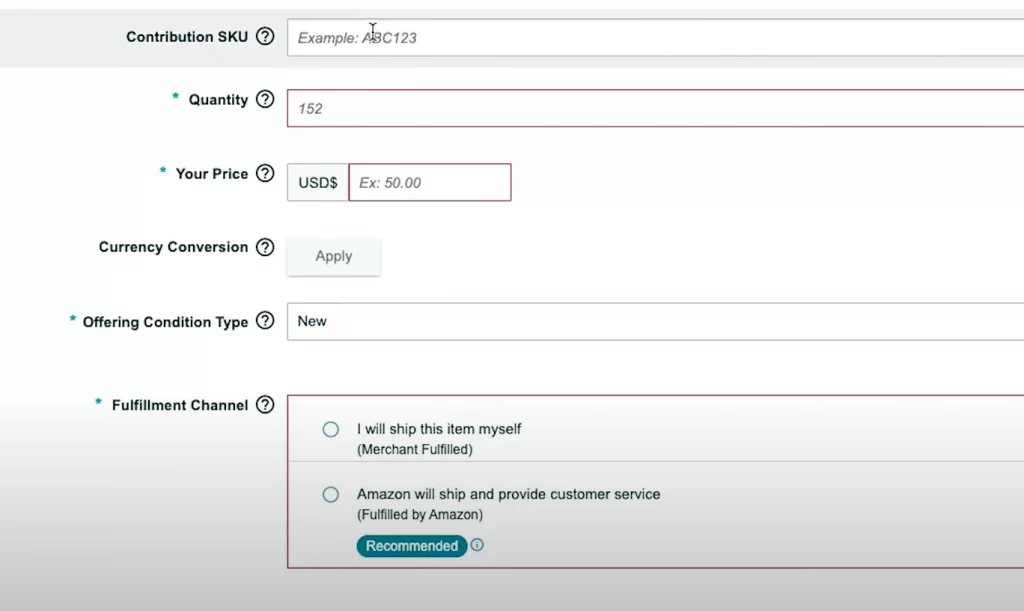
The SKU – Stocking Stock Keeping Unit is a unique product identifier that helps you track your inventory on Amazon. If you leave it blank, Amazon will automatically assign an SKU for you.
As for the Fulfillment Channel, you can choose between 2 options:
- Merchant Fulfilled (FBM): If you handle shipping yourself, enter the quantity available for sale.
- Fulfilled by Amazon (FBA): If Amazon handles fulfillment, you’ll be redirected to set up an Amazon FBA shipment.
Once all information is entered, scroll down to the bottom and click Save and Finish.
After completing this step, your product will appear in the “Manage Inventory” section of Seller Central. If you use FBA as your fulfillment method, the listing will become active once Amazon receives your inventory.
How to List Products That Are Not Sold on Amazon
If your item hasn’t been for sale on Amazon before, you will need to create a new Amazon listing to make your product accessible. Here’s how to list products on Amazon with a whole new brand.
Step 1: Start a new Amazon listing
As mentioned above, if your products are not yet sold on Amazon. On your Amazon Seller Central, click Add products, head to the option Blank Form, and click Start.
Step 2: Enter your product name
Enter a name for your product. While naming your item, try adding high-ranking search terms or keywords for Amazon SEO. This can help customers find your Amazon product listing more easily through search results. You can do your own keyword research using Amazon keyword tools, such as Helium 10, Jungle Scout, or AMZScout, to track popular search terms.
Then, Amazon will suggest a product type based on your product name. Click Confirm if that matches your product correctly. Otherwise, you can freely select another product type.
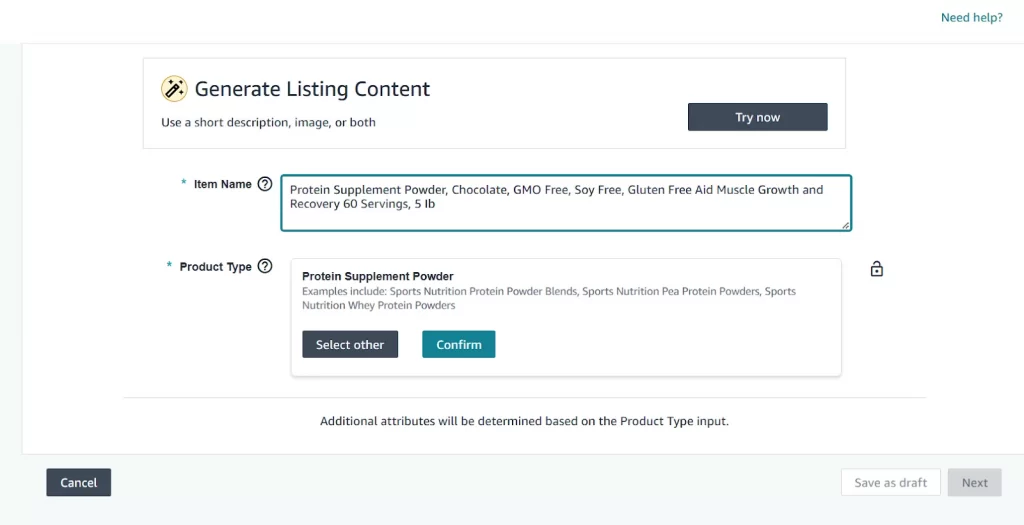
After that, you will see multiple tabs, including Product Identity, Description, Product Details, Offer, and Safety & Compliance. Continue to fill out all these tabs to list a new product on Amazon.
Step 3: Fill in your product identity
Next, you will need to select if your product has variations, then add your Brand Name and your Product ID to the Product Identity tab. The product ID can be UPC (Universal Product Code), EAN (European Article Number), GTIN (Global Trade Item Number), or ASIN. These product identifiers are often required to list products on Amazon to help ensure accurate product identification and tracking.
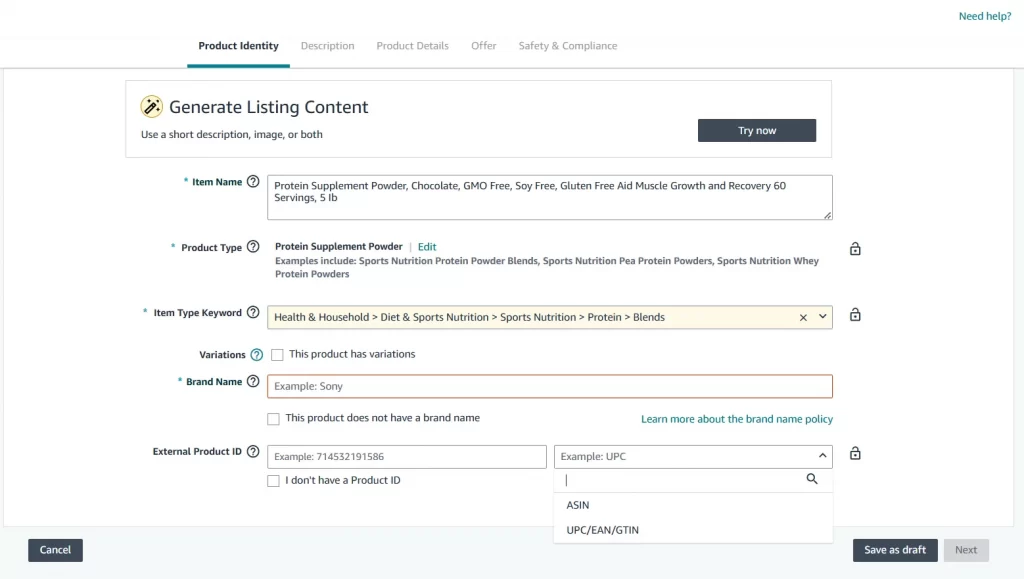
You have two options for the Brand Name: choose “This product does not have a brand name” or enter your brand name. If you select “This product does not have a brand name,” your brand name will default to “Generic.” Otherwise, if you choose to add your own brand name, you will need to complete a brand approval form, as we showed above.
For the External Product ID, enter your product ID or select “I don’t have a Product ID” to apply for a GTIN exemption.
Step 4: Add your product description
The Product Description tab is where you’ll describe your item and tell customers what it is and why they need it. Here, fill in your product description, bullet points, and product images.
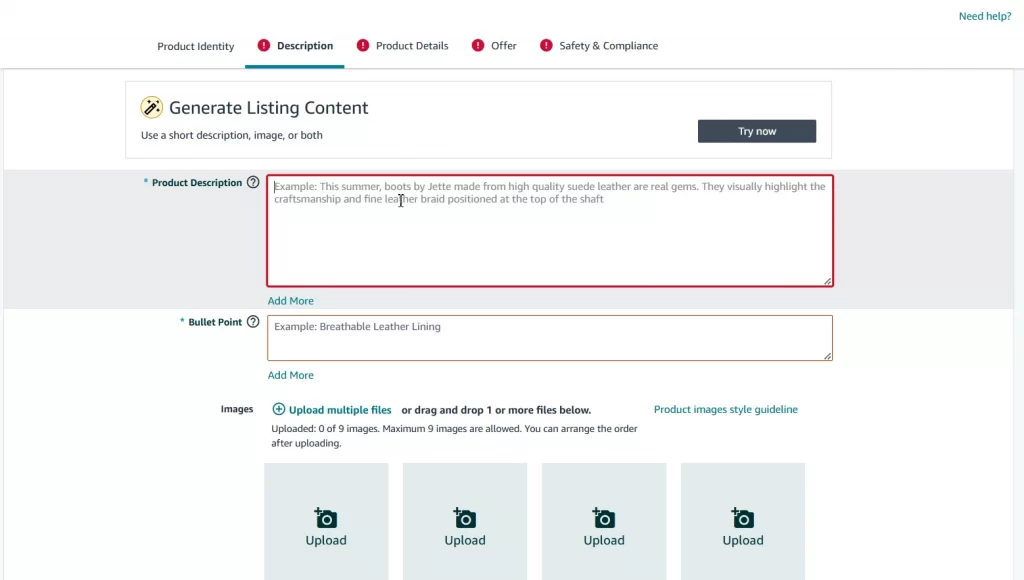
Like the product name, your product description and bullet points should be well SEO-optimized to boost your listing’s organic ranking and increase sales. This should include a concise paragraph explaining the product features and benefits.
In addition to text, pop and high-resolution product images are essential for a strong Amazon listing. Ensure your product photos are sharp, well-lit, and displayed on a simple backdrop to meet Amazon’s guidelines.
Let’s continue to fill the 3 tabs left on how to create a listing on Amazon!
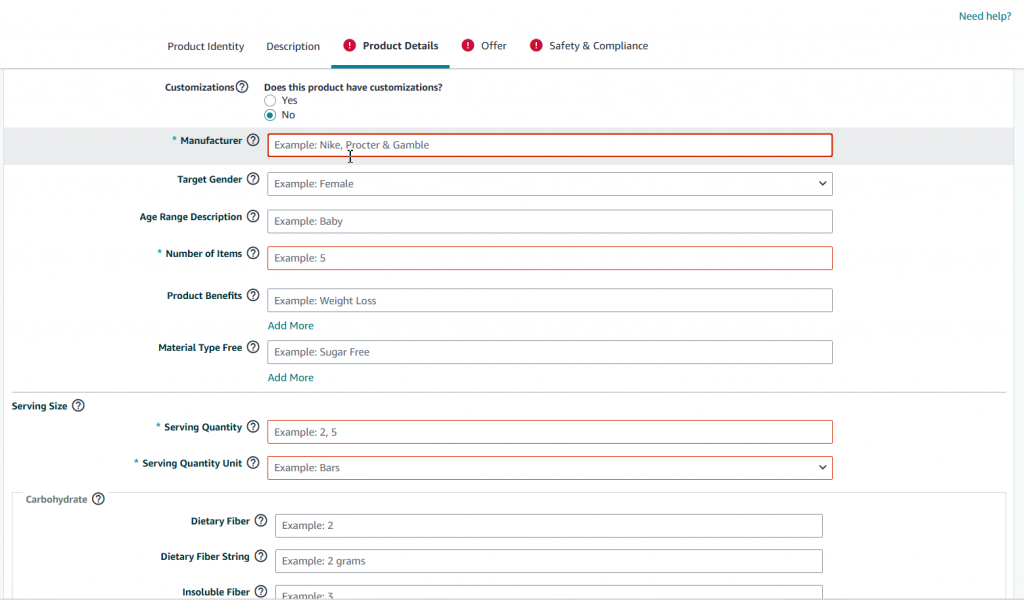
Step 5: Enter product details
After that, provide more details about your product, including Manufacturer, Number of items, Serving Quantity, and Serving Quantity Unit. Although optional, adding Target Audience and Age Range Description can improve your product’s visibility in search results. These keywords help match your listing to what customers are looking for.
Step 6: Add an offer for your product
In this Offer tab, you’ll need to provide details like the number of items available (Quantity), your price, the product’s condition (New or Used), and the fulfillment channel (FBA or FBM). This process is similar to creating an offer for an existing Amazon listing, as explained in the previous section. If you choose Amazon FBA, the Quantity field will disappear as Amazon will handle and manage your inventory.
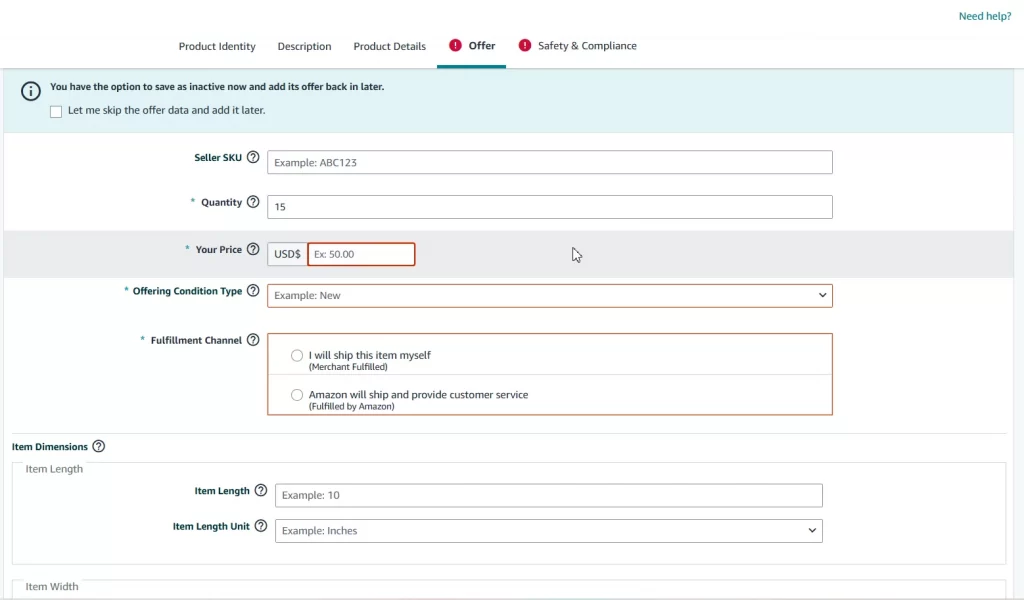
When listing a product on Amazon, don’t underestimate the Price field. Your price should include all associated costs, such as storage, shipping fees, and the original product cost, plus profit margins.
Moreover, if your listing isn’t a private-label one, other sellers can also sell under the same listing. A competitive price thus can increase your chance of being featured in the Buy Box. For example, you can leverage the power of .99 endings (people tend to see $9.99 as closer to $9 than $10).
Step 7: Provide safety&compliance information
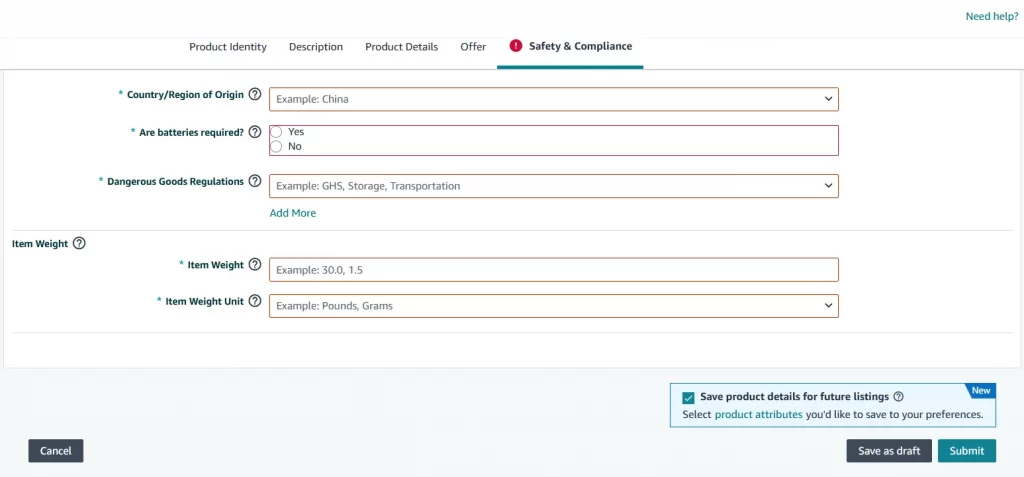
The last tab to list a product on Amazon is Safety& Compliance. Here, include important safety details, such as the product’s origin, battery requirements, and any dangerous goods regulations. Providing these details not only helps you meet Amazon’s guidelines but also builds customer trust, ensuring a safer and more reliable shopping experience.
Step 8: Submit your products
Once you’ve completed filling out all the above information, review your details and click Submit to list your product on Amazon. Not ready yet? You can select Save as Draft to go back to it and make edits later.
And that’s it. That’s all 8 steps on how to list products on Amazon!
Bulk Amazon Listing Made Easy
Add multiple products to Amazon in minutes! Simplify your workflow with LitCommerce’s powerful bulk listing and inventory sync.
How to List Items on Amazon via A Listing App
If you already sell on other channels and want to list products on Amazon without having to copy-paste the same piece of information over time and sync your inventory across all your stores, using a listing app like LitCommerce can be helpful.
Currently, LitCommerce supports you in creating Amazon listings from 20+ eCommerce platforms and top marketplaces such as Shopify, Wix, eBay, Etsy, TikTok Shop, etc.
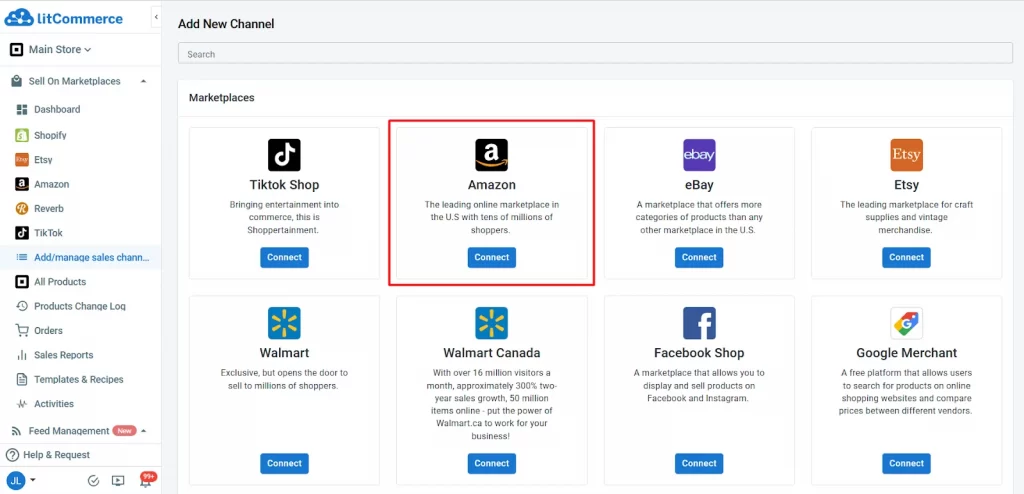
Here is how to list products on Amazon using the LitCommerce app:
- Connect your web store and Amazon store to LitCommerce: Once linked, your product listings will be automatically imported to LitCommerce.
- Select products to list on Amazon: Navigate to All products and choose the desired items. Next, go to the Select section, click List Products to Channels, tick the box beside your Amazon store, and click Add as Draft Now.
- Edit Amazon listings: Once you’ve completed adding products to Amazon as drafts, navigate to your Amazon store on the left sidebar, and you’ll find the draft listings. Now, it’s time to edit and optimize your listings before publishing them on Amazon. Make sure to add essential information, such as ASINs and GTIN exemptions, to meet all Amazon’s requirements.
- List products on Amazon: Once you complete the steps above, your listing will be ready to go live on Amazon. Click Save and Publish to Amazon.
Disclaimer: Due to Amazon API limitations and marketplace prerequisites, the listing process may encounter issues with Amazon’s requirements. Some data during sync might be blocked and require manual input. For these reasons, don’t hesitate to contact our support team at any time.
You can also watch this video guide on how to list products on Amazon with LitCommerce for a clear and step-by-step walkthrough:
How to Create an Amazon Listing – FAQs
Creating a listing on Amazon is simple. Simply log in to your Seller Central account, click “Add a Product”, enter your item details, and you’re live! Be sure to include high-quality images and compelling descriptions. To list an existing product, search for it on Amazon first. If found, you can opt to sell it yourself by clicking “Sell this product”. Then, fill in the product details, and you’re done! Of course, you can create a brand-new Amazon listing if you’re the first or only seller who sells that product. You’ll need to learn how to add products on Amazon by bulk uploading using the “Add Products via Uploads” feature under the “Inventory” if you have lots of items to list. Or you can create a single list by choosing “Add products” under “Catalog” in your Seller Central account. Amazon requires sellers to provide a product identifier, such as a UPC, EAN, or JAN, along with basic product details like the title, brand, images, price, quantity, and shipping information to list products on Amazon. Yes, listing a product on Amazon is free, but being an Amazon seller takes fees. You can choose between an Individual plan for $0.99 per item sold or a Professional plan for $39.99 per month, regardless of the number of items you sell.
Start Listing Products on Amazon Now!
Listing your products on Amazon is the first and crucial step for reaching a vast customer base. Whether you’re offering an existing product or a new one to the market, this guide has provided clear steps to navigate the process successfully. Therefore, follow it to list products successfully on every first try.
For more tips on listing and selling on Amazon, visit our blog. Also, don’t hesitate to contact us if you have any further questions.

