
Most Etsy sellers already share their products on Facebook, Instagram, or TikTok. The catch is that a post scrolls out of view within a day, while a shop stays put. When you connect Etsy to Facebook Shop, your listings get a permanent storefront on your Facebook Page. People who find you on social media can browse your whole catalog, then tap through to Etsy to buy.
This guide covers two ways to set it up in 2026. The manual method uses Meta’s own tools. The auto sync method keeps your Facebook prices and stock in line with Etsy. You’ll also learn how to link your Facebook Page back to your Etsy shop, whether you have 10 listings or hundreds.
Let’s get started!
Key takeaways
- Domain verification only proves you own your Etsy shop. Your products appear on Facebook only after you add them to a Meta catalog.
- Checkout now happens on Etsy. Your Facebook Shop is a storefront that sends buyers to your listings.
- The manual method suits small shops with stable stock. Auto sync suits shops that sell out often or list on several channels.
- Facebook Shops are not available in every country, so check eligibility before you start.
Title: Kick Off Selling on Etsy with Facebook Shop or Many More Channels
Maximize reach and multiply profit by going live on Etsy, Facebook, and more platforms. LitCommerce connects multiple channels and offers all-in-one-place management, minimizing your multichannel selling effort!
What Happens When You Connect Etsy to Facebook Shop?
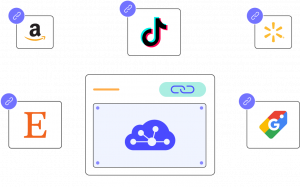
When you connect Etsy to Facebook Shop, your Etsy products appear in a shop tab on your Facebook Page. Shoppers browse your items on Facebook. When they want to buy, they tap the product and land on your Etsy listing.
To make this work, Meta uses two tools:
- Domain verification: proves to Meta that shopname.etsy.com belongs to you.
- Catalog: a product list in Commerce Manager. It stores each item’s title, photos, price, stock, and Etsy listing link.
Your Facebook Shop simply displays what’s in that catalog. If a product isn’t in the catalog, it won’t show up in your shop.
In mid-2025, Meta removed checkout from Facebook and Instagram Shops. Since August 26, 2025, buyers finish every purchase on the seller’s own website (Shopify Help Center). For you, that website is Etsy. In practice, this means:
- Every sale goes through Etsy, with Etsy’s usual fees and payment processing.
- You manage orders in Etsy Shop Manager, just as you do today.
- Your Facebook Shop works as a storefront that brings buyers to Etsy.
Why Should You Connect Etsy to Facebook?
Etsy is one of the top marketplaces for handmade and vintage goods, but buyers there are also browsing thousands of competing shops. So when you start selling on Etsy, getting noticed often depends on search rankings and ads you don’t fully control, and a Facebook Shop gives you a second way to reach buyers.
Unlike an Etsy search page, a Facebook Shop is a storefront where your products are the only ones on the page.
Here are 4 reasons it’s worth the setup:
- Increase reach for your Etsy shop: Linking your Etsy shop to Facebook allows you to tap into Facebook’s vast user base of over 3 billion monthly active users. This exposure can significantly expand your reach and showcase your products to a broader audience. Check out Facebook Marketplace reviews to get more insights about this social eCommerce platform.
- Send buyers straight to the right listing: Your Facebook Shop shows only your products. Each tap opens the matching Etsy listing, so buyers skip Etsy search and land on the item they want.
- Build a brand that lives beyond Etsy: Your Page, Shop, and Etsy listings use the same name, photos, and product descriptions. Buyers who see the same shop in two places are more likely to remember it, and they can follow your Page for new drops instead of relying on Etsy search to find you again.
- Turn engagement and ads into product views: Once your listings sit in a Meta catalog, you can tag products in posts and use the same catalog for Facebook and Instagram ads. Replying to comments and messages keeps your Page active, so followers see more of your updates and products.
There are two ways to set it up. The right one depends on how often your stock changes. Let’s explore how to connect an Etsy shop to Facebook.
How to Connect Etsy to Facebook Shops: Method 1 – Manual Setup
If you only sell a handful of pieces, or your stock rarely changes, you don’t need extra software to get your Etsy products onto Facebook. Meta already gives you the tools for free: Meta Business Suite to verify your shop, Commerce Manager to hold your product catalog, and a shop builder to display it all on your Page. On the Etsy side, everything happens in your Shop Manager.
Here is the whole process of how to connect Etsy to Facebook Shops manually
Step 1: Check eligibility and set up your business portfolio
On Etsy, your listings will appear on Facebook exactly as they look in your shop, so fix weak spots first. Run through our Etsy SEO checklist, focus on how to take pictures for Etsy, Etsy listing photo size, and tighten your titles and descriptions.
On Facebook, you need:
- A published Facebook Page for your Etsy brand
- A business portfolio in Meta Business Suite (formerly Business Manager) connected to that Page, with full admin control
- A Page that follows Meta’s commerce eligibility requirements, including its Terms of Service, Commercial Terms, and Community Standards
- Products that can be bought directly from your verified domain (your Etsy shop)
- A business located in a country where Meta supports Shops
Not every business can open a Facebook Shop, so you need to make sure Meta supports Shops where your business is based. In August 2023, Meta stopped letting most businesses in Asia-Pacific host a shop on their Page, keeping Shops only in Australia, India, Indonesia, Japan, South Korea, Taiwan, and Thailand in that region (Marketing-Interactive)
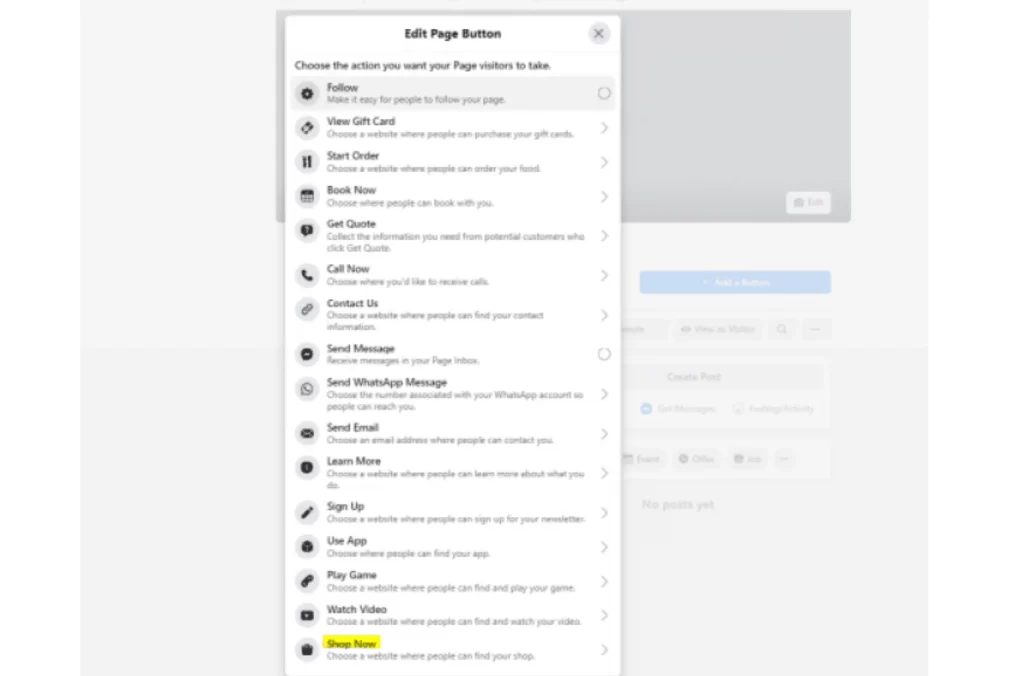
If Shops aren’t available where you are, you can still send Facebook visitors to Etsy. Add a Shop Now action button to your Page that links to your Etsy shop:
- Go to your Facebook Page and open the action button settings (shown as Add action button or Edit action button).
- Choose Shop Now.
- Paste your Etsy shop URL (for example, shopname.etsy.com) and save.
Step 2: Verify your Etsy domain in Meta Business Suite
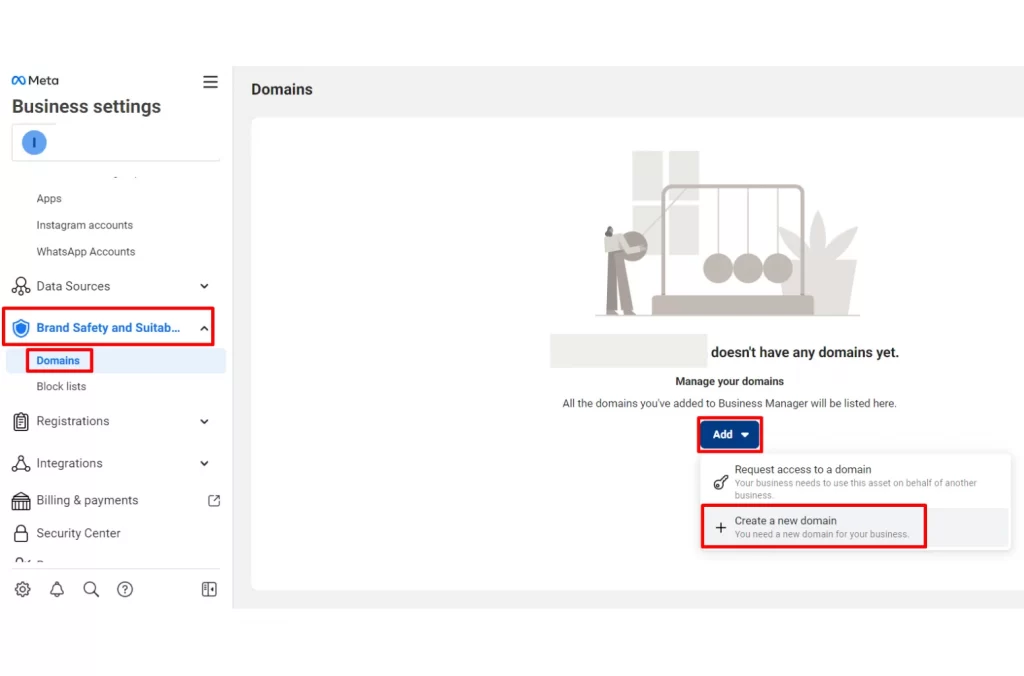
Next, with your Page and business portfolio ready, you need to verify Etsy domain on Facebook in Meta Business Suite. Domain verification tells Meta that shopname.etsy.com belongs to you. Meta requires it before your Etsy links can power a shop.
1. Log in to Meta Business Suite and open your business portfolio Settings.
2. Under Brand safety and suitability, click Domains.
3. Click Add, then Create a new domain.
4. Type your Etsy shop domain in this format: shopname.etsy.com.
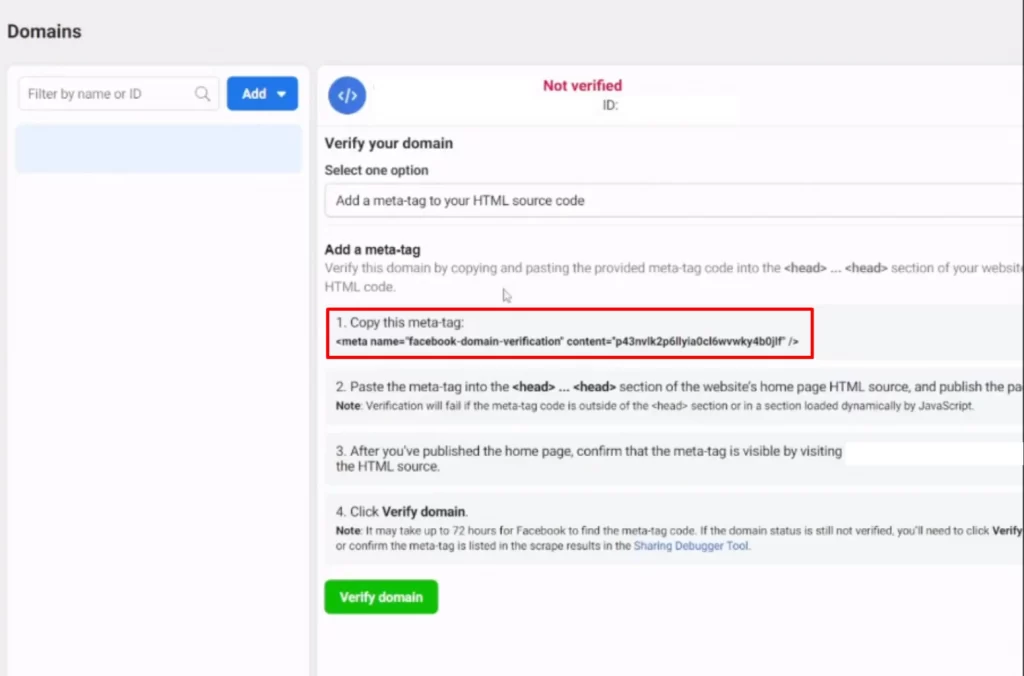
5. Choose meta-tag verification and copy the full meta-tag verification code (it starts with <meta name=).
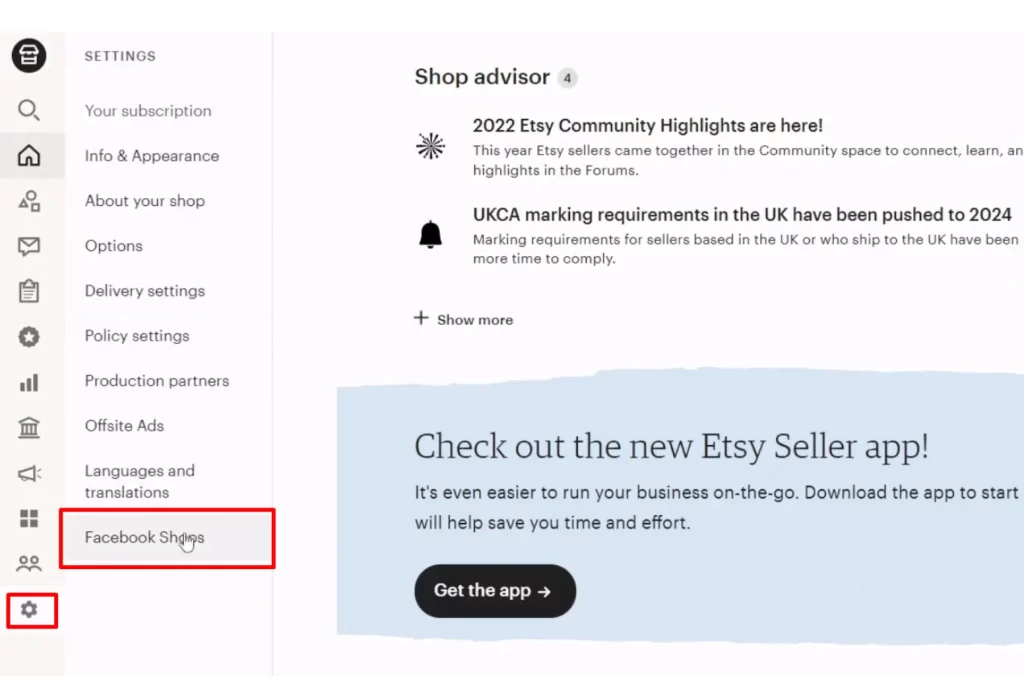
- 6. In a new tab, go to Etsy Shop Manager > Settings and choose Facebook Shops.
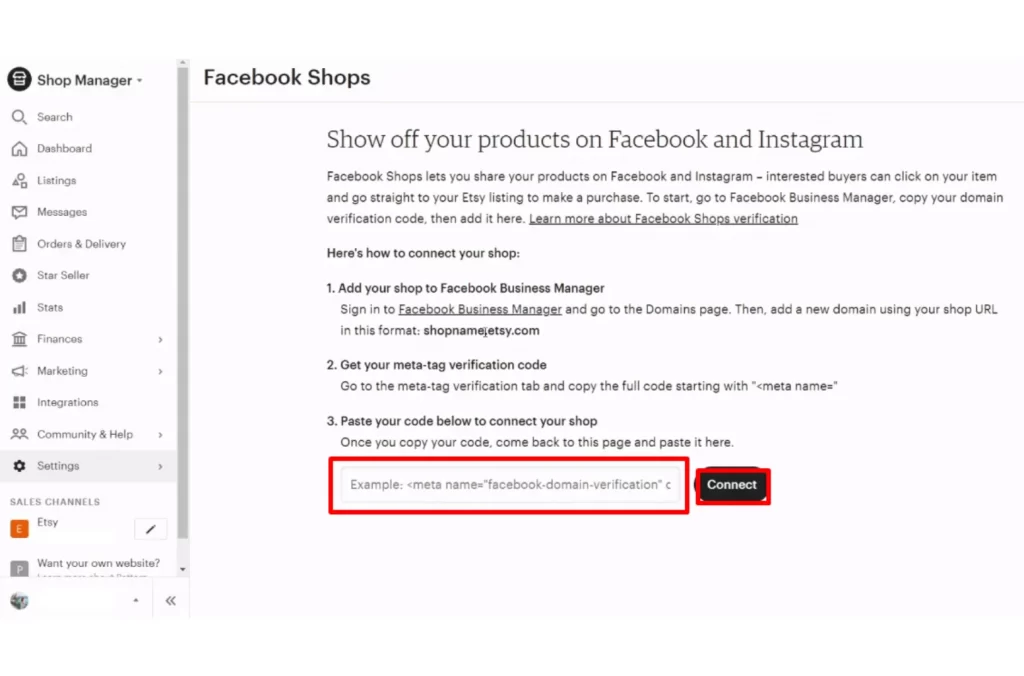
- Paste that code into the box and click Connect
- Switch back to Facebook and click Verify domain
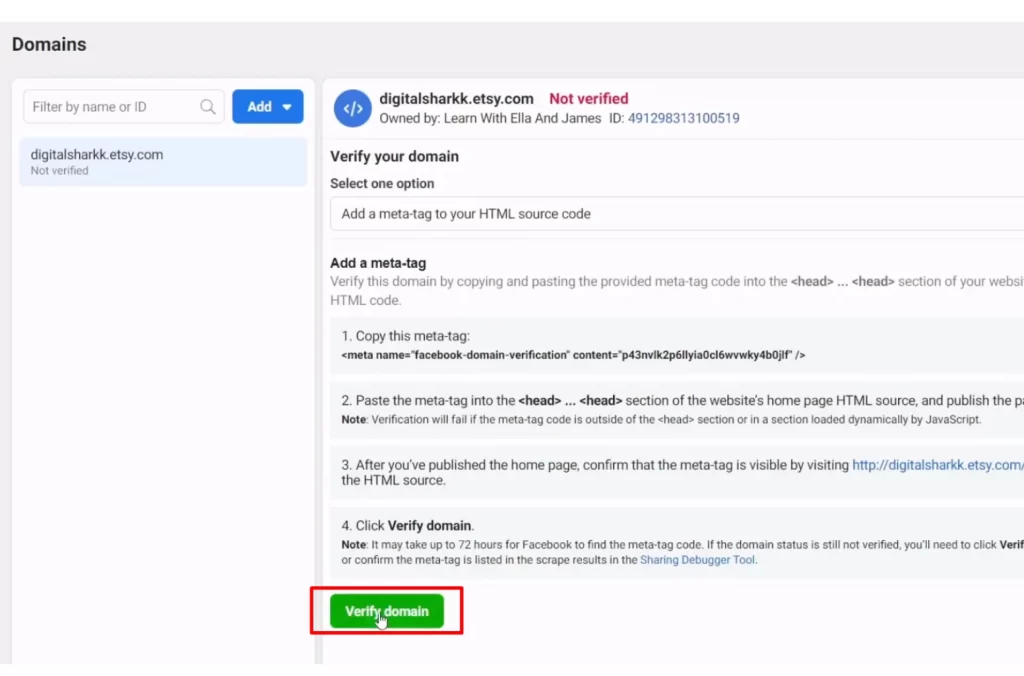
Once the domain shows as verified, Meta knows your Etsy links are yours. Your products are not on Facebook yet. That happens in the next two steps.
Tip: If Meta can’t verify your domain, check the format first. It must be shopname.etsy.com. Then check the meta tag you pasted on Etsy. Some sellers report that Etsy drops the space and slash at the end of the code.
Step 3: Create a catalog in Commerce Manager
1. A catalog is the product list your Facebook Shop reads from.
2. Click Add Product.
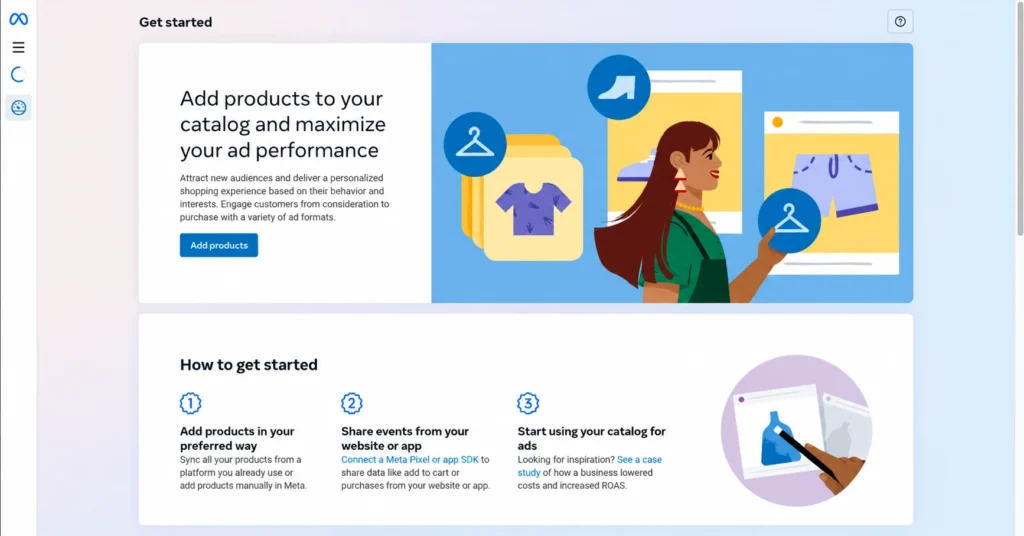
3. For catalog type, choose online products.
4. Turn off the “Connect to a partner platform” toggle. Etsy isn’t one of Meta’s partner platforms, so you need to upload product info yourself.
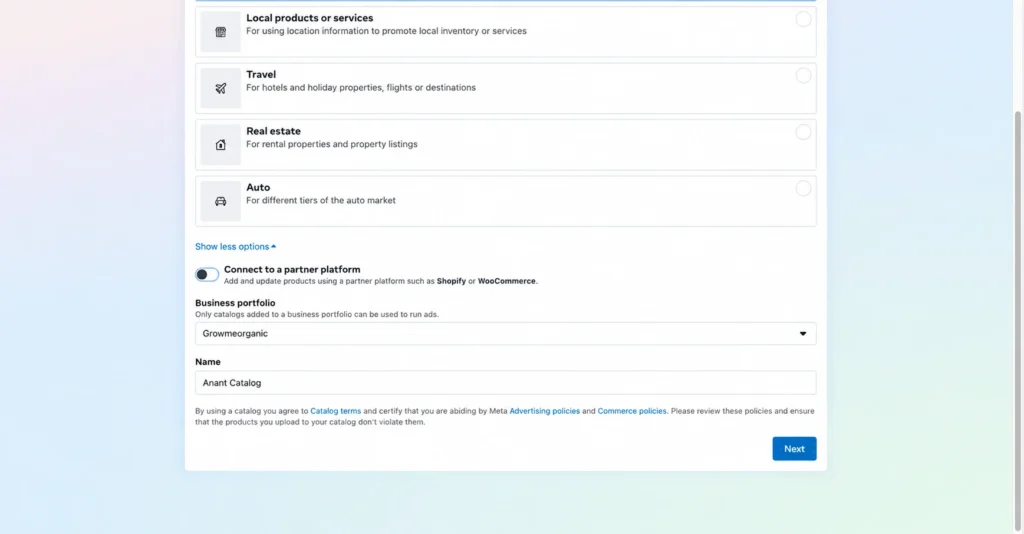
5. Select your business portfolio as the owner, name the catalog (for example, “Etsy Shop Catalog”), and click Next to move to step 4
Step 4: Add your Etsy listings to the catalog
You have two native options to add Etsy products to Facebook Shop. Pick the one that matches your listing count.
Before uploading your listings, complete Add basic info, review the tracking setup, and set your catalog permissions.
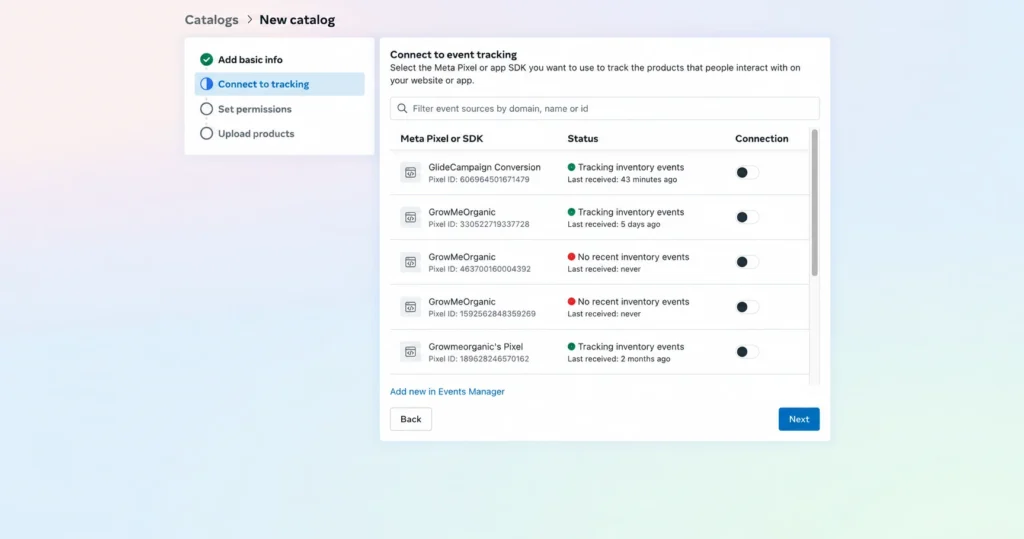
Once you reach Upload products, you need to choose one of two options:
- Manually add your products: Enter each item’s details through a form. This works well if you only have a few Etsy listings.
- Connect to a data feed: Add multiple products using a spreadsheet or file. You can start with your Etsy listings CSV, then prepare it to match Meta’s catalog requirements.
Option A: Add items manually
1. Open your catalog and go to Items, then Add items and choose Manual.
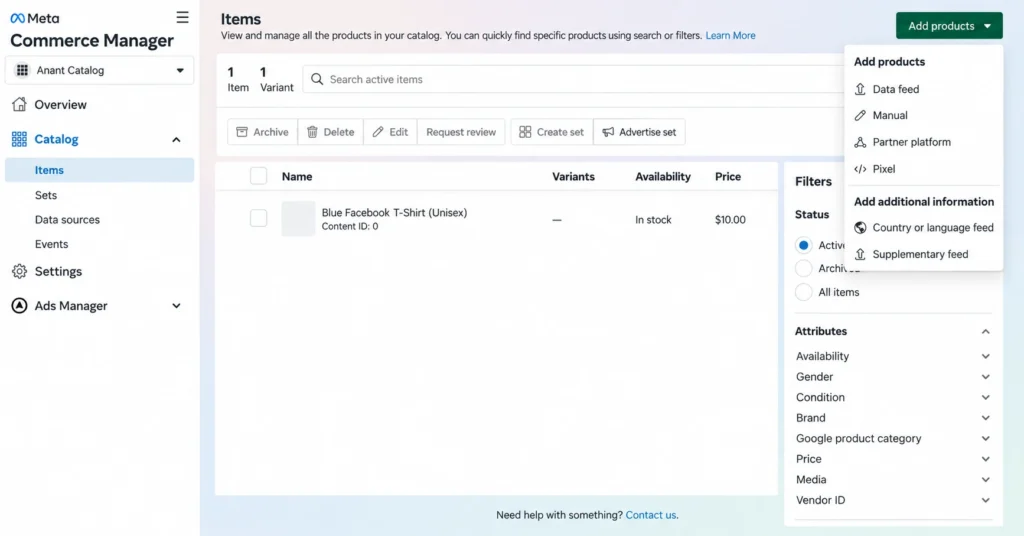
2. For each product, enter the title, description, price, photos, availability, and condition, copied from your Etsy listing.
3. In the website link field, paste the Etsy listing URL in this format: shopname.etsy.com/listing/ID. This is where buyers land when they tap the product.
4. Repeat these steps for each listing.
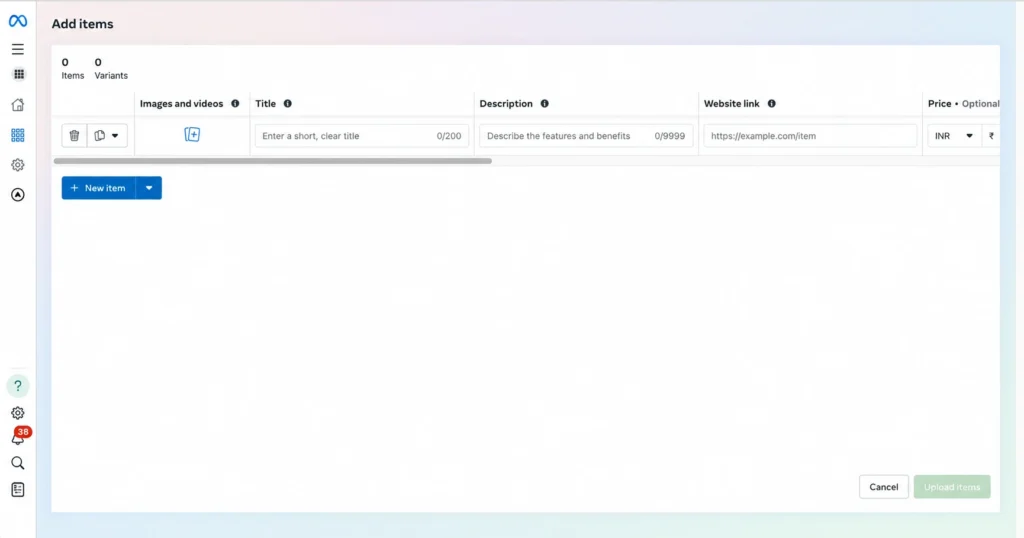
5. Once done, click Upload product
Option B: Connect to a data feed
1. For this option, you need a spreadsheet of your Etsy products. It can be an online link, such as a Google Sheet, or a file on your computer that you upload to Meta.
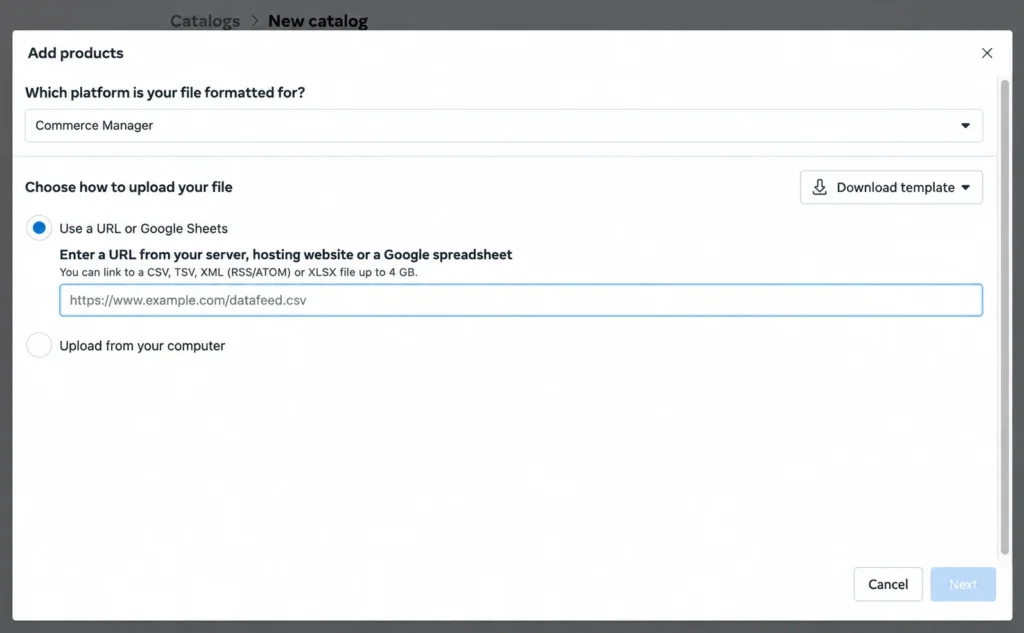
2. Open the file in Google Sheets or Excel and rename the columns to Meta’s field names, such as id, title, description, availability, condition, price, link, image_link, and brand.
3. In your catalog, go to Data sources, choose Data feed, and upload the file. Meta accepts CSV, TSV, and XML feeds, and you can set an hourly, daily, or weekly upload schedule from a hosted file or Google Sheet (Meta for Developers).
4. Choose your default currency, name the feed, and click Upload.
5. Once done, click Next
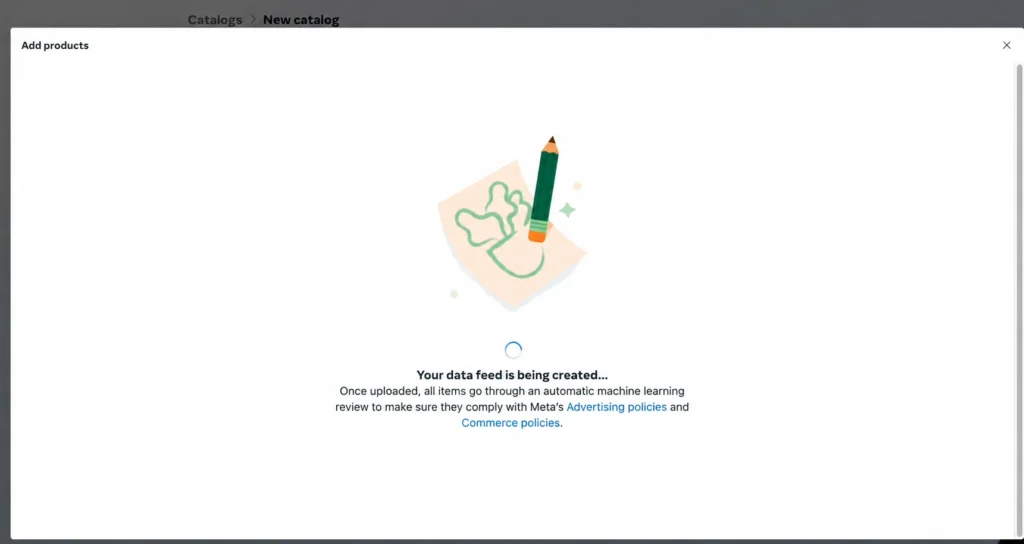
A data feed lets you import Etsy listings to Facebook catalog in one upload. But Facebook only re-reads your file. It doesn’t watch your Etsy shop. When an item sells out on Etsy, Facebook stays out of date until you update the file.
Step 5: Set up and publish your Facebook Shop
With your Etsy listings in the catalog, you can arrange your shop so customers can browse your products easily.
1. In Commerce Manager, click Shop to open the shop builder.
2. Highlight featured collections, or group several collections into a carousel. If you’d rather not arrange it yourself, turn on Optimize layout to set your shop’s layout automatically based on each customer’s interests and shopping activity.
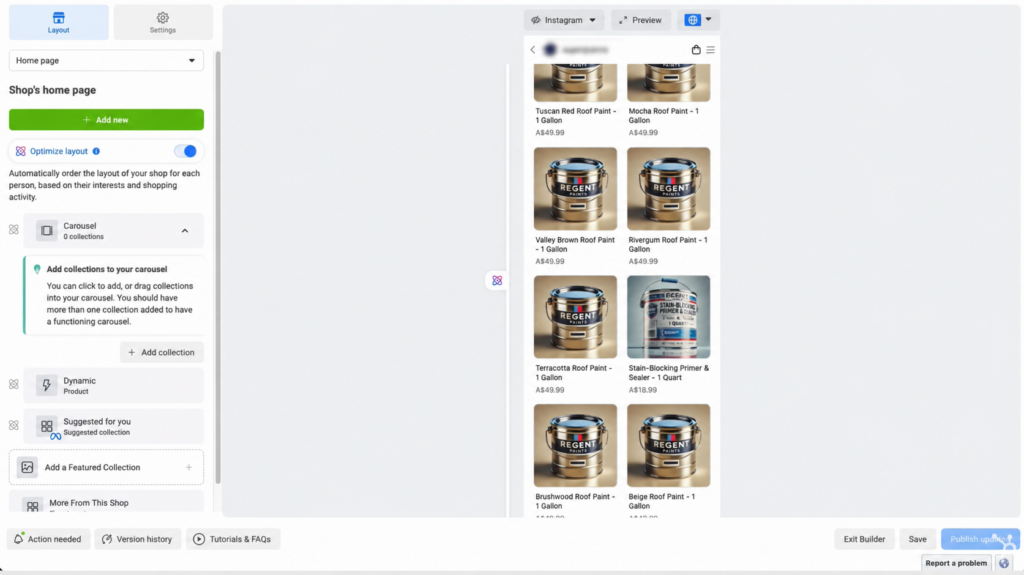
3. Use Preview to check how your storefront looks.
4. When you’re happy with the layout, click Publish updates to make your changes live.
Next, you need to set up your shop’s shipping and payment
1. Go to Settings, then Shipping.
2. Click Add shipping.
3. Fill in your shipping details. Make sure the countries you ship to match the shipping profiles in your Etsy shop. You can also add shipping speeds and rates if you want buyers to see them on Facebook.
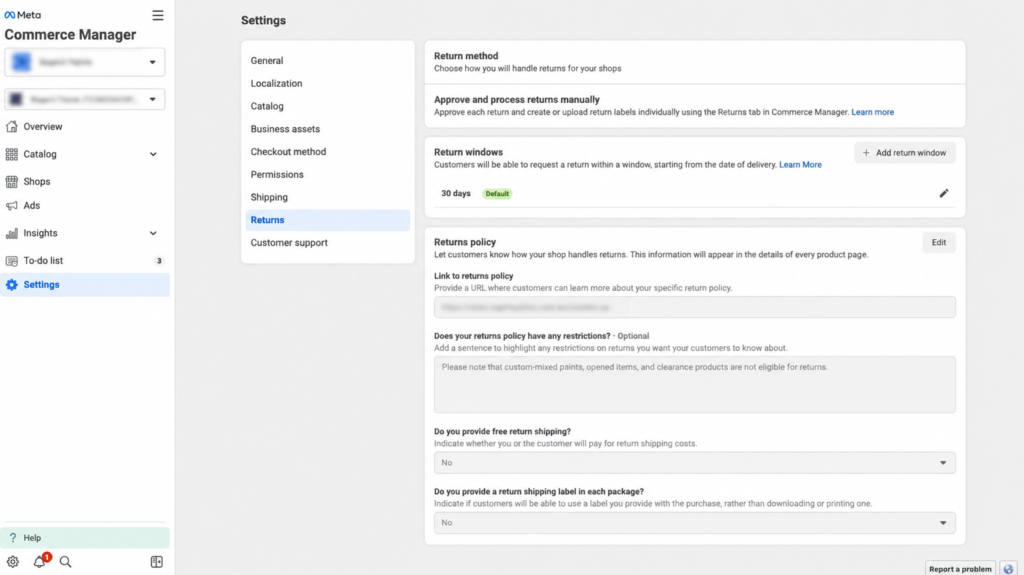
4. After saving your shipping settings, go to the returns section and add your return policy. Use the same terms as your Etsy shop policies, so buyers don’t see two different sets of rules.
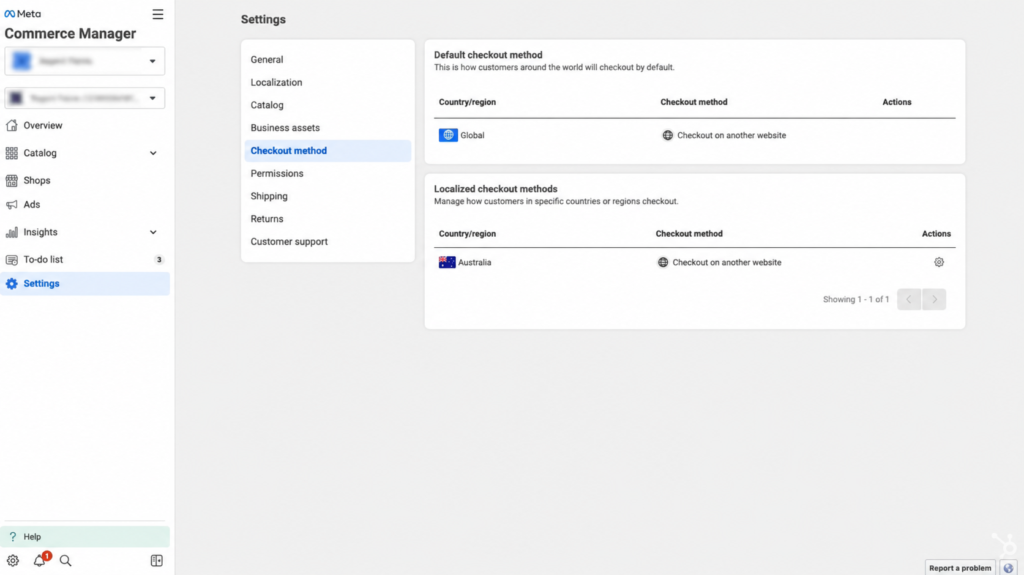
5. Where Meta asks how buyers will check out, choose checkout on another website, so product taps lead to your Etsy listings.
Meta reviews new shops against its commerce policies before they go live. It may ask for documents that confirm your business. You’ll find the review status in Commerce Manager.
Ready to Sell Seamlessly on Facebook Shops?
Connect Facebook Shops Now
How to Connect Etsy to FB Shops: Method 2 – Auto Sync Etsy to Facebook Shop with LitCommerce
If you import Etsy listings to Facebook catalog every week or sell one-of-a-kind pieces, keeping your Meta catalog in sync with Etsy by hand gets old fast. A sold-out item can stay live on Facebook for days, and buyers who tap it land on an Etsy page that says “Sold”.
LitCommerce connects your Etsy shop to Facebook Shop and keeps price and stock in sync for you.
Step 1: Create your LitCommerce account
First, create your account. It’s where you’ll connect both Etsy and Facebook Shop.
- Go to LitCommerce’s app
- If you’re new to LitCommerce, click Sign up and register with your email. Every new account starts with a 7-day free trial that includes every feature. Or, if you already have an account, click Sign in.
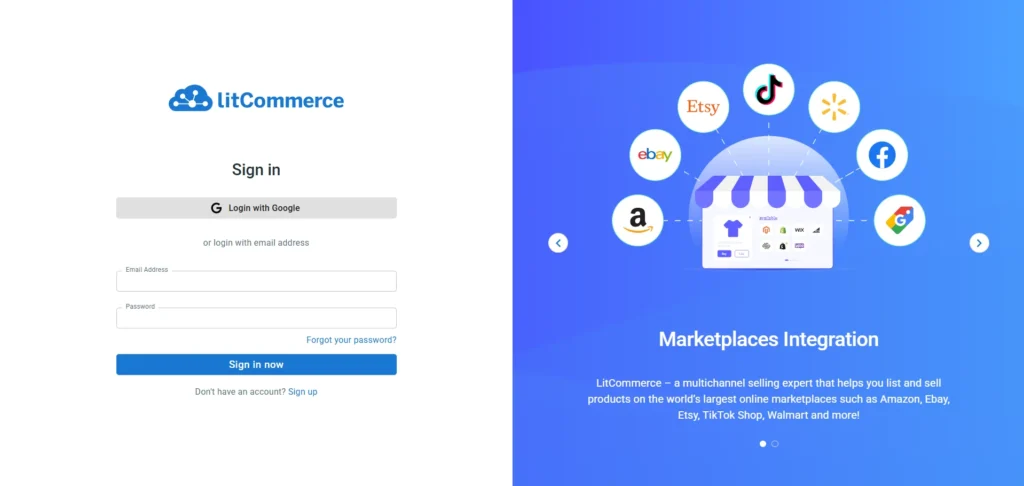
Step 2: Connect Etsy and set up your Main Store in LitCommerce
When you first start, set up a Main Store—the central hub that keeps your products in one place and connects your sales channels. Connect your website if you have one. If you only sell on Etsy and don’t have a website, click Skip, I don’t have any of these to use LitCommerce as your Main Store, with Etsy as a sales channel.
1. Find Etsy in the list of supported marketplaces and click Connect under the Etsy logo.
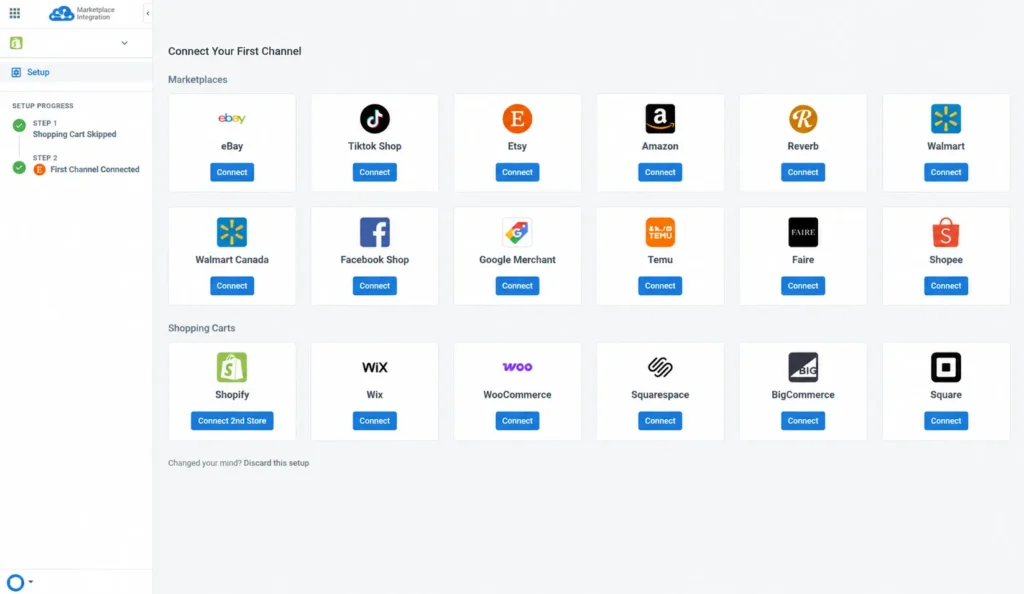
2. Enter your Etsy store name, then click Connect Your Account and allow LitCommerce to access your Etsy seller account.
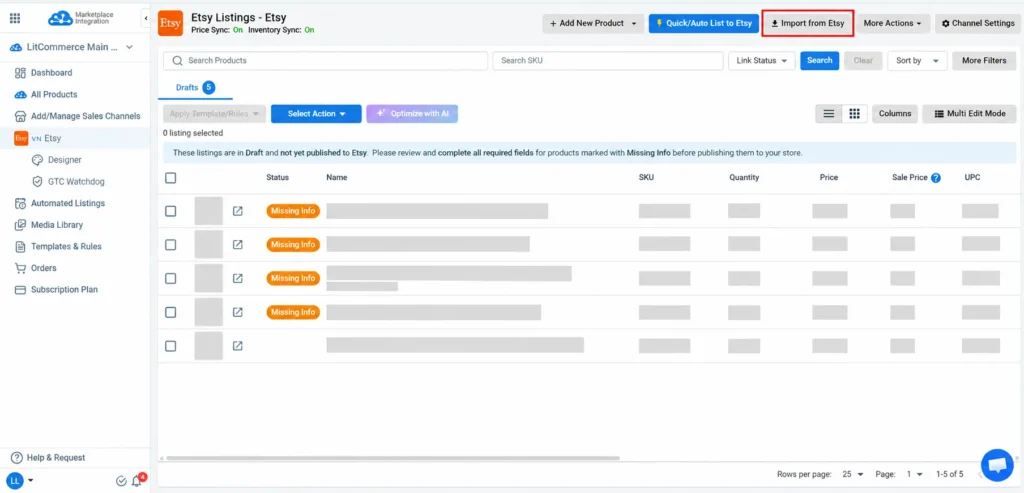
3. Open the Etsy channel tab and click Import from Etsy.
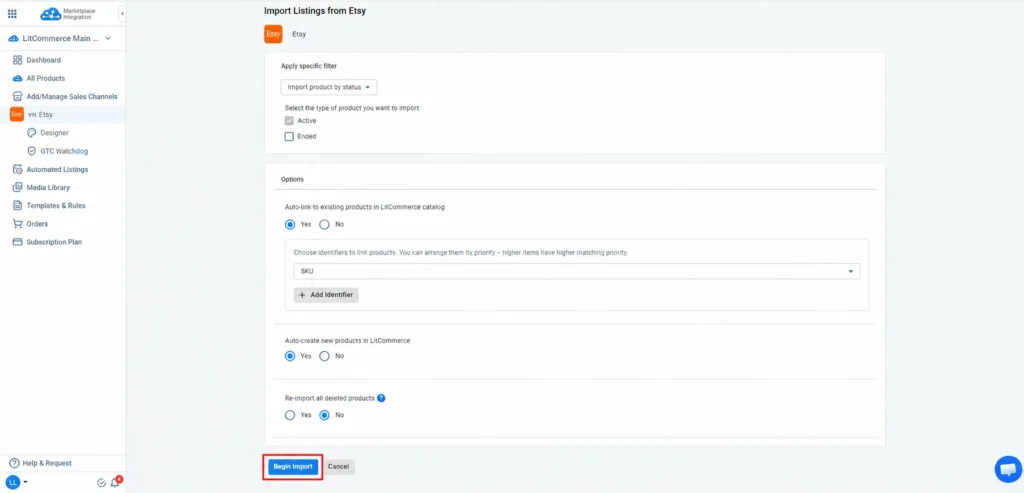
4. Filter the products you want, keep auto-link turned on, and click Begin Import.
5. In your Etsy channel, select the products you want to sell on Facebook, then choose Create on Main Store. Once created, these products will appear in All Products, where you can select them and add them to your Facebook Shop drafts.
Step 3: Add your Etsy products to All Products
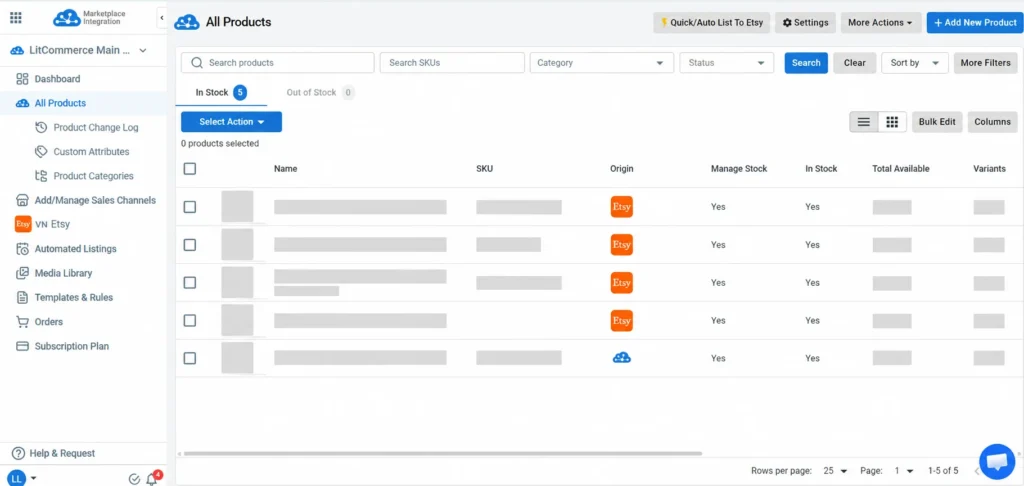
Every product you send to Facebook Shop has to come from All Products, which is your Main Store catalog. So check that your Etsy products are there first.
1. Go to All Products and check that your Etsy listings appear.
2. LitCommerce links listings automatically when they share the same SKU or UPC with a product already in your Main Store.
Step 4: Connect Facebook Shop with your Product Catalog ID
Before you connect, you’ll need your Product Catalog ID. Your Product Catalog is where your Facebook Shop products are stored in Meta Commerce Manager, and the Product Catalog ID is that catalog’s number. LitCommerce uses this ID to know which catalog to send your Etsy products to.
To get your Product Catalog ID, follow these steps:
- Go to Facebook and open Commerce Manager.
- Select the catalog you’ll use for your Etsy products.
- Copy the catalog’s Product Catalog ID. If you can’t find it, follow Meta’s guide to finding your catalog ID.
Once you have the ID, you go back to your LitCommerce dashboard:
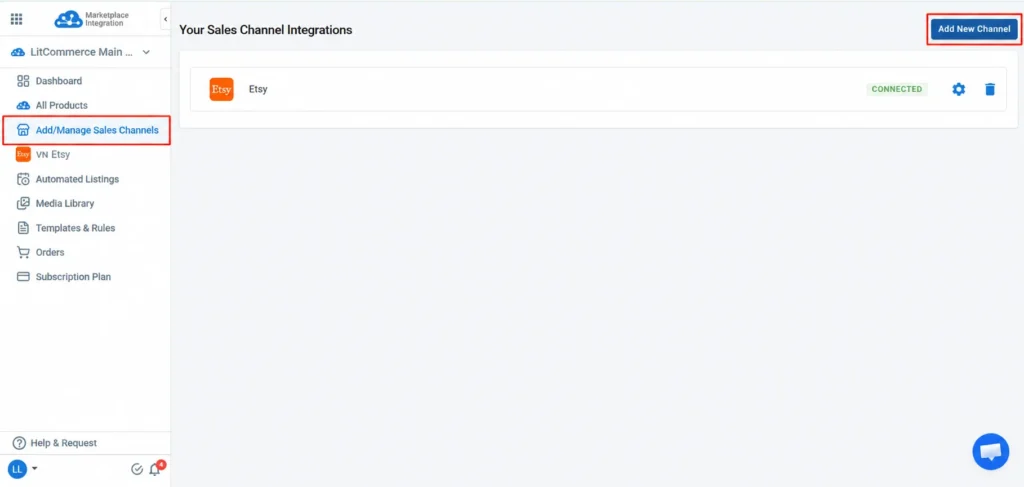
- In LitCommerce, select Add/Manage Sales Channels, then Add New Channel.
- Find Facebook Shop and click Connect.
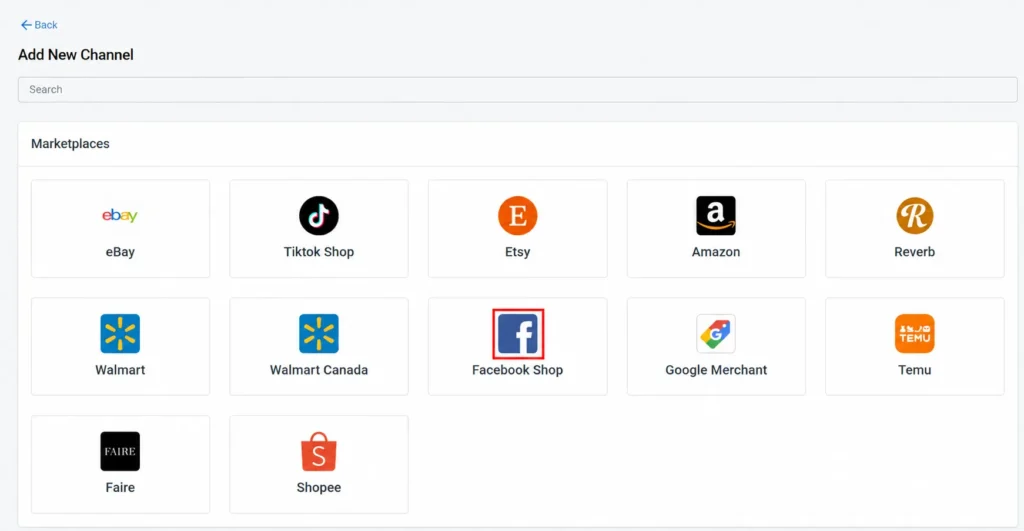
- Log in with the Facebook account that has full control of your business portfolio, then allow LitCommerce to connect to your Facebook Shop.
- In the Product Catalog field, enter the Product Catalog ID you copied earlier.
- If your catalog isn’t ready yet, click Set up later on New Catalog, then enter your Product Catalog ID manually once it’s ready.
- Save your settings to finish the connection. Any products already in your Facebook catalog will now appear in the Facebook Shop tab in LitCommerce.
Step 5: Add your Etsy products to Facebook Shop and publish
Now choose which products go to Facebook. You can send your whole shop or only a collection, such as best sellers or a seasonal line.
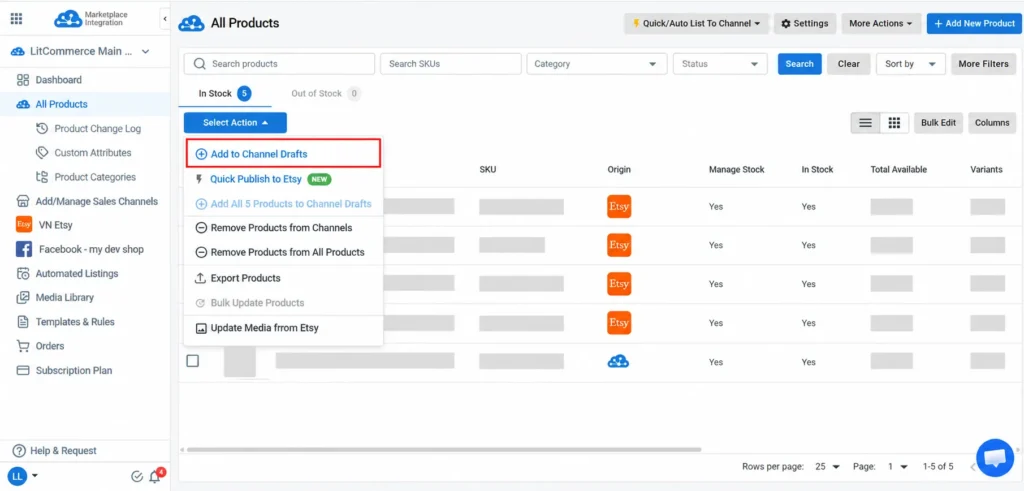
1. Go to All Products and select the items you want on Facebook.
2. Click Select Action, then Add to Channel Drafts.
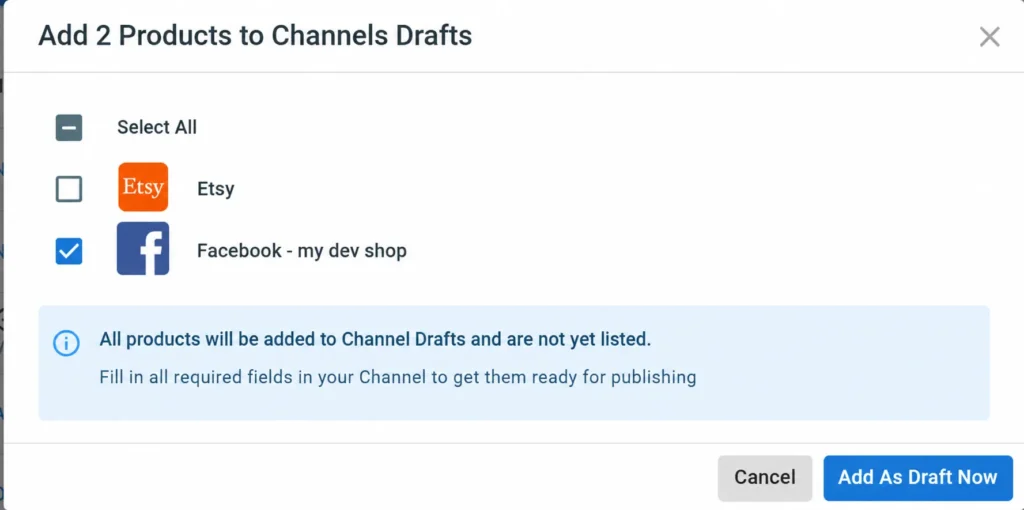
3. Check the box next to your Facebook Shop, then click Add As Draft Now.
4. Open the Facebook Shop tab and review each draft. Fill in or adjust anything Facebook needs, such as the title, category, or price.
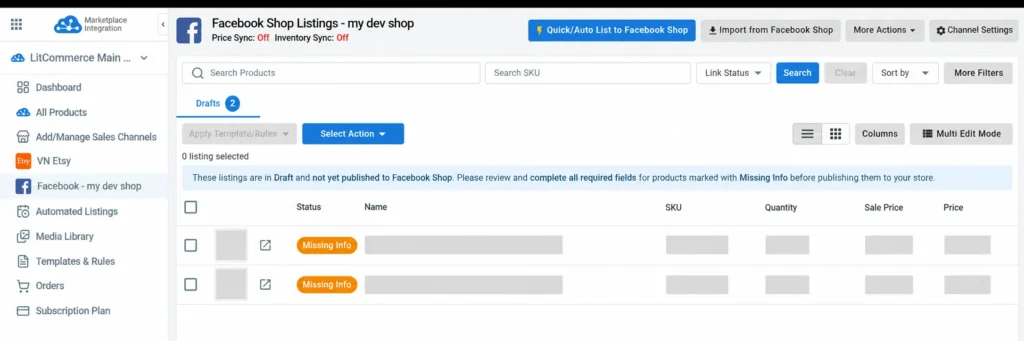
5. Select your finished drafts and click Publish to send them to your Facebook catalog.
Tip: If your drafts are ready as they are, use Quick Publish to list them on Facebook Shop in one click, without opening each draft first. It saves time when you’re moving dozens of Etsy products at once.
Your products appear in your Facebook Shop once Meta approves them.
Step 6: Turn on price and inventory sync
Finally, switch on sync so your stock stays the same on Etsy and Facebook.
- Open Channel Settings in your Etsy channel. Turn on Import Orders to Main Store, price sync, and inventory sync.
- Open Channel Settings in your Facebook Shop channel. Turn on price sync and inventory sync.
- Click Save Settings in each channel.
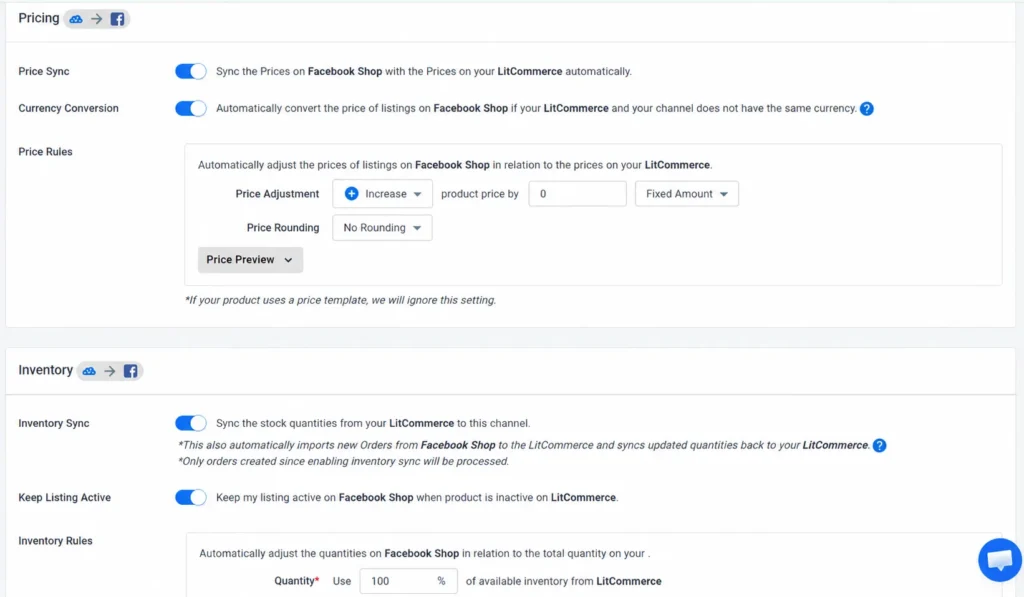
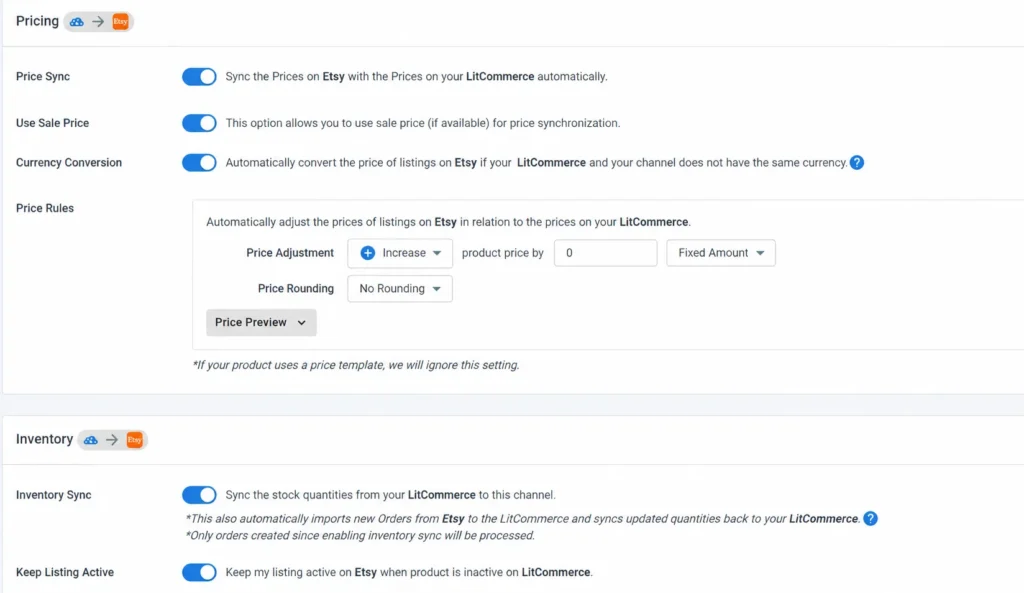
From then on, make price changes in LitCommerce. LitCommerce pushes them to both Etsy and Facebook Shop. When an item sells on Etsy, the order comes into LitCommerce, which lowers your stock and updates Facebook Shop.
Auto sync doesn’t change Meta’s rules, though. You still need a verified Etsy domain and an approved shop in a supported country, and buyers still check out on Etsy.
How to Add a Facebook Button and Link a Facebook Page to Etsy?
Beyond connecting Etsy to your Facebook business page, linking Facebook to Etsy is also crucial for a marketing strategy or, more specifically – the Etsy marketing strategies. This ensures that your Etsy customers can see your Facebook page.
Let’s find out how to add a Facebook button and link the Facebook page to Etsy
Add the Facebook button to your Etsy page
The Facebook button lets Etsy shoppers follow your Page in one click. Here’s how to add it:
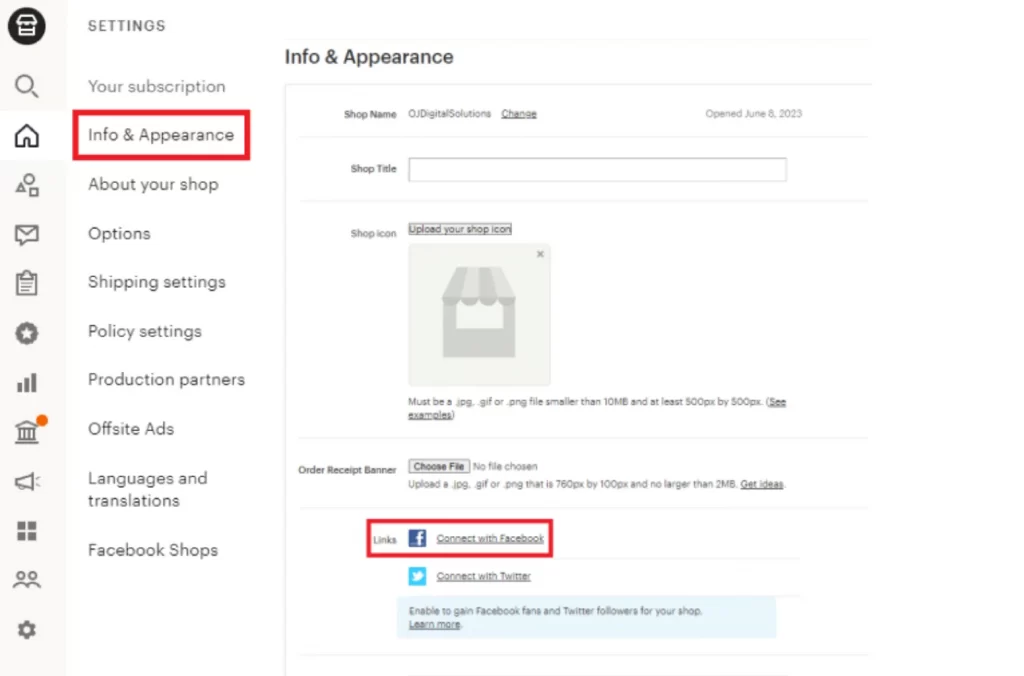
- Go to Shop Manager on Etsy
- Choose Settings from the menu on the left side of the page.
- Click Info & Appearance.
- Scroll down and click Connect with Facebook.
- Etsy will direct you to a page so that you can choose the Facebook shop you want.
- Click Save Changes.
Link your Facebook page to your Etsy shop
After your Facebook Shop is live, add your Page link to your Etsy shop. Buyers who check your shop can then find you on Facebook.
Here is how to connect your Facebook page to your Etsy shop:
1. Go to Shop Manager on Etsy
2. Go to Settings
3. Choose About your shop, then click Story
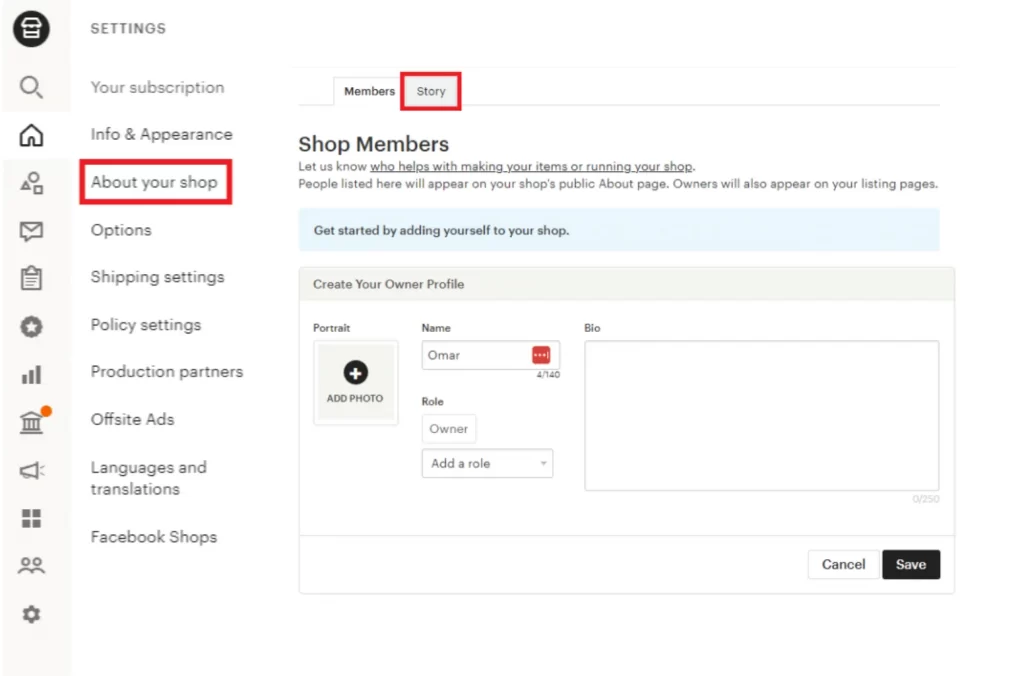
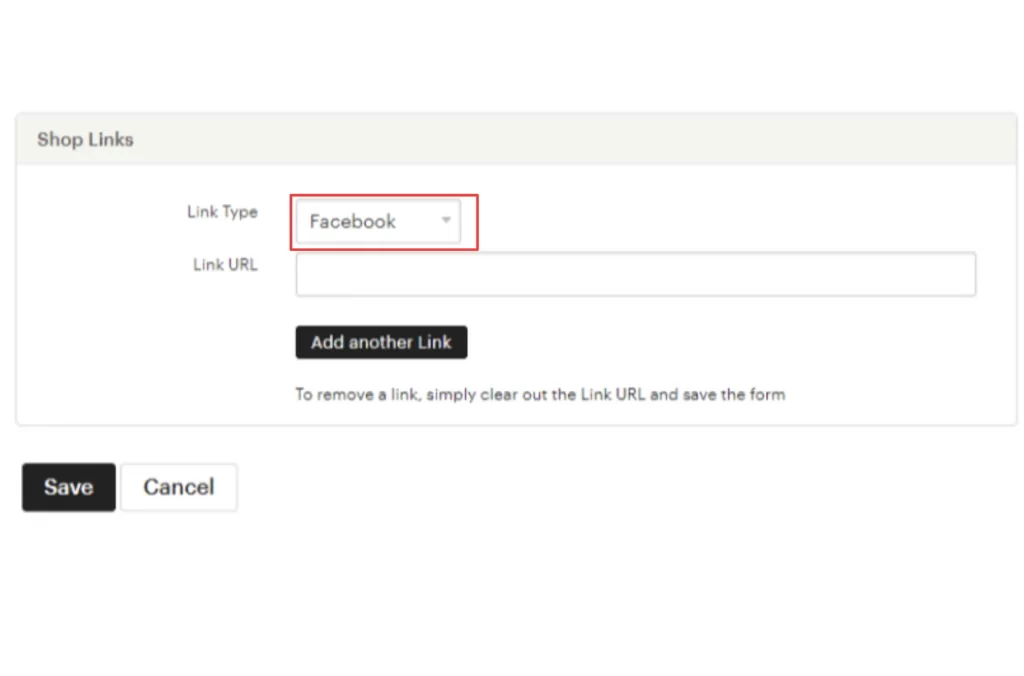
4. Scroll down to the bottom to see the Shop Links.
5. Opt for Facebook in the Link Type section.
6. Paste your Facebook Page URL into the Link URL box.
7. Lastly, click Save
Now that you understand how to connect Etsy to Facebook, add the Facebook button, and link your Facebook page to Etsy, let’s move to the next chapter: How to increase sales for your Etsy shop beyond Etsy and Facebook.
Read more: Etsy vs eBay: Which Marketplace is Better for Your Business?
How to Boost Etsy Shop Sales Beyond Etsy and Facebook?
As we are in a multichannel world, besides learning how to link Etsy to Facebook, being on multiple channels where your target customers are is one of the vital eCommerce Facebook is a strong second channel, but it’s still a discovery channel that sends every sale back to Etsy. To get more sales on Etsy and protect your income from changes in Etsy search or fees, list the same products on marketplaces where your buyers already shop, such as eBay, Amazon Handmade, or TikTok Shop.
Besides the Facebook Etsy integration, LitCommerce lets you sell the same Etsy products on 10+ best-selling platforms from one account. Trusted by 80,000+ sellers, this Etsy integration keeps every channel in one dashboard, so you can:
- Publish to every channel: send your Etsy products to eBay, Amazon, Walmart, TikTok Shop, and Facebook Shop without re-creating each listing.
- Keep price and stock in sync: updates run every 15 minutes on most channels, and every 60 minutes on Etsy, so you don’t sell the same piece twice.
- Edit listings in bulk: update price, quantity, and SKU for many products at once.
- Improve listings with AI: optimize titles and descriptions to fit each channel.
- Manage every order in one place: order sync is unlimited on every plan.
Plans start at $29/month for 1,000 listings on 3 channels, and you can try every feature for free for 7 days.
Besides Facebook Etsy integration, our LitCommerce sync tool allows the integration of 20+ best-selling platforms such as Amazon, eBay, Shopify, Wix, etc. With these 4 features below, you can say goodbye to manual updates and tedious data entry across channels:
- Multichannel Connect: With this feature, you can seamlessly connect and sell on multiple channels simultaneously and manage them from one central dashboard.
- LitCommerce QuickGrid: This one–spreadsheet interface allows you to create or edit listings in bulk, saving time and effort while managing your product listings on multiple platforms.
- LitCommerce LiveSync: Our state-of-the-art feature also includes real-time pricing, inventory, and order synchronizations.
- Integrated Order Flow: For LitCommerce, you can seamlessly view and fulfill orders across selling channels in one place, keeping you updated constantly.
Sell on Shopify, Facebook, and Beyond
20,000+ sellers use LitCommerce to list products from Shopify to Facebook, Amazon, Etsy, eBay, and more. Inventory, prices, and orders sync automatically across all channels.
Connect Etsy to Facebook – FAQ
How do I connect my Etsy shop to Facebook?
There are two ways.
With the manual method, you verify your shopname.etsy.com domain in Meta Business Suite, create a catalog in Commerce Manager, add your Etsy listings with their listing URLs, then set up and publish your Facebook Shop.
With auto sync, you set LitCommerce as your main store, connect Etsy and Facebook Shop, then publish your products. LitCommerce keeps price and stock updated for you.
Does Etsy work with Facebook?
Yes, but only in part on its own. Etsy lets you verify your shop domain for Facebook Shops and add a Facebook button or Page link to your shop. It doesn’t send your listings to Facebook or keep a Meta catalog updated, so you either add products yourself in Commerce Manager or use a sync tool such as LitCommerce.
Can you connect Etsy to a Facebook shop?
Yes, you can link Etsy to Facebook. Facebook allows you to connect directly with Etsy shops so that your Facebook fans or audience can easily see your Etsy products.
But Meta removed Shops for most businesses in Asia-Pacific in 2023, so check its supported countries list first. Once your Etsy domain is verified and your listings are in a catalog, they appear in your Facebook Shop, and buyers complete checkout on Etsy.
How to add Etsy products to Facebook shop?
Add them to a catalog in Commerce Manager. For a few listings, add items manually and paste each Etsy listing URL (shopname.etsy.com/listing/ID) as the link. For a larger shop, upload a data feed built from your Etsy product spreadsheet. To skip the catalog work, select your products in LitCommerce, choose Select Action > Add To Channel Drafts, pick Facebook Shop, then publish your drafts.
Can customers buy my Etsy products directly on Facebook?
No. Meta phased out checkout on Facebook and Instagram in 2025. Buyers can browse your products in your Facebook Shop, but when they tap to buy, they go to your Etsy listing and pay on Etsy.
The Bottom Line
Connecting Etsy to Facebook Shop gives your products a second storefront where shoppers see only your items. Every sale still goes through Etsy. The manual method works well for a small, stable catalog and costs nothing. If you sell out often or list on several channels, auto sync saves you from fixing your catalog by hand. Whichever method you choose, link your Facebook Page back to Etsy. Buyers can then follow you in both places.
Are you still confused? Do you need expert advice? Reach out to us for more further support. For additional online selling strategies, check out our Retailer blog for valuable insights.